
2.4 Configuration
Please find the PDF version at this link.
BLAXTAIR - CHECKLIST CONFIGURATION
Configuration steps
The Blaxtair checklist requires actions on the smart display and on the checklist dashboard to be functionnal. This paragraph presents the configuration steps required on the checklist dashboard.
Access to Portal Link: https://connect.blaxtair.com/
Step | Description | Mandatory or optional | to be done by | comment |
|---|---|---|---|---|
1 | Company creation/ first company admin creation | Mandatory | App Admin or company admin + validation by App admin | gives access to dashboard |
2 | First driver Creation | Mandatory | App Admin or Company Admin | to have at least one user allowed to fill checklist |
3 | Segment creation | Optional but recommended | App Admin or Company Admin | to sort questions in the checklist |
4 | Questions creation | Mandatory (unless template questions are used) | App Admin or Company Admin | questions for the driver |
5 | Checklist creation | Mandatory (unless Checklist template is used) | App Admin or Company Admin | |
6 | First Vehicle type creation | Mandatory | App Admin or Company Admin | one checklist type is linked to one vehicle type |
7 | First Planning creation | Optional | App Admin or Company Admin | Days / time at which checklist shall be filled by the driver |
8 | First Vehicle creation | Mandatory | App Admin or Company Admin | a vehicle has one vehicle type |
The steps are detailed in the below paragraphs:
Step 1 - Company & Company Admin account creation | |
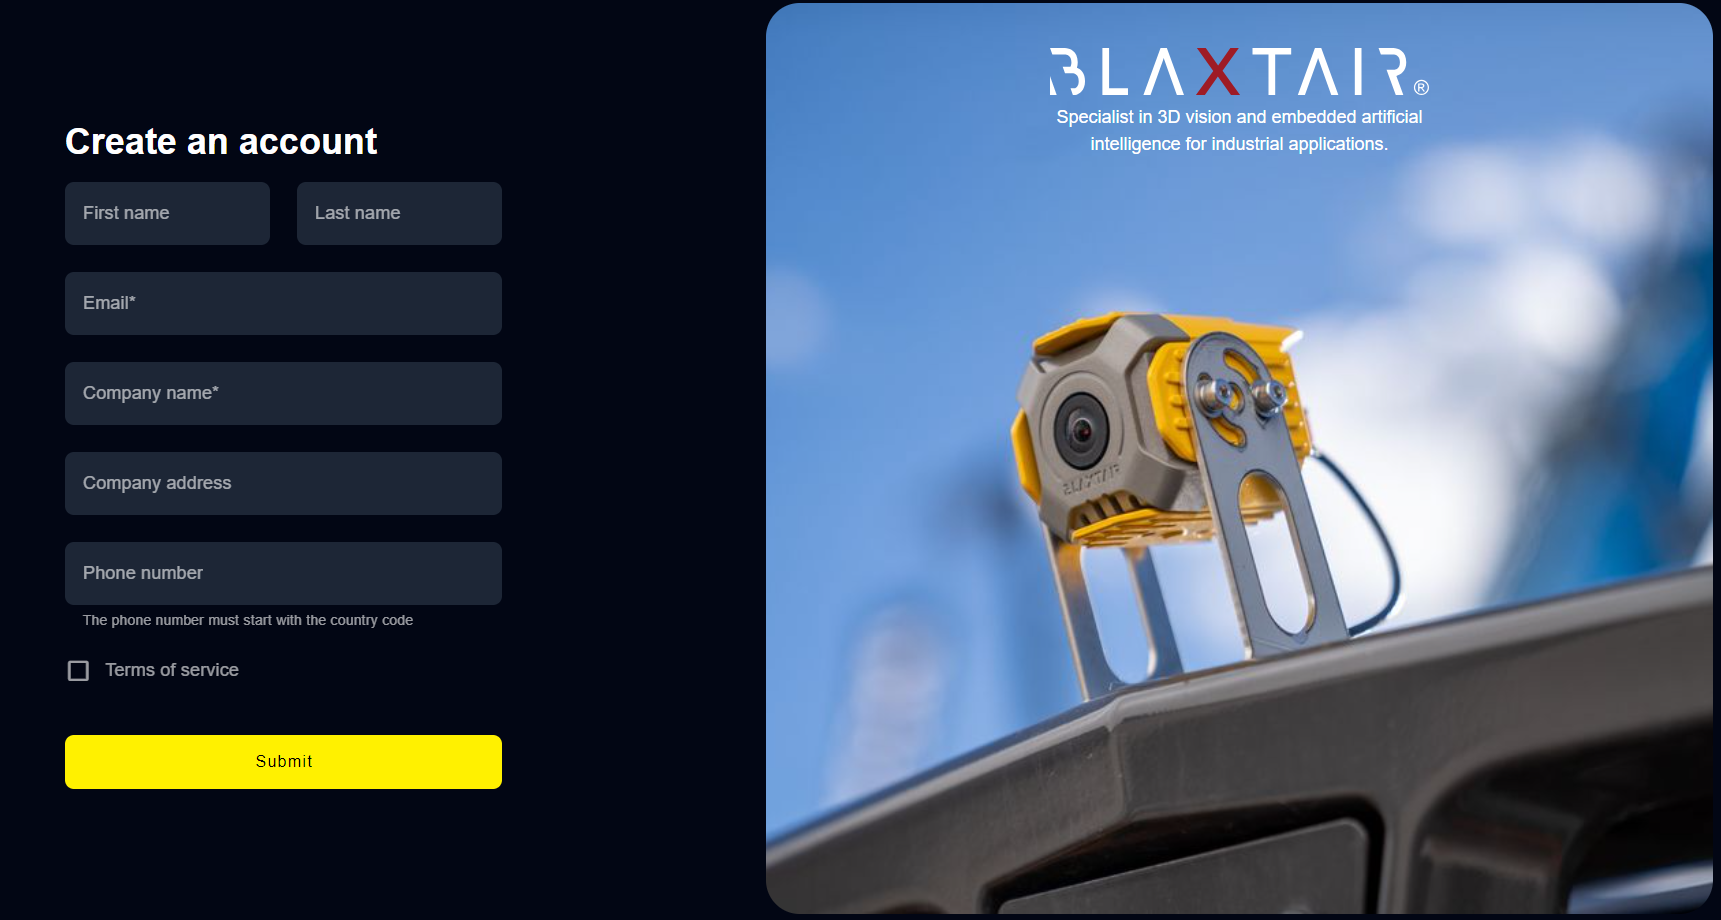 Figure 1: account creation view 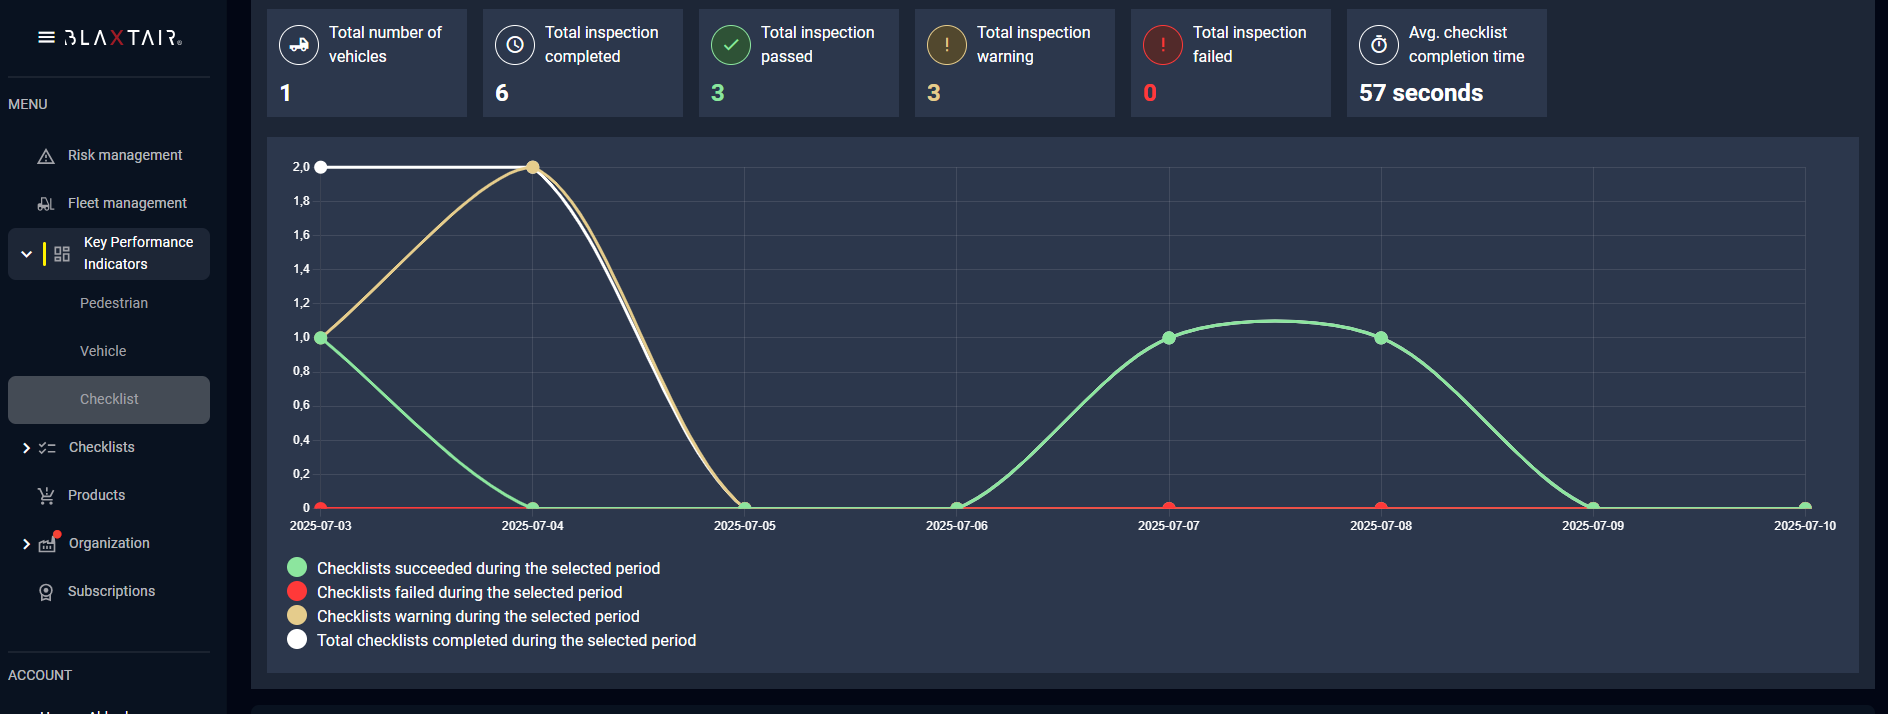 Figure 2: checklist KPI dashboard 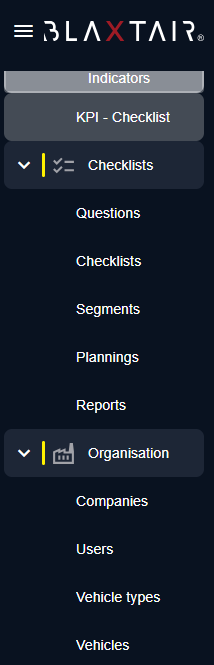 Figure 3: Checklists and organization menus | There are several ways to create a [COMPANY ADMIN] account.
In all cases , after approval, the new user will receive an email with a link for password creation. Example of account creation sign up page in figure 1 at right. [COMPANY ADMIN] gains access to dashboard HOME PAGE and will be able to;
There are 3 sections on the left menu :
Organization:
|
Step 2 - First driver creation | |
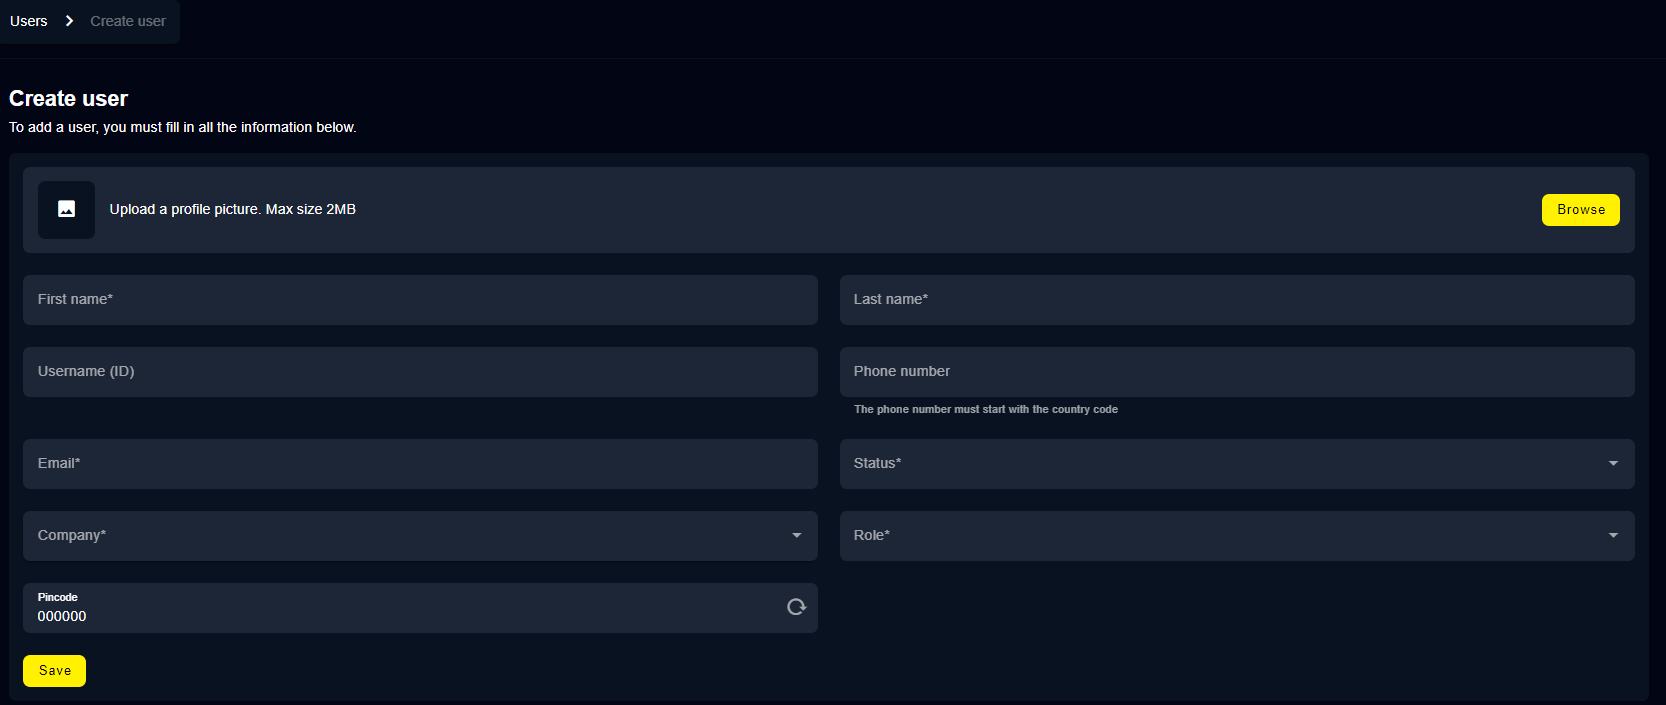 Figure 4: create first driver | [COMPANY or App ADMIN] clicks the "Users" left section and then "Create user" on the top right to add a [DRIVER] account. See figure 4. Mandatory fields are notified with an “*”. Mandatory fields depend on the selected role.

|
Step 3 - Segment creation (optional) | |
 Figure 5-a: Segment creation page 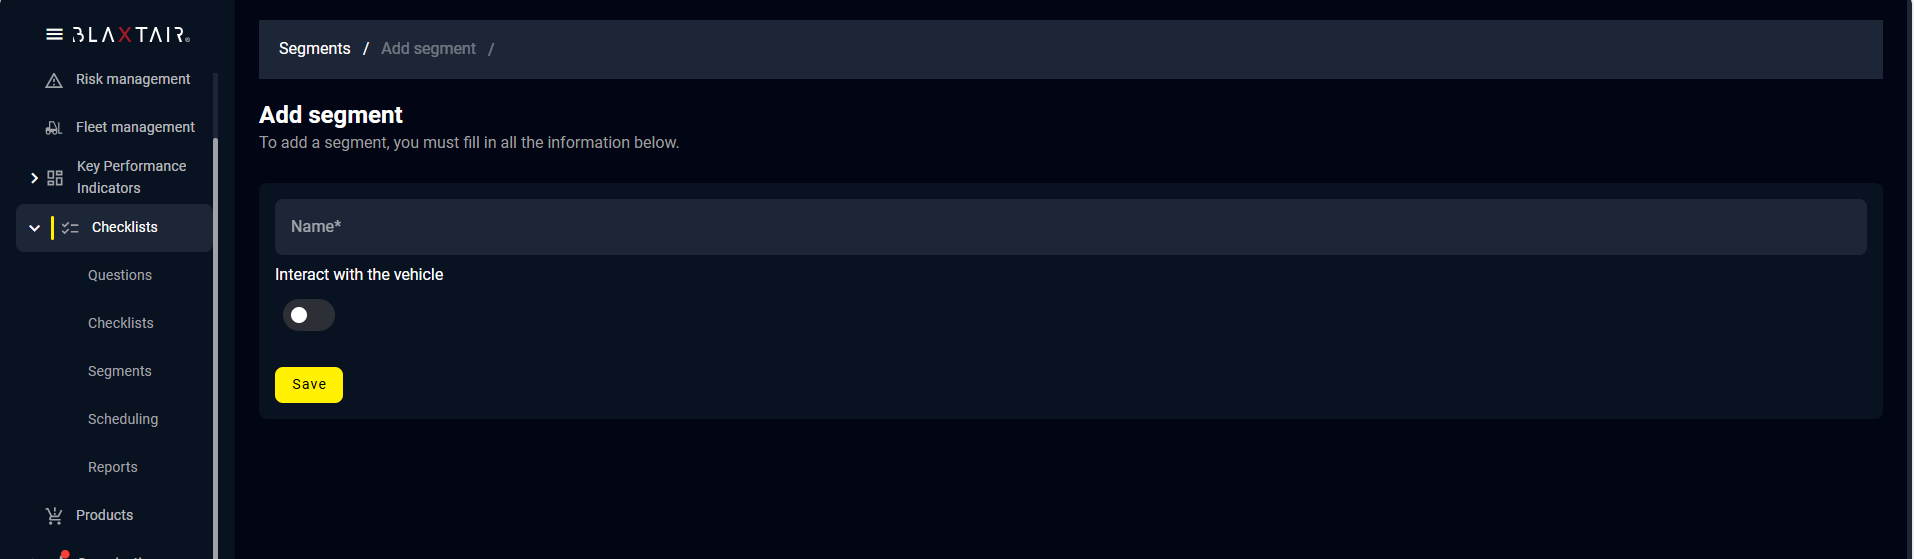 Figure 5-b: Segment creation menu | The segments allow to interact with the vehicle during the filling of the question. User should define segments if the need is to have questions that allow the startup of the engine and questions that do not allow this startup. If the discrete output feature will not be used, then there is no need for segments and you can go to next paragraph. Segments give the possibility to group questions of the checklist logically (for example “visual inspection”, “operational inspection”, etc.). The naming of segment is free. [COMPANY or App ADMIN] clicks on Segments section in order to add as many as needed with the button on the top right corner. (see figure 5) The slider “Interact with the vehicule” is to be ticked if the segment will regroup questions needing vehicle to be operated : if ticked, when driver will enter the first question of the segment, if discrete output is used (see step 8 "configuring vehicle”), then discrete output will be set at high state and remain at high state until the end of the segment. The Segments general page summarizes all segments of the company and whether the segments allow vehicle unlocking (green circle) or not (red circle) (figure 6). WARNING: Use the “interact with the vehicule” with caution. Transition from a segment not interacting with the vehicule to a segment interacting with the vehicle might lead to dangerous situations. This shall not be done while vehicle is moving. |
Step 4 - Questions Management | |
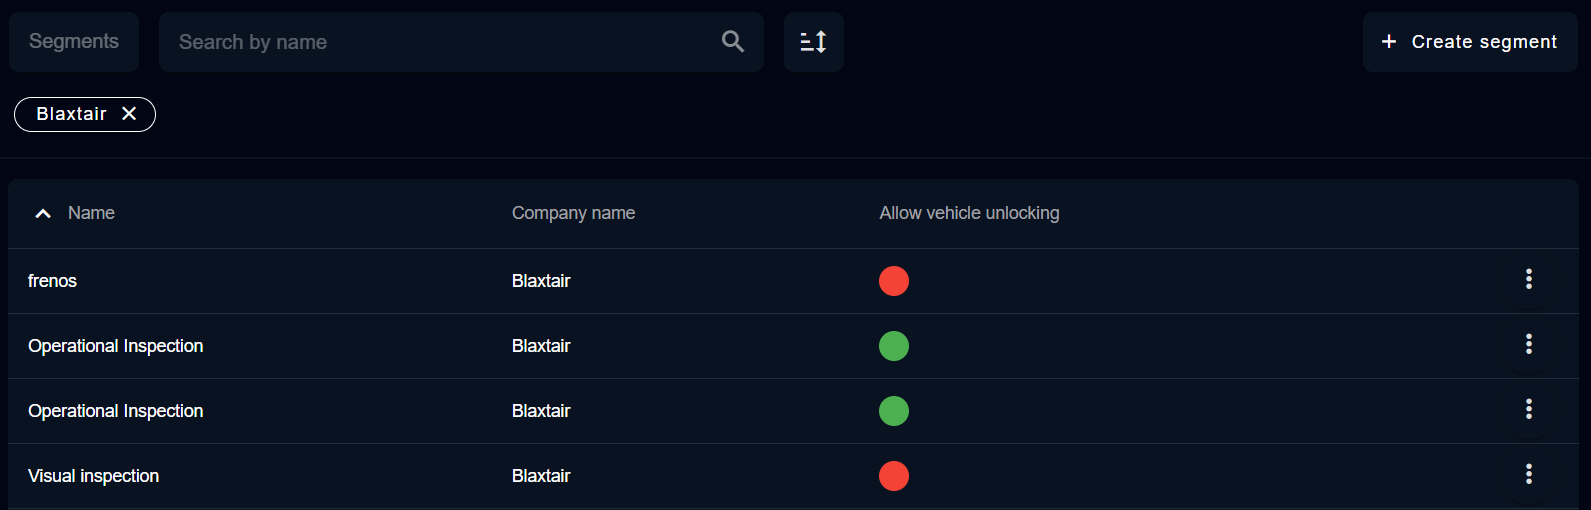 Figure 6: segment general page 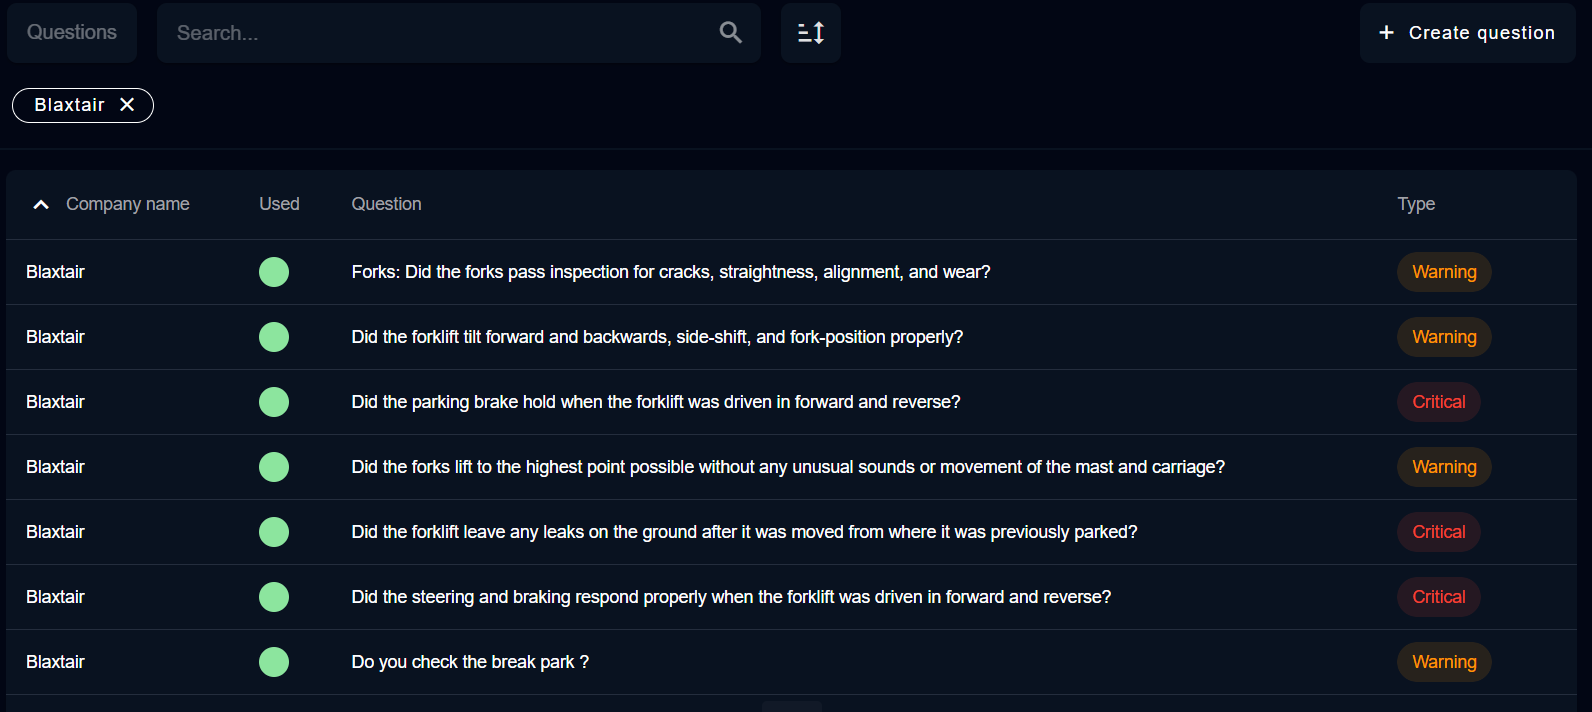 Figure 7: question recap view 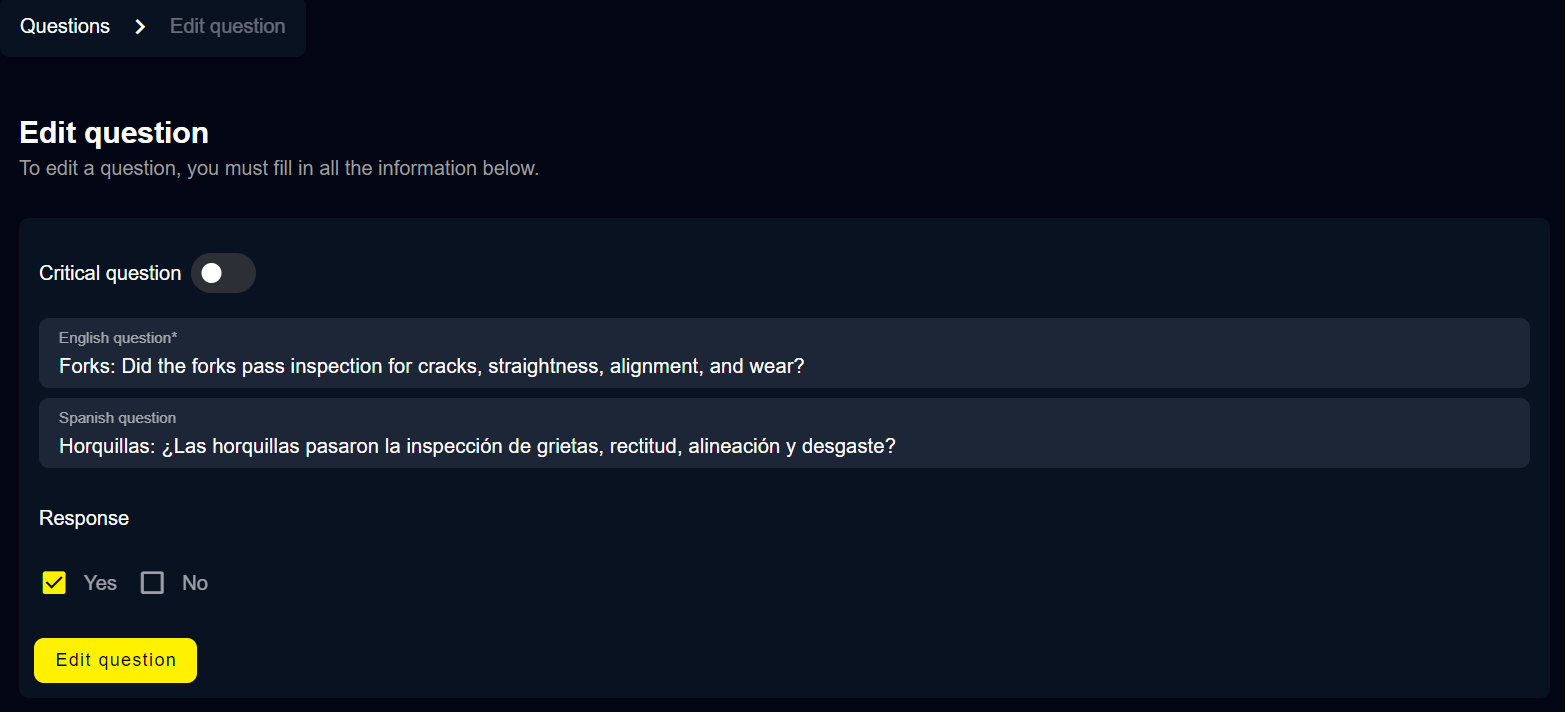 Figure 8: question creation menu | The question section shows whether questions are used in a checklist or not, the text of the question (in the language set for the dashboard) and its type.
After clicking on a question or on “create question” the page below will be displayed allowing to (see figure 8):
|
Step 5 - Checklist Management | |
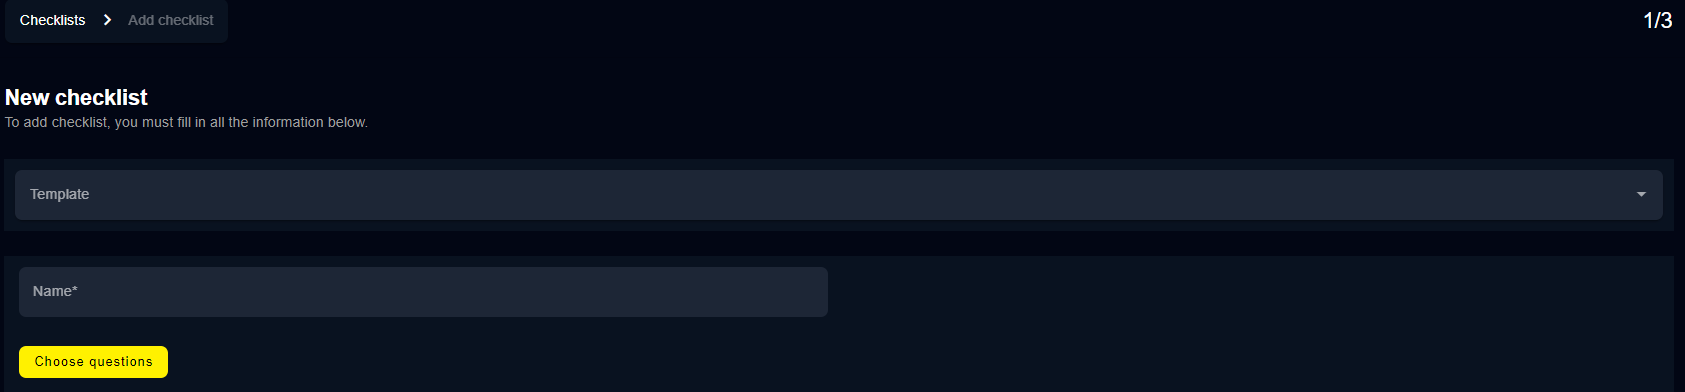 Figure 9: new checklist definition 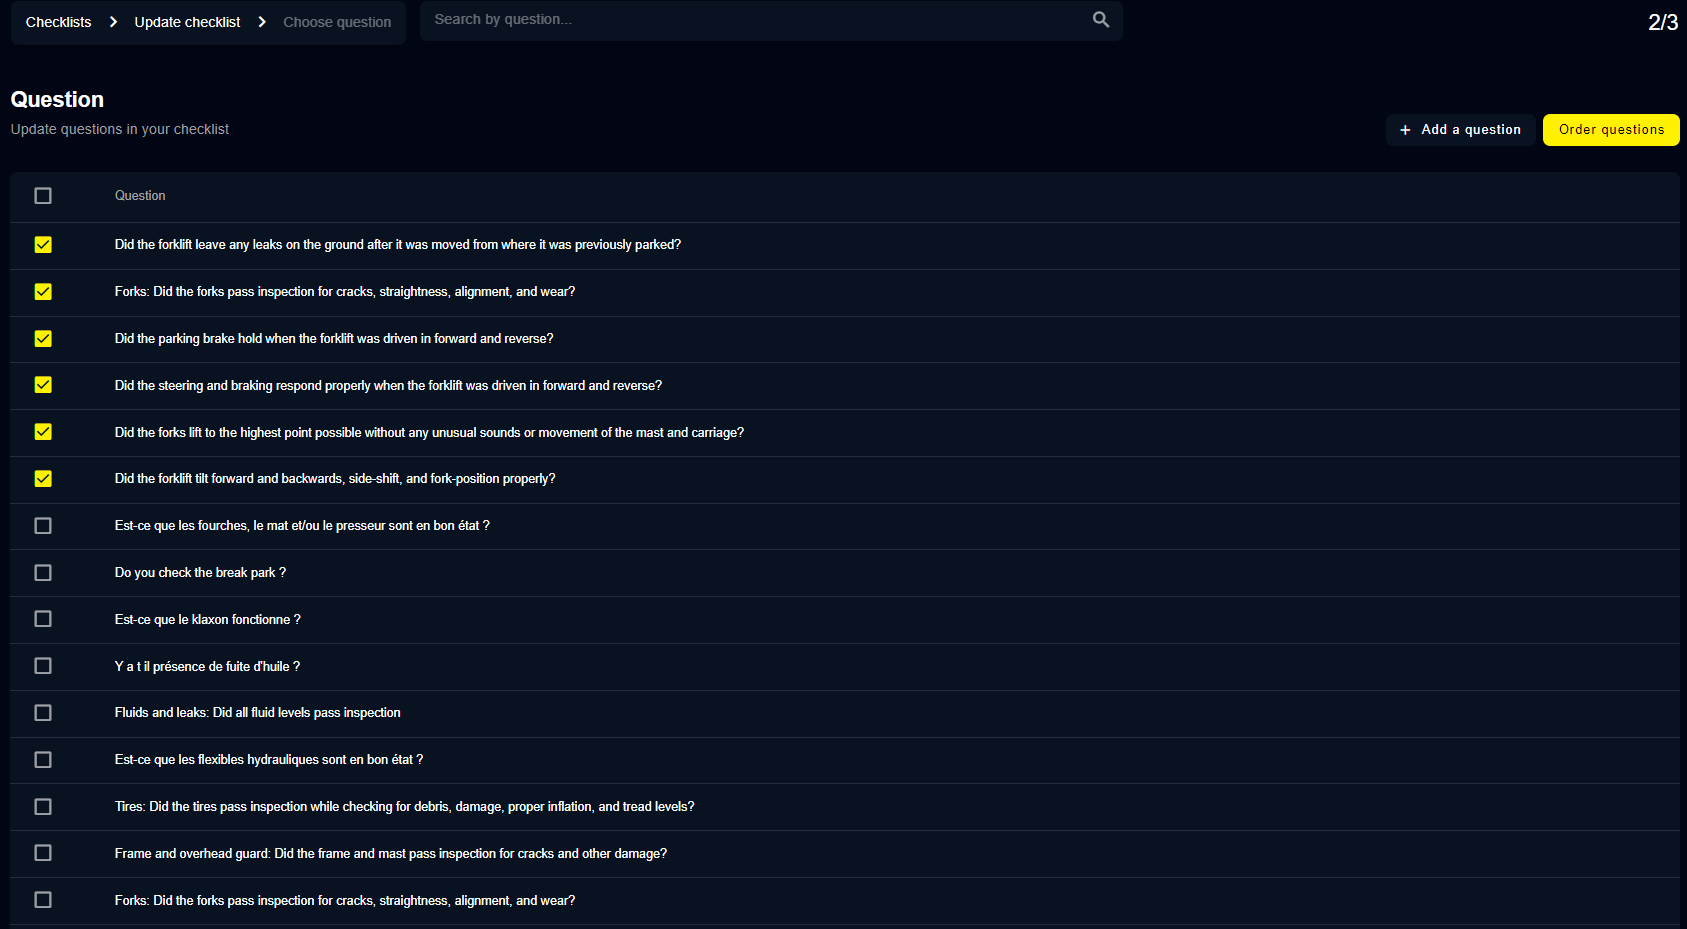 Figure 10: selection of questions from template
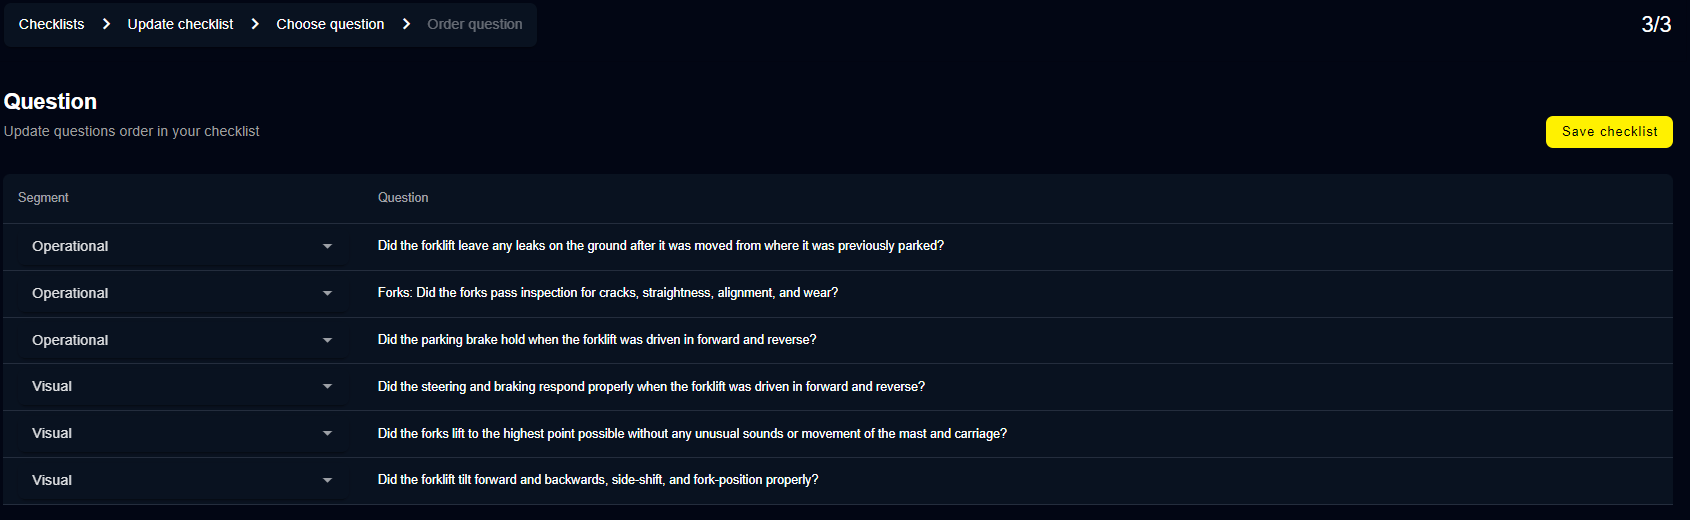 Figure 11: Segment association to the questions 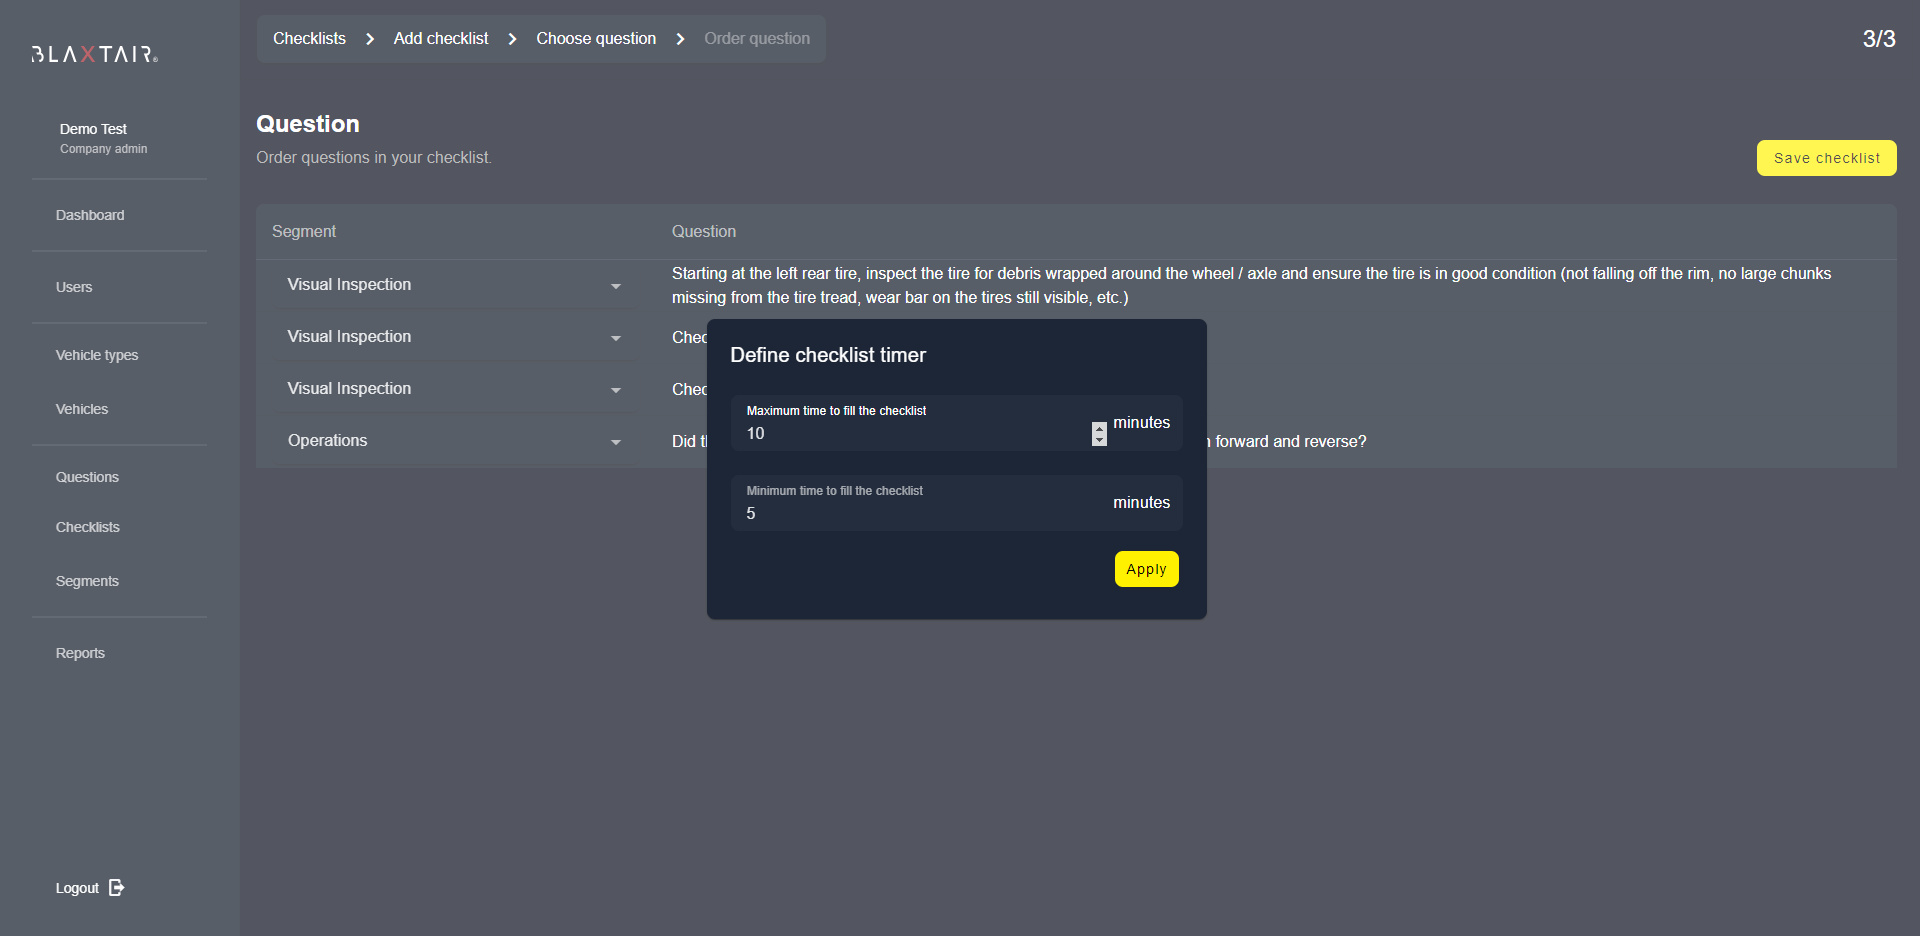 Figure 12: timer definition | [COMPANY or APP ADMIN] can click on the checklist section on the left menu to create a new checklist. He can either select an existing template or create his own Checklist (see figure 9). if a Template is selected, there will already have a list of questions / segments selected. [COMPANY ADMIN] then selects the questions he wants to add to the checklist and then clicks on Order questions. (see figure 10) [COMPANY ADMIN] can then select a segment for each question and can reorder them by clicking on it, finally, he saves the checklist. selecting a segment is optional. However, to use the “discrete output” feature, it’s necessary to use the appropriate segment. (see figure 11) [COMPANY ADMIN] defines the maximum and minimum time needed to fill the checklist. (see fig.12) Those parameters are in “minutes” so it’s not possible to set a minimum time to 30s. In such case customer shall choose between 0 and 1 min. This min / max timers are important as they will lead to warning / failed checklist if not respected. IMPORTANT NOTE : if checklist max timer is exceeded, the checklist will be failed AND an alarm at maximum sound will be displayed until Key off. This is to avoid an inappropriate use of the vehicle. |
Step 6 - Vehicle Type Management | |
 Figure 13: vehicule type definition | This section allows [COMPANY or APP ADMIN] to create a vehicle type. Only one checklist can be linked to one vehicle type. But the same checklist can be applied to several vehicle types. (see fig. 13) |
Step 7 - Planning Management (OPTIONAL) | |
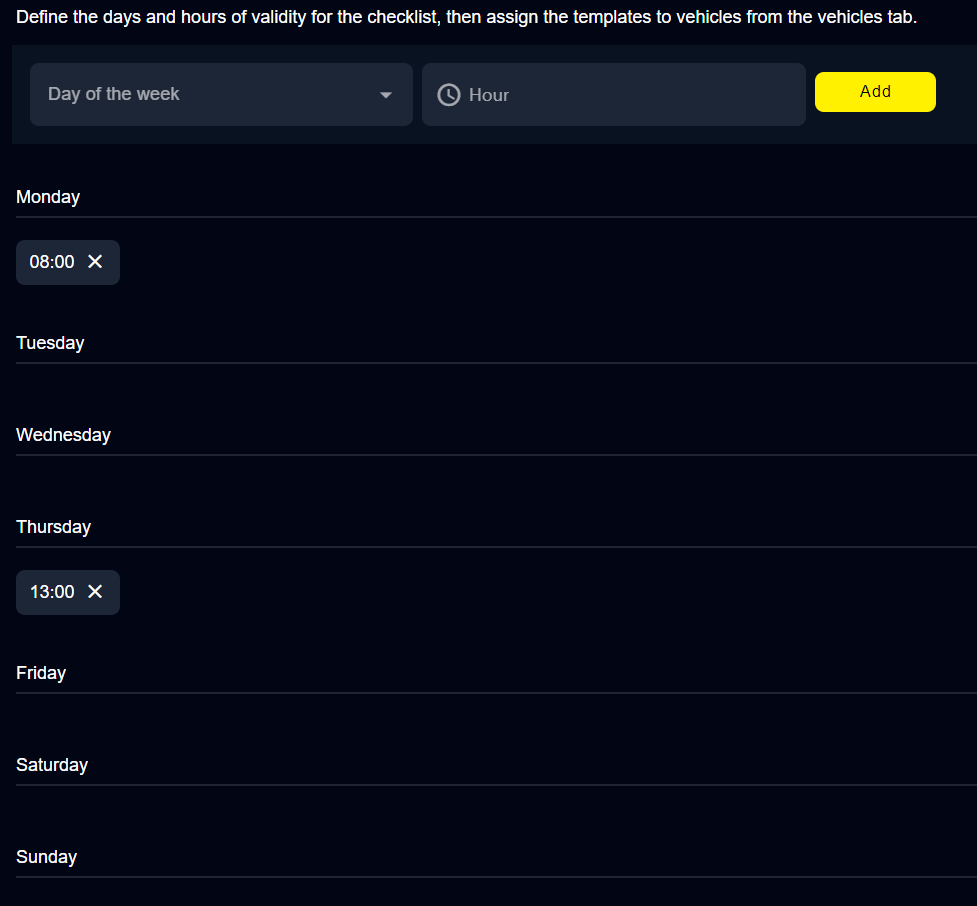 Figure 14: planning definition
| Planning is optional. If not used, Checklist will need to be filled 8 hours after last successfull checklist filled + next key off / key on. If planning is used, Checklist will need to be filled at the key off/ key on following the day/ time specified in the planning. [COMPANY or App ADMIN] can click on Planning section and on “+ Add Template” on the top right to create a new planning. After defining the name for this new planning, the page below will be displayed. Clicking on “Day of the week” will allow to select days of the week (monday, tuesday, etc.) ; “Hour" will allow to define the time. After clicking on “Add”, the planning will be updated with the days / time previously selected. See fig. 14. |
Step 8 - Vehicle Management | |
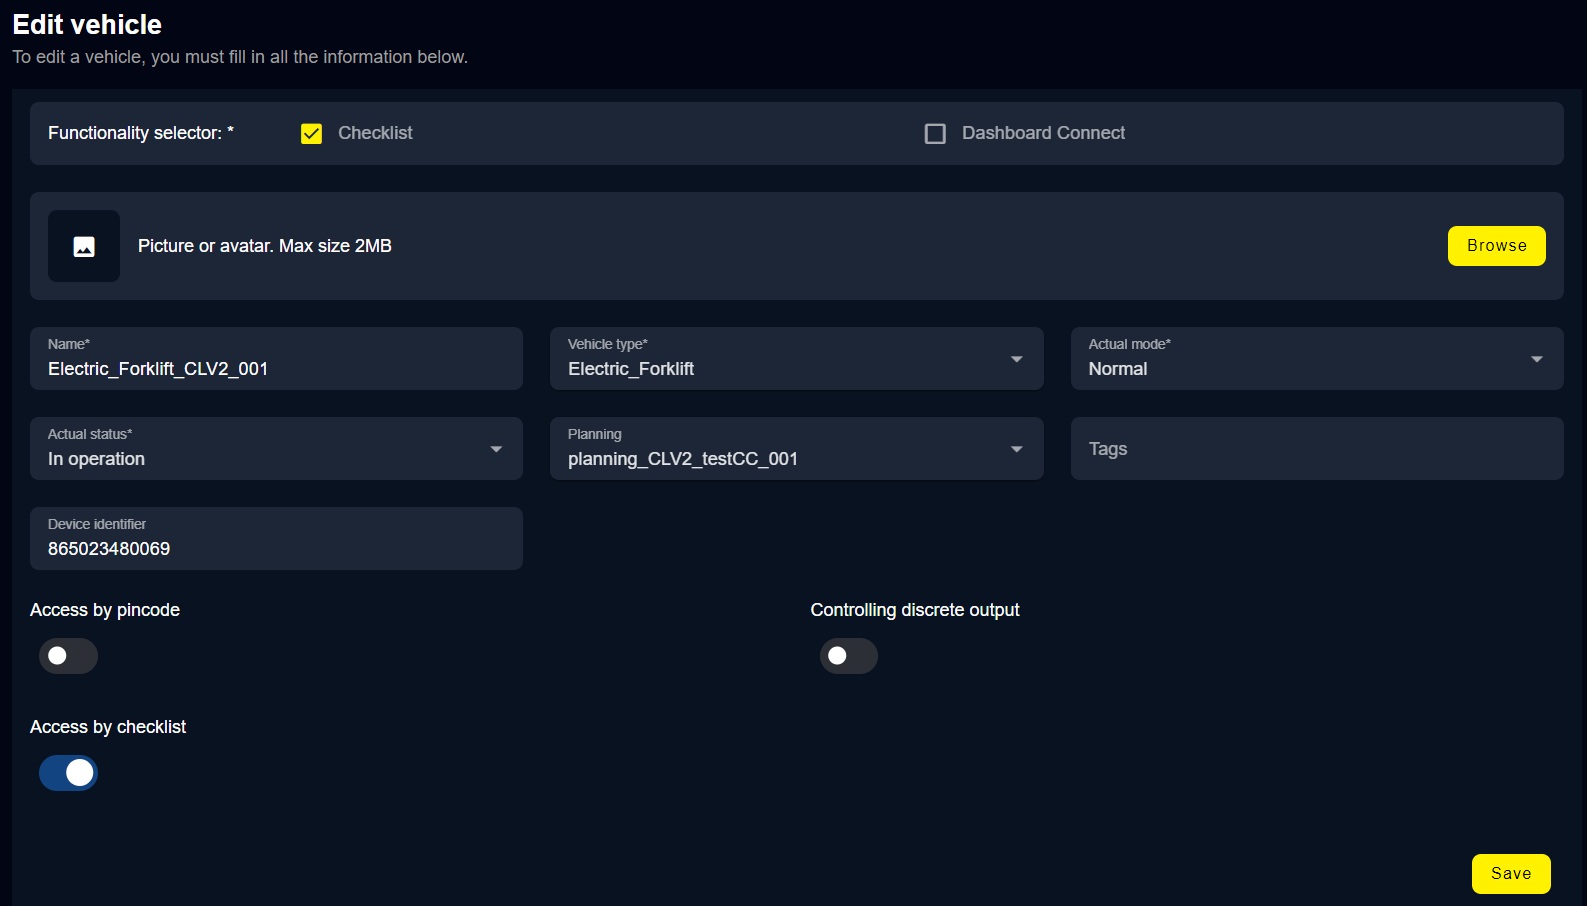 Figure 15: vehicule creation
| [COMPANY or app ADMIN] can click on Vehicles section on the left and Create vehicle on the top right corner. (see fig 15) Description of the field / Tick boxes : Mandatory fields are shown with an “*”
If Access by pincode AND Access by checklist are activated, then driver will have to enter its pincode to get the right to fill the questions of the checklist
This option not be activated if not used on the vehicule. This could lead to short cut between the discrete output and the ground. |