
2.8 User manual
Please find the PDF version at this link.
INTRODUCTION
This user manual aims to provide necessary information in order to understand, install and operate Blaxtair Checklist system.
The Checklist system is composed of the following elements:
a smart display installed on vehicles of a fleet, with optional PIN code access and checklist questions displayed
a discrete output that can be linked to the vehicle to interact with the vehicle.
This choice and related connection is under customer’s responsibility. Slowdown system is NOT provided in the checklist equipement.
an online web dashboard to administrate the vehicle fleet equiped with the checklist, create accounts and analyse reports
THE BLAXTAIR CHECK LIST IS TO BE USED AS A SAFETY TOOL BUT DOES NOT REPLACE THE NEED FOR DRIVERS TO COMPLY WITH THE RULES OF THE ROAD, OSHA RULES AND REGULATIONS AND OTHER DRIVING SAFETY PRACTICES AND STANDARDS
Features
The following features are available :
Checklist without PIN CODE authentification for driver
Checklist with PIN CODE authentification for driver
PIN CODE authentification for driver without checklist
If PIN CODE is activated, it will be requested at each key off/ key on and can therefore serve as an access control
in all cases, it’s possible to decide whether the discrete output of the system will be controlled or not (to interact with vehicle)
For the system to work at its best, it’s necessary to have a 4g or Wifi connection. However it’s only MANDATORY for setting up of the system and for updates (change checklist content). It’s needed also to retrieve the reports from the smart displays.
Elements structure and Hierarchy
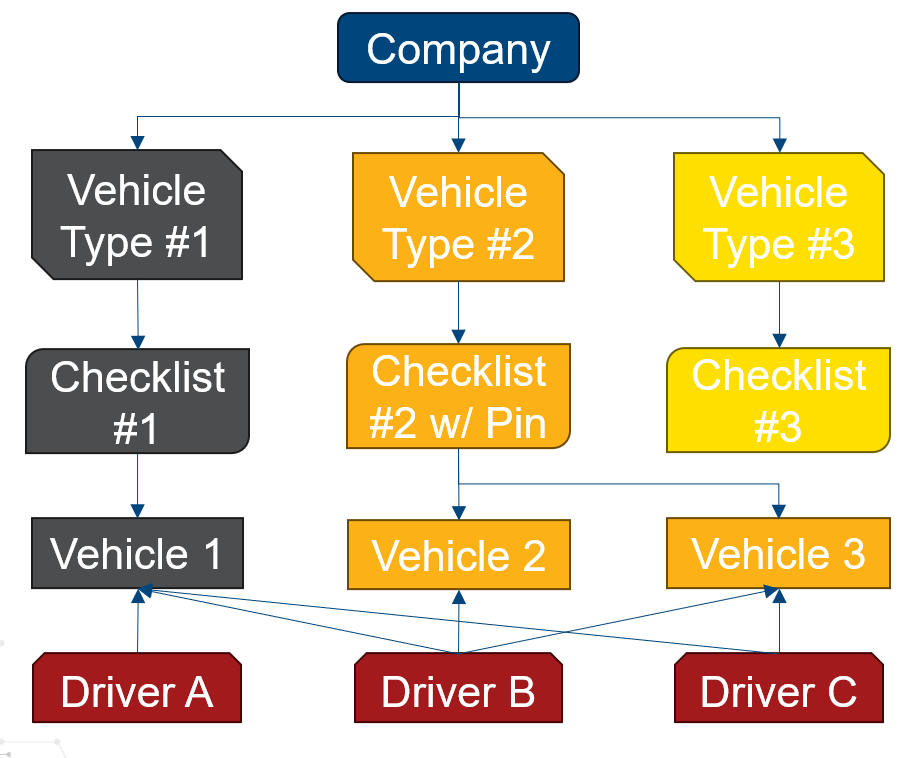
A COMPANY has a fleet of vehicles.
The vehicle fleet can have several VEHICLE TYPES - they can be freely defined by user
Each VEHICLE TYPE has to be linked to one CHECKLIST
Each VEHICLE has to be linked to a VEHICLE TYPE
Any DRIVER of the company (valid in the dashboard) can answer any CHECKLIST
Checklist Description
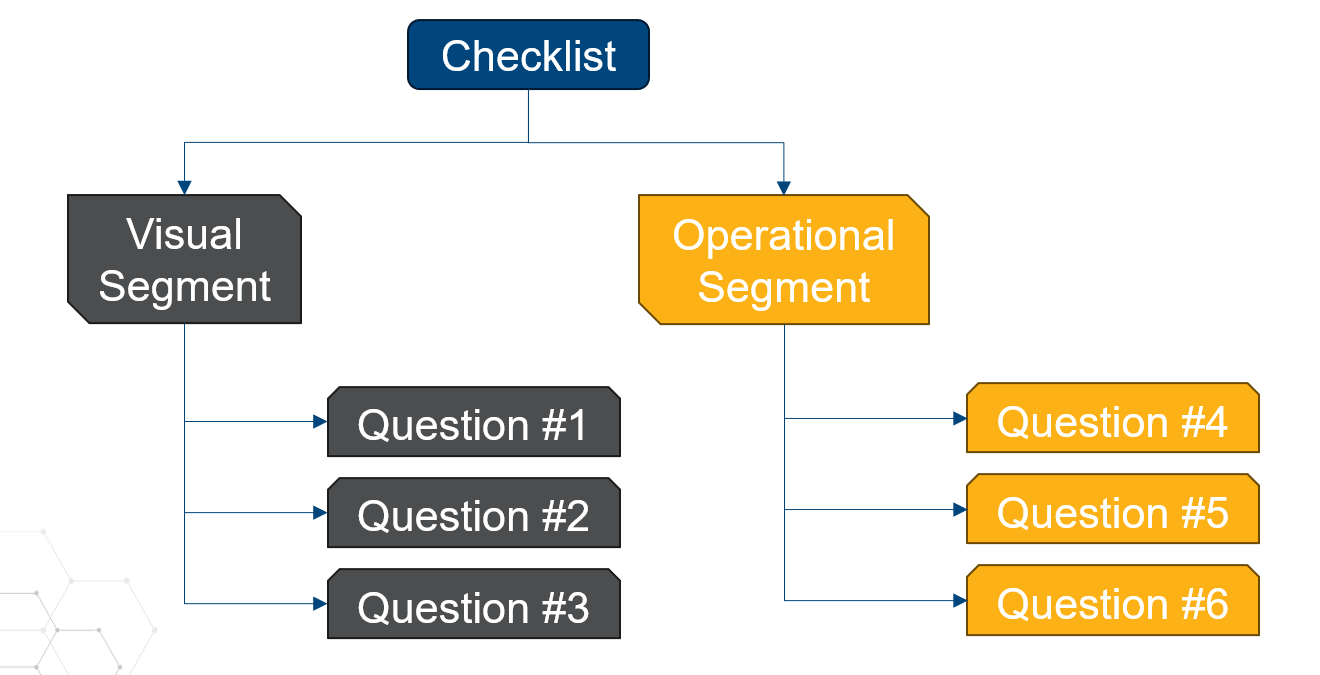
A checklist is a set of QUESTIONS that can be optionnally grouped by SEGMENTS (a segment is a group of questions of the same type, Visual, Operational, Electrical and so on - it can be freely defined by user).
SEGMENTS can be configured not to limit the vehicle movement (discrete output, if configured as used, will be set to high level)
QUESTIONS can be selected from an existing TEMPLATE or be created by the [COMPANY or App ADMIN].
QUESTIONS can be of type CRITICAL (a wrong answer leads to fail checklist) or of type WARNING (a wrong answer leads to a warning checklist)
REPORTS are generated automatically after a checklist is filled by a driver and can be viewed on the dashboard.
First set up of the system
Actions on Dashboard
Portal Link: https://connect.blaxtair.com/
Each step described below will be detailed in the following chapters
Step | Description | Mandatory or optional | to be done by | comment |
|---|---|---|---|---|
1 | Mandatory | App Admin or company admin + validation by App admin | gives access to dashboard | |
2 | Mandatory | App Admin or Company Admin | to have at least one user allowed to fill checklist | |
3 | Optional but recommended | App Admin or Company Admin | to sort questions in the checklist | |
4 | Mandatory (unless template questions are used) | App Admin or Company Admin | questions for the driver | |
5 | Mandatory (unless Checklist template is used) | App Admin or Company Admin | ||
6 | Mandatory | App Admin or Company Admin | one checklist type is linked to one vehicle type | |
7 | Optional | App Admin or Company Admin | Days / time at which checklist shall be filled by the driver | |
8 | Mandatory | App Admin or Company Admin | a vehicle has one vehicle type |
Actions on smart display
Each step will be detailed in the following chapters
Step | Description | Mandatory or optional | 4G or WIFI needed | to be done by | comment |
|---|---|---|---|---|---|
9 | Mandatory | No | no role needed | ||
10 | Mandatory | Yes | no role needed | Network is mandatory for smart display to get vehicle information | |
11 | Optional | No | need to know maintenance pwd | ||
12 | smart display optional configuration through maintenance mode | Optional | No | need to know maintenance pwd |
Step 1 - Company & Company Admin account creation
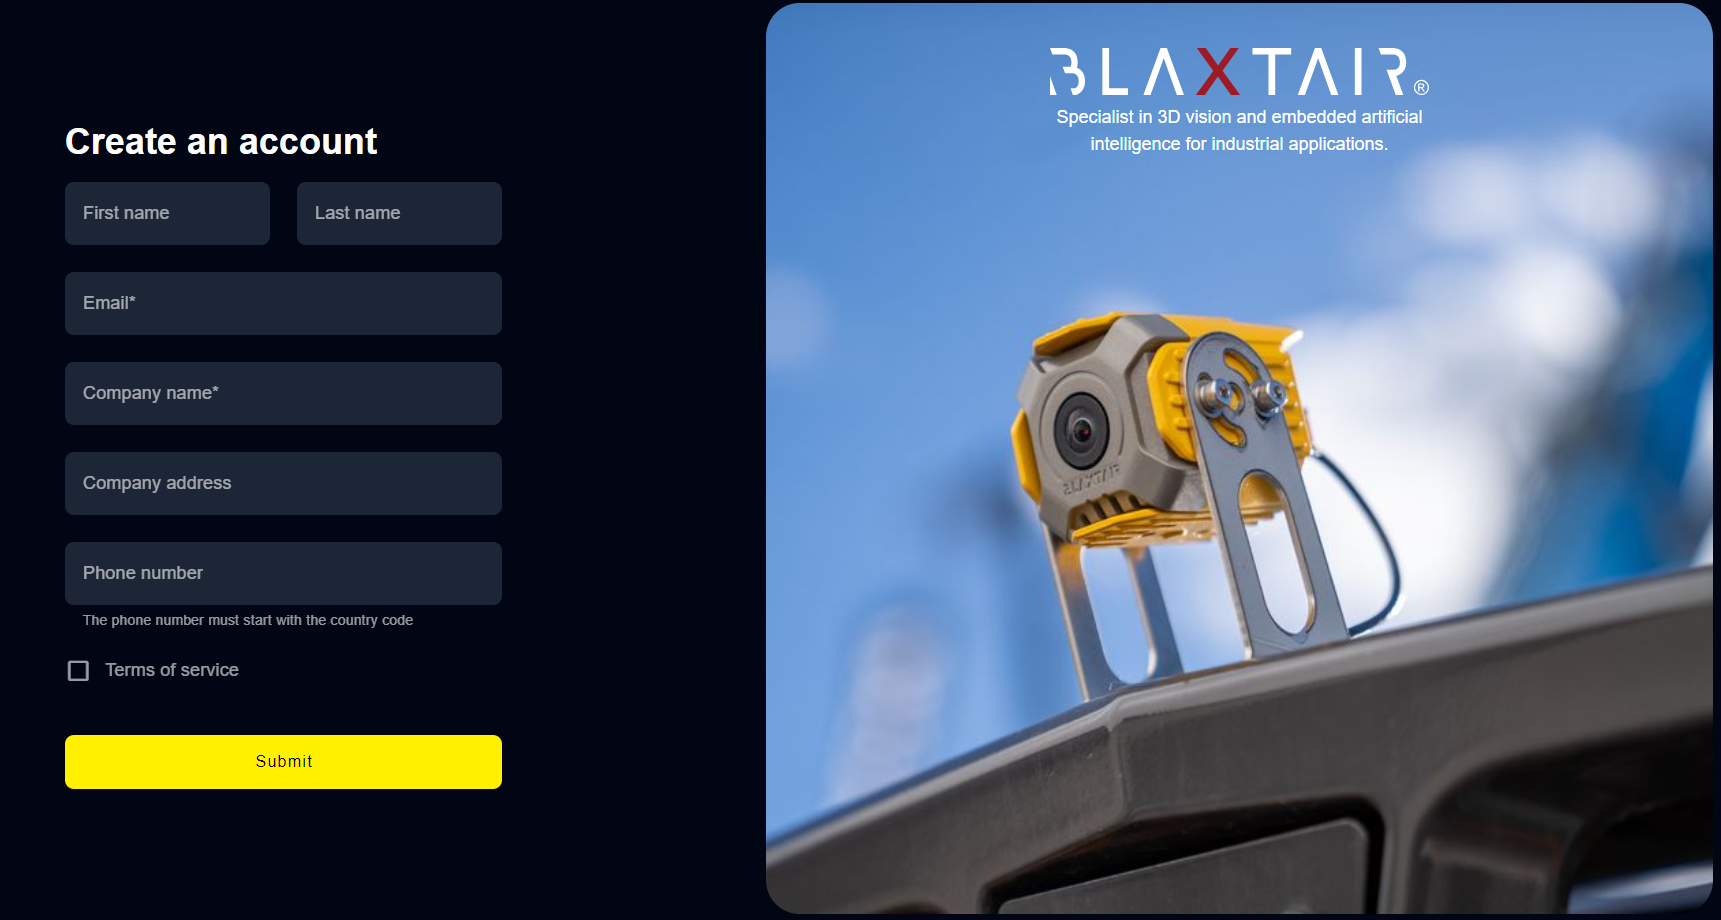
There are several ways to create a [COMPANY ADMIN] account.
case 1 : the company does not exist in Arcure’s database:
his account can be created by Arcure app admin after having created the company
or the user can sign up
case 2 : the company already exists in Arcure’s database :
his account can be created by Arcure app admin
or by another company admin in the dashboard - Sign up is not possible (an error message will be displayed if a user tries to create an account with a company already existing)
In all cases , after approval, the new user will receive an email with a link for password creation
Example of account creation sign up page - possible only if Company name is not already existing.
[COMPANY ADMIN] gains access to dashboard HOME PAGE and will be able to create users, vehicle types, vehicles, questions, checklists, planning , segments and visualize Kpis and analyse reports.
Below is the home page of checklist dashboard :
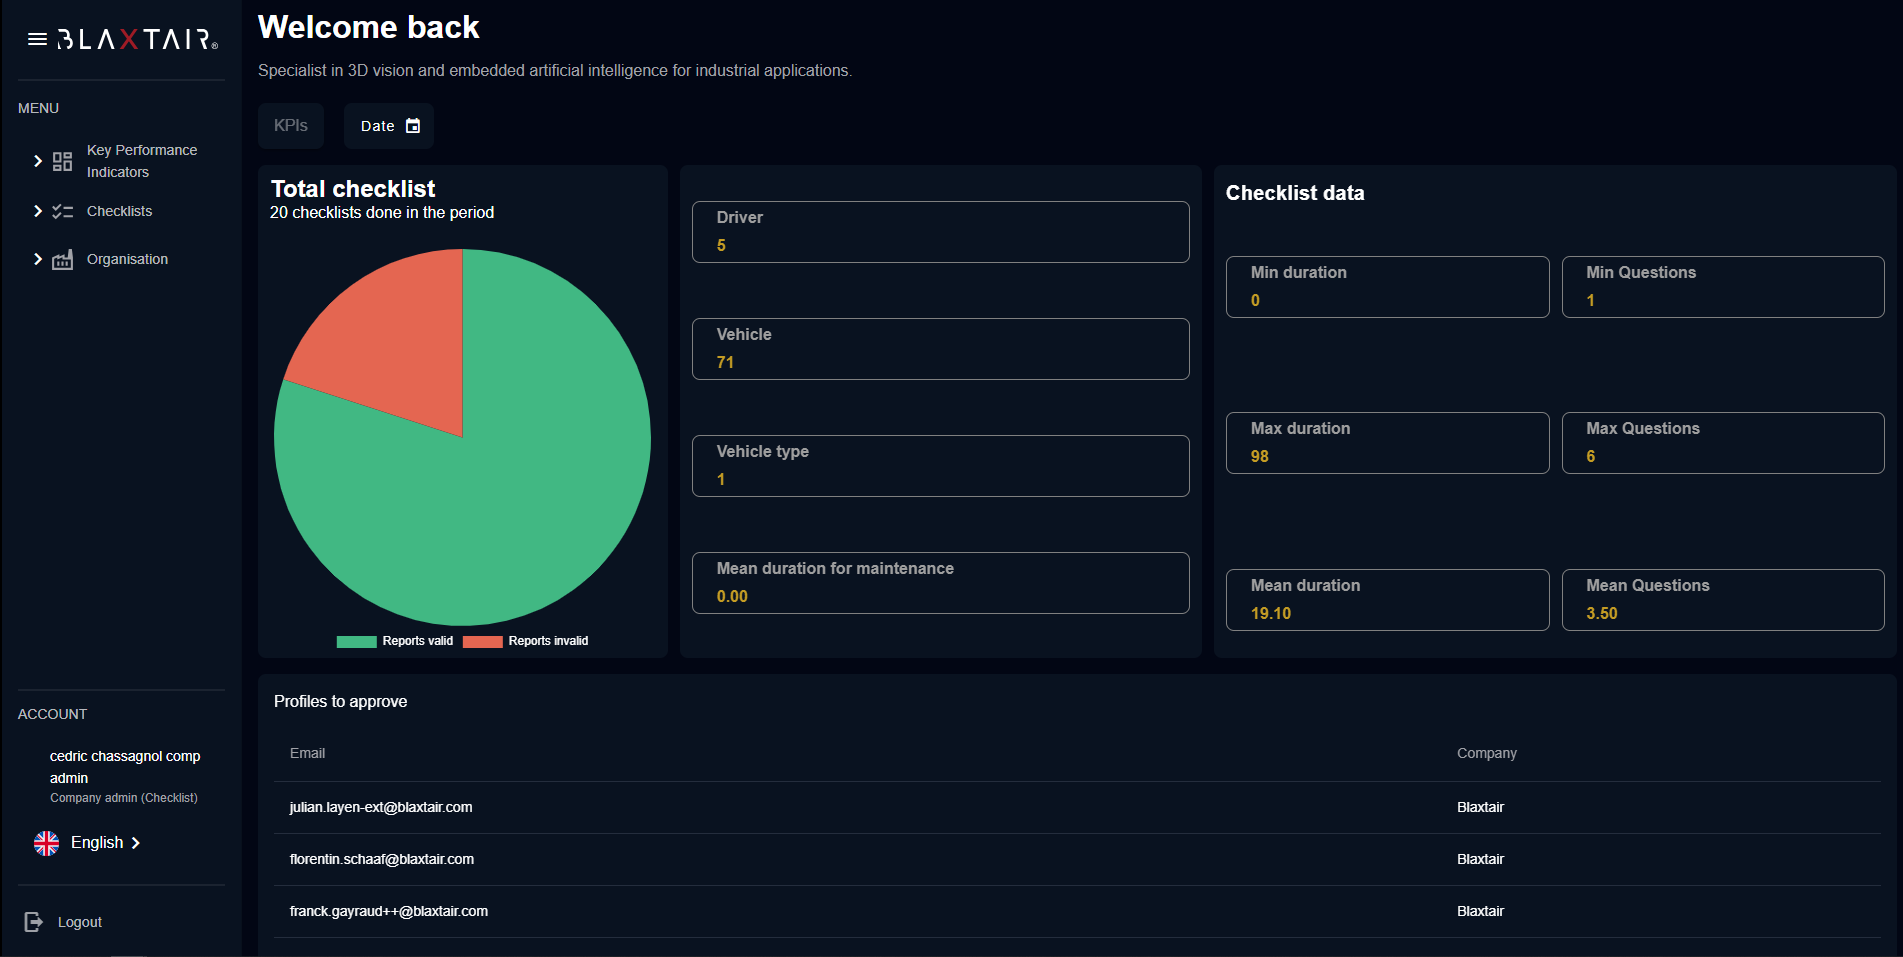
 | There are 3 sections on the left menu : KPI : will show the KPi page Checklist :
Organization:
|
|---|
Step 2 - first driver creation
[COMPANY or App ADMIN] clicks the "Users" left section and then "Create user" on the top right to add a [DRIVER] account
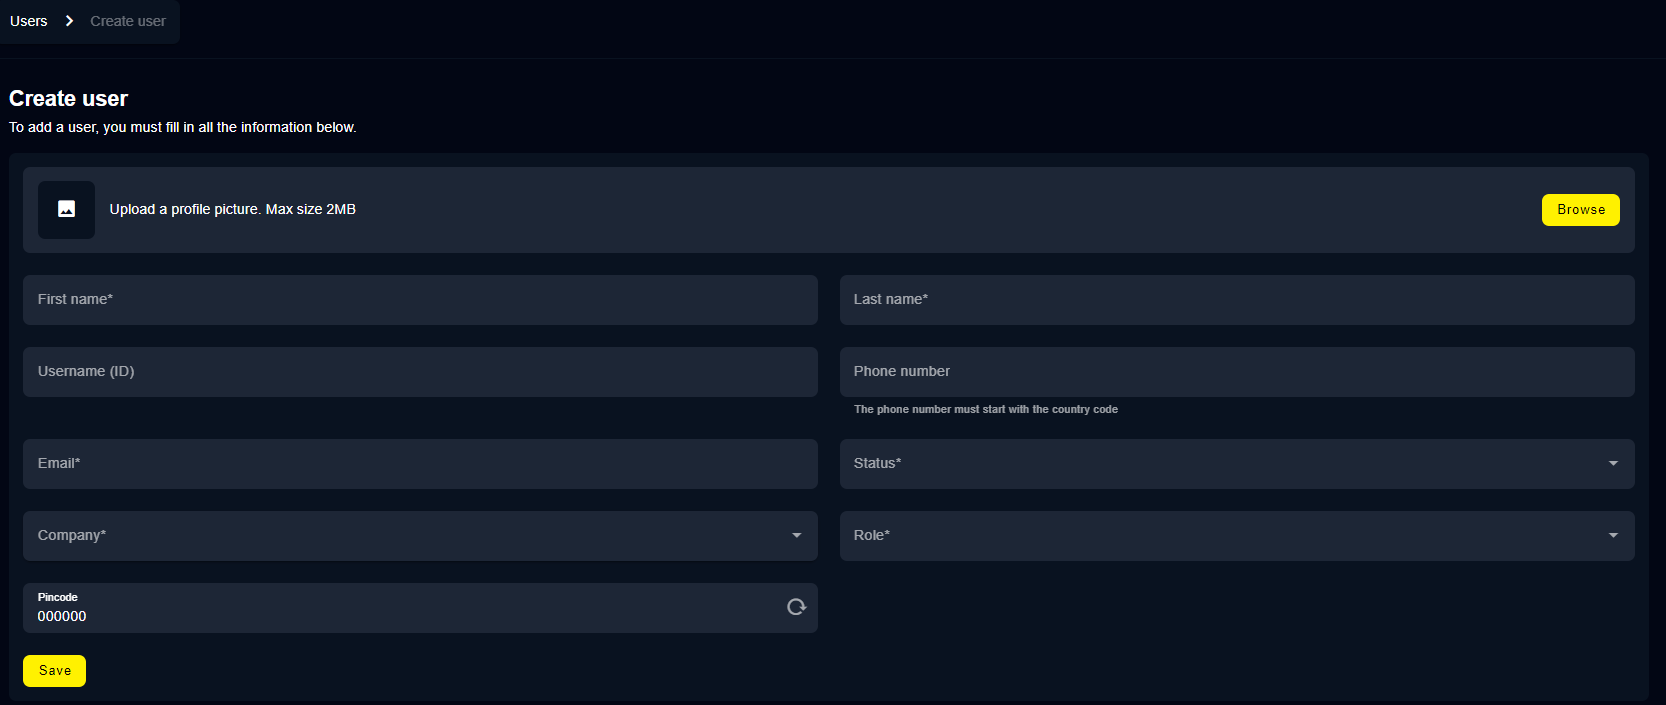
Mandatory fields are notified with an “*”. Mandatory fields depend on the selected role.
“Username (ID)” is optional. It will only be seen in the dashboard “users” section. It won’t be seen in the smart display.
“phone number” / “email” : If role “Driver” is selected, then phone and email are not mandatory. If filled, then driver’s pin code can be sent to the driver by pressing the text message icon or the mail icon

“Status” - available only for Arcure APP Admin
to be approved : to be used to let the user approval for later - the approval can be done directly in the “users” page
approved : to be used to get immediate approval of the user - this will automatically send an invitation email if the role grants web access (all roles except driver)
blocked : to be used to revoke any access to the user
“Company” is available only if connected as Arcure app admin. Otherwise, the company is automatically the one of the company admin creating the user
“Role” :
App Admin (only available if connected as Arcure app admin)
Company Admin : to be used for a company admin who administrates Checklist and dashboard
Company Admin (checklist) : to be used for a company admin who administrates only Checklist
Company Admin (Dashboard) : to be used for a company admin who administrates only Dashboard
Installer : installer of smart displays on vehicle - NOT TO BE USED FOR NOW
Driver : users of the checklist on vehicles - no access to dashboard
Step 3 - Segment creation (optional)
Segments give the possibility to regroup questions of the checklist logically (for example “visual inspection”, “operational inspection”, etc.). The naming of segment is free.
[COMPANY or App ADMIN] clicks on Segments section in order to add as many as needed with the button on the top right corner.
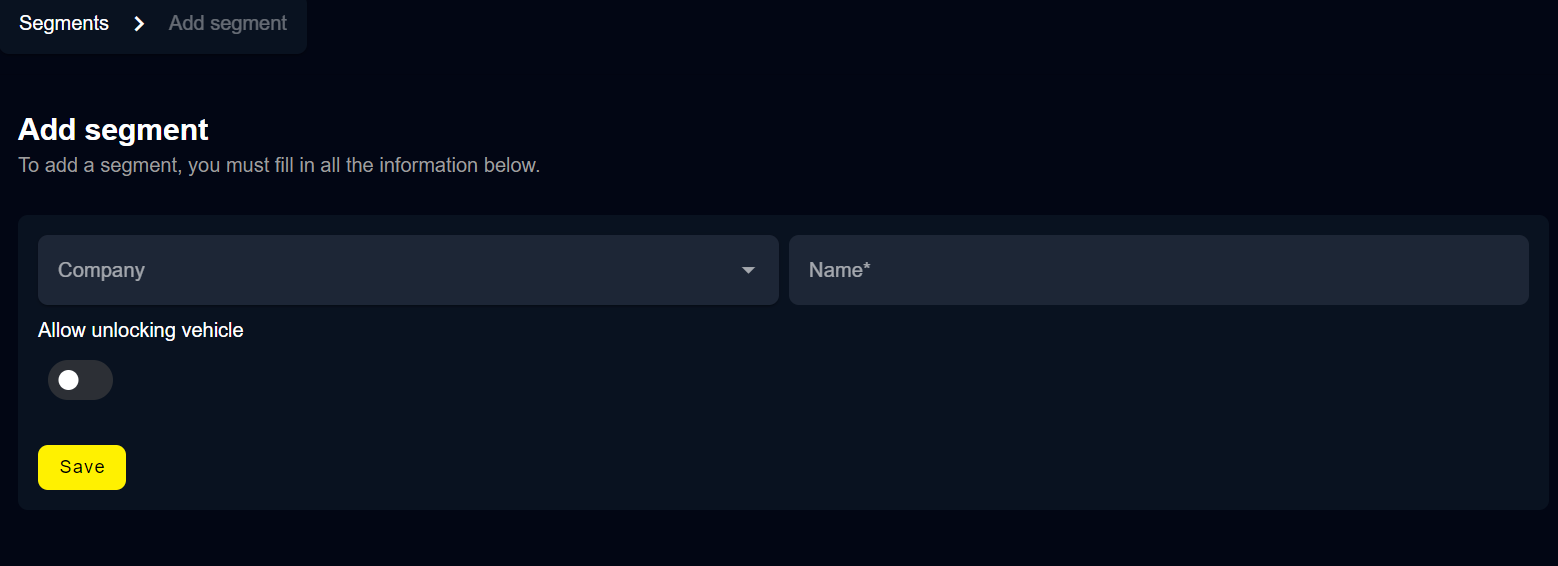
“Company” field is available only if connected as an Arcure app admin
the tick box “Interact with the vehicule” is to be ticked if the segment will regroup questions needing vehicle to be operated : if ticked, when driver will enter the first question of the segment, if discrete output is used (see step "configuring vehicle”), then discrete output will be set and remain at high state until the end of the segment.
WARNING: Use the “interact with the vehicule” with caution
Transition from a segment not interacting with the vehicule to a segment interacting with the vehicle might lead to dangerous situations. This shall not be done while vehicle is moving.
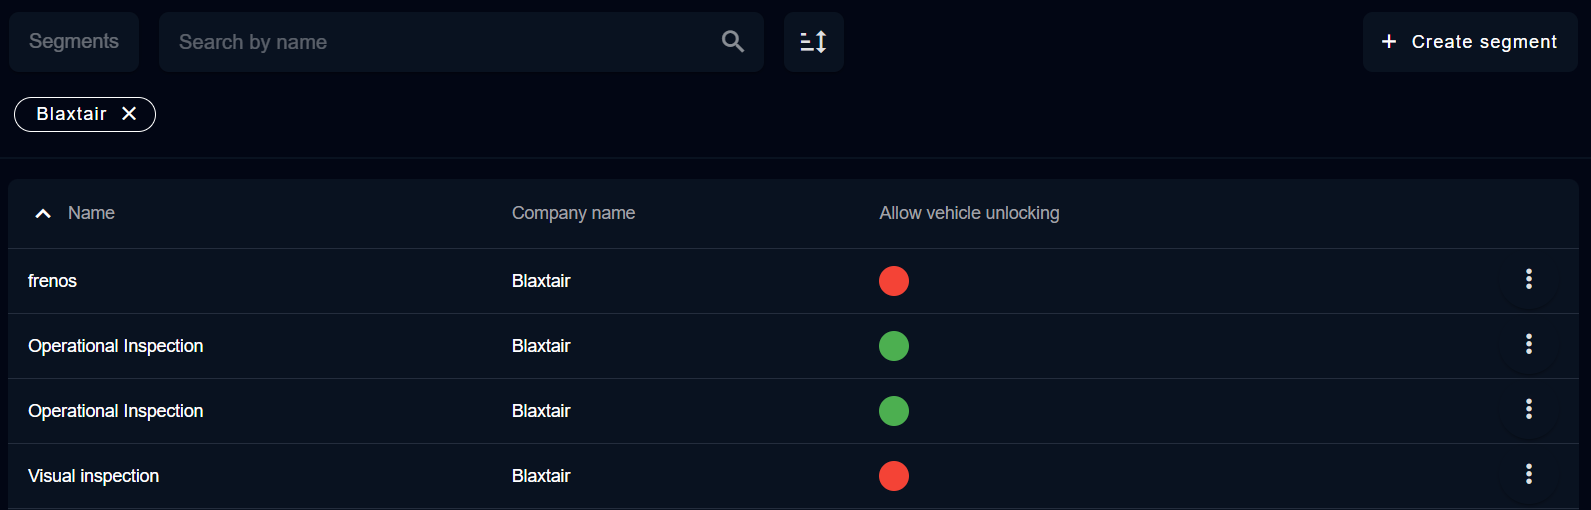
the Segments general page will summarize all segments of the company and whether the segments allow interaction or not with the vehicle.
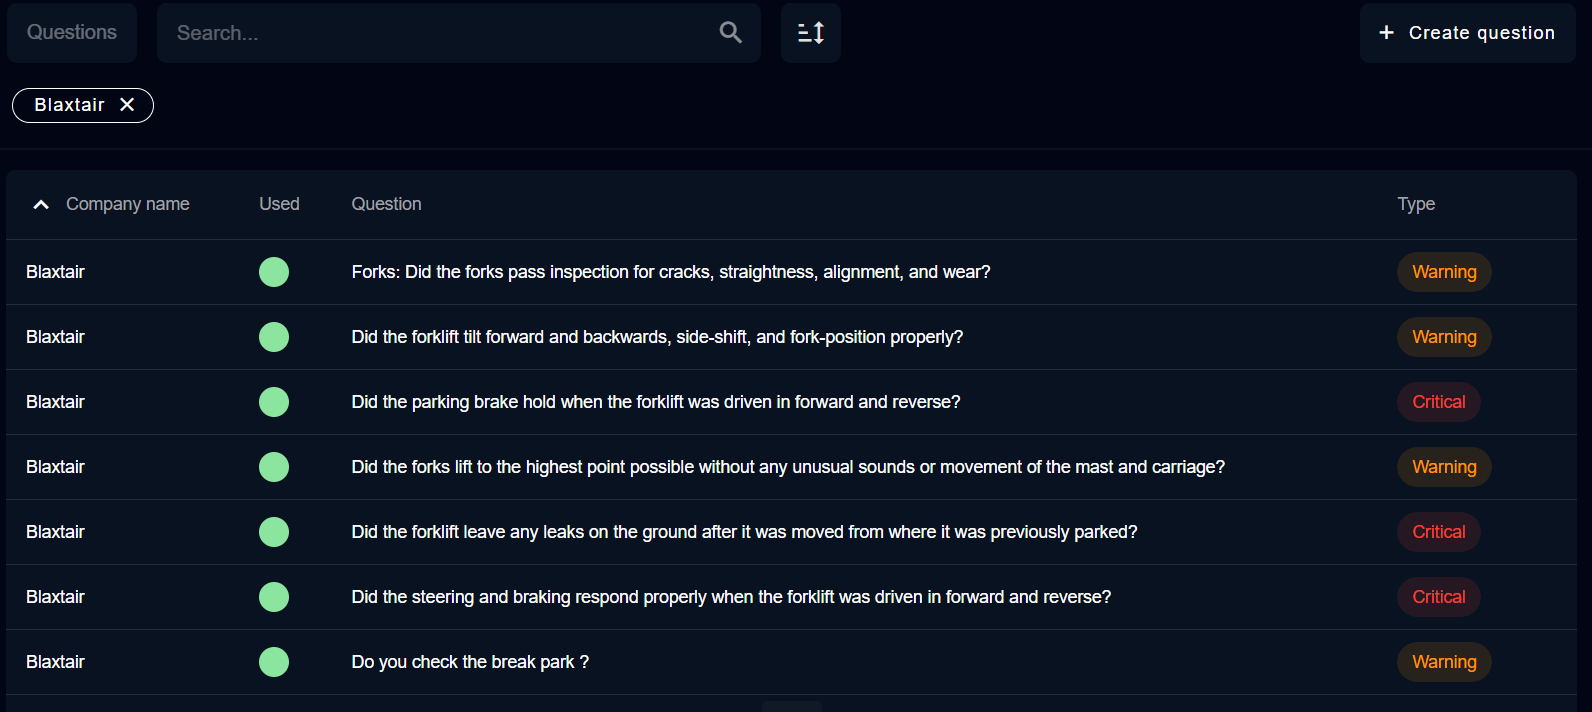
Step 4 - Questions Management
The question section shows whether questions are used in a checklist or not, the text of the question (in the language set for the dashboard) and its type.
a “Critical” question answered wrongly will generate a failed checklist (and potential interaction with the vehicle)
a “Warning” question answered wrongly will generate a warning checklist but will not lead to interaction with the vehicle
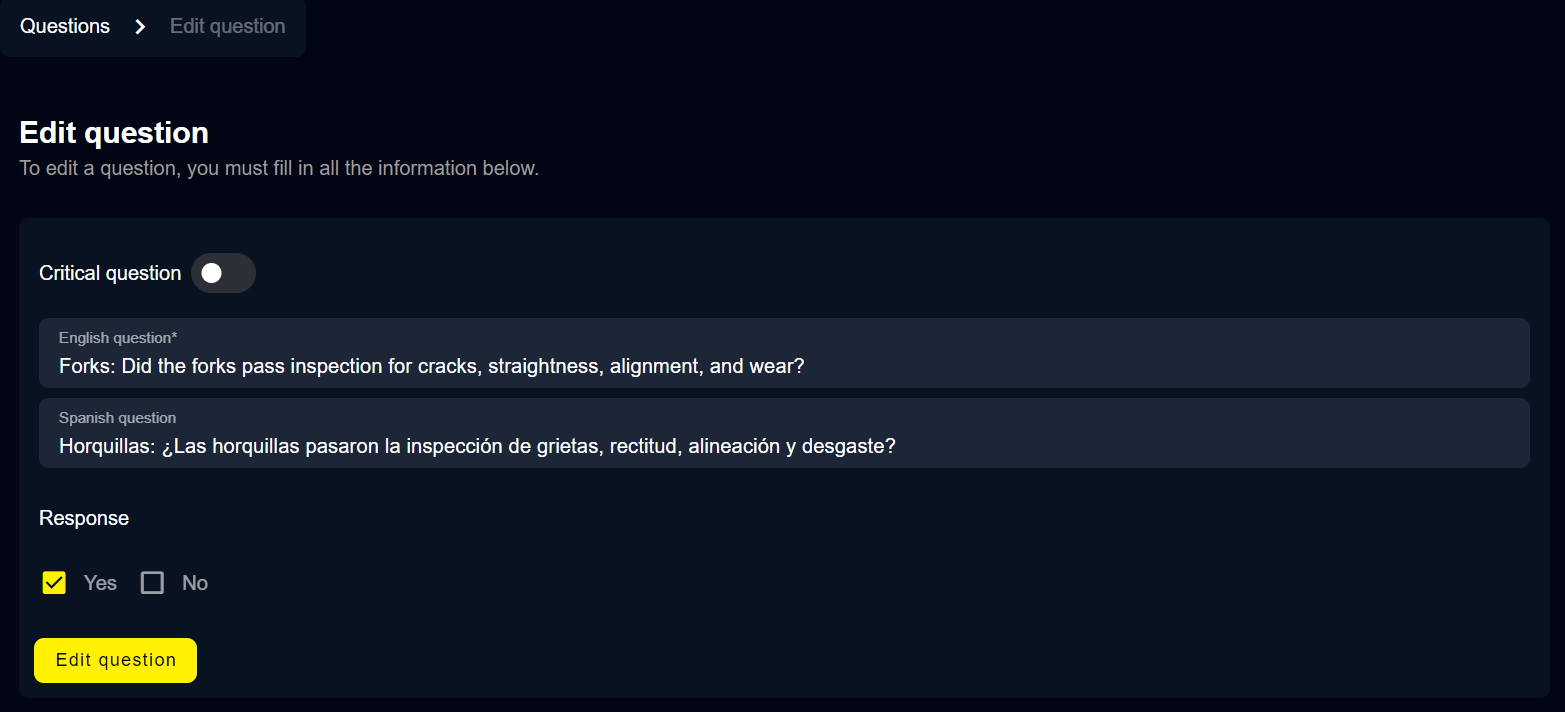
After clicking on a question or on “create question” the page below will be displayed allowing to:
write the text of the question (For this version of checklist we manage only 2 languages : English and spanish.)
tick whether the correct answer to the question is “Yes” or “No”
tick whether the question is “Critical” or not
Step 5 - Checklist Management
[COMPANY or APP ADMIN] can click on the checklist section on the left to create a new checklist. He can either select an existing template or create his own Checklist
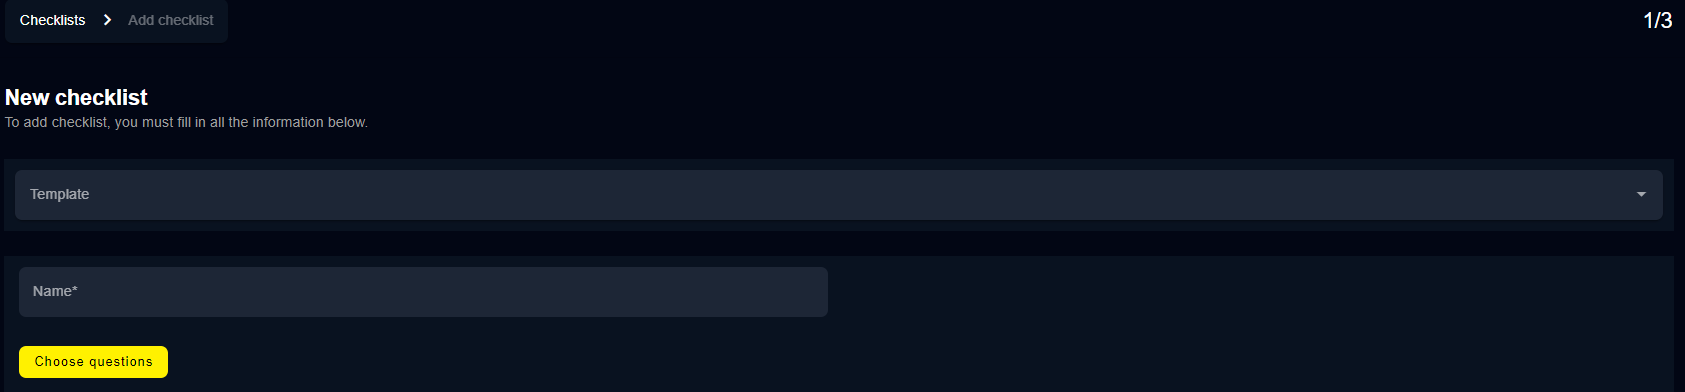
if a Template is selected, there will already have a list of questions / segments selected.
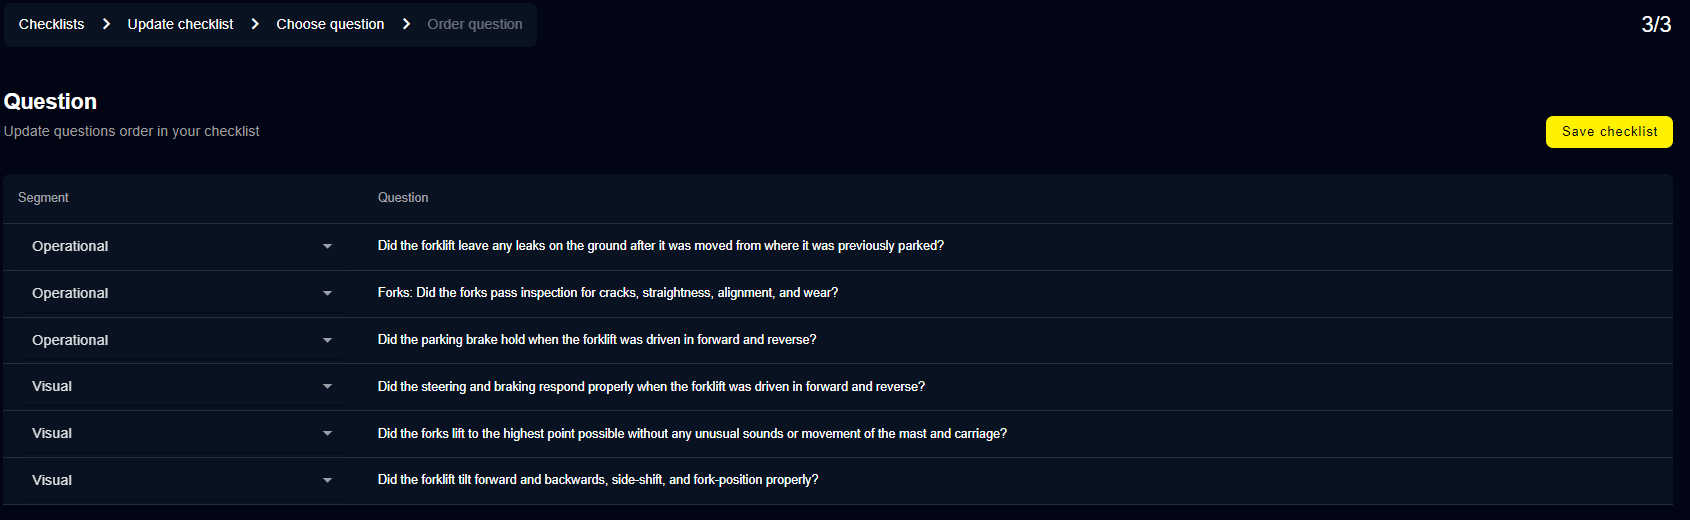
[COMPANY ADMIN] then selects the questions he wants to add to the checklist and then clicks on Order questions.
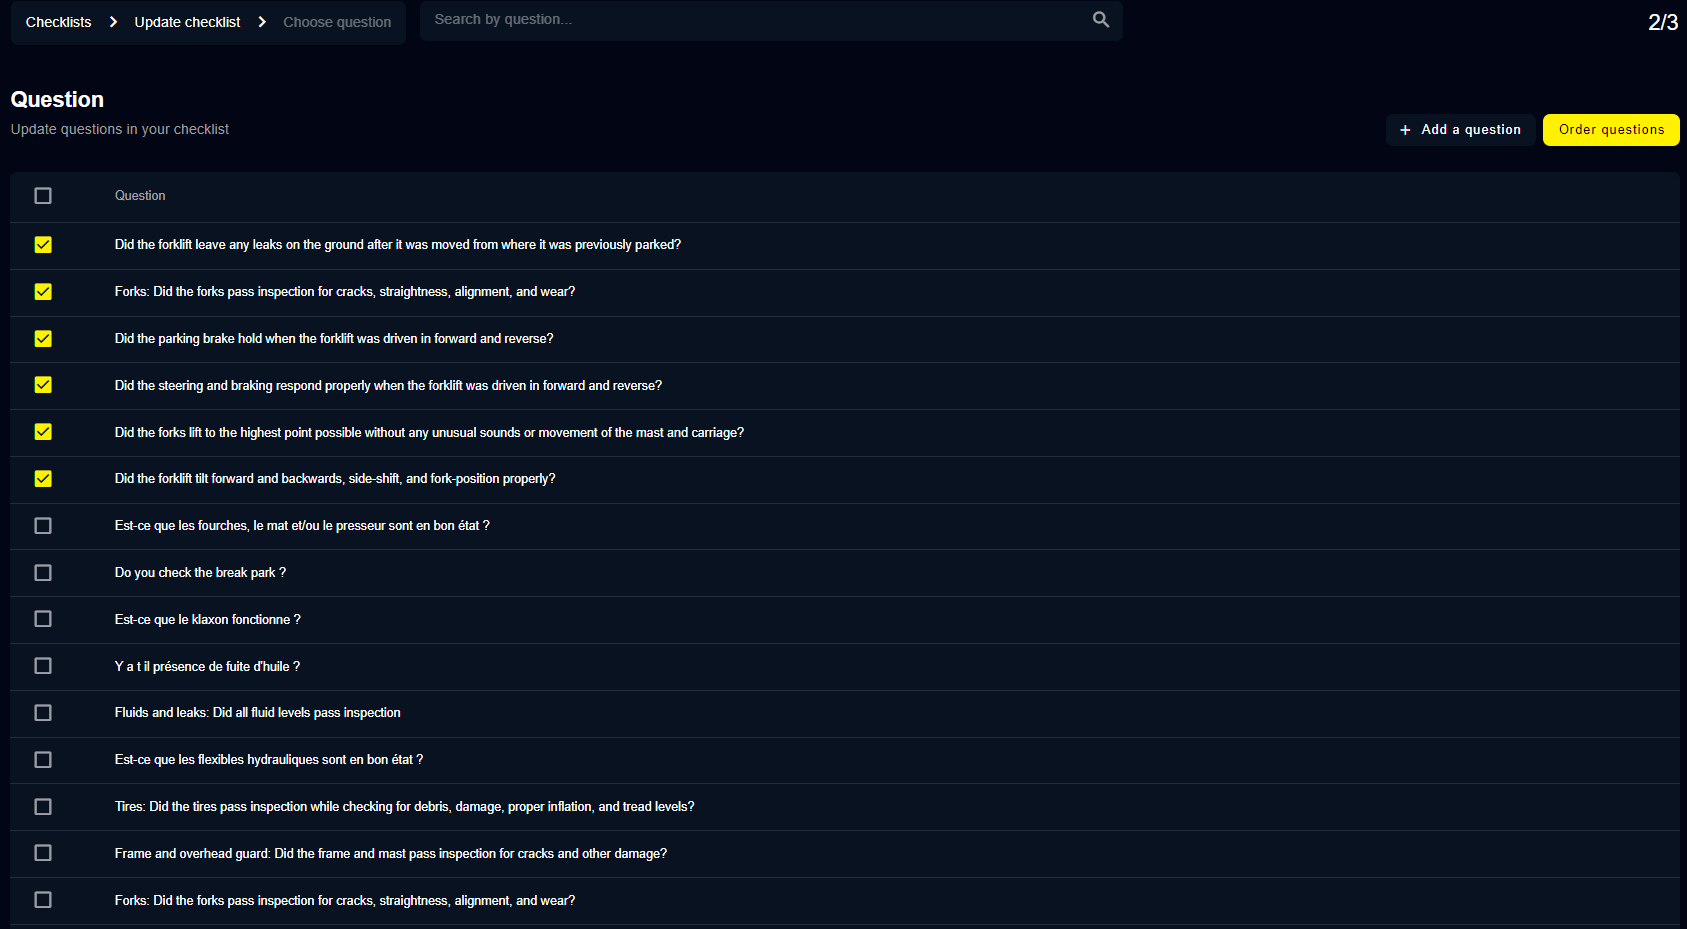
[COMPANY ADMIN] can then select a segment for each question and can reorder them by clicking on it, finally, he saves the checklist.
Selecting a segment is optional. However, to use the “discrete output” feature, it’s necessary to use the appropriate segment.
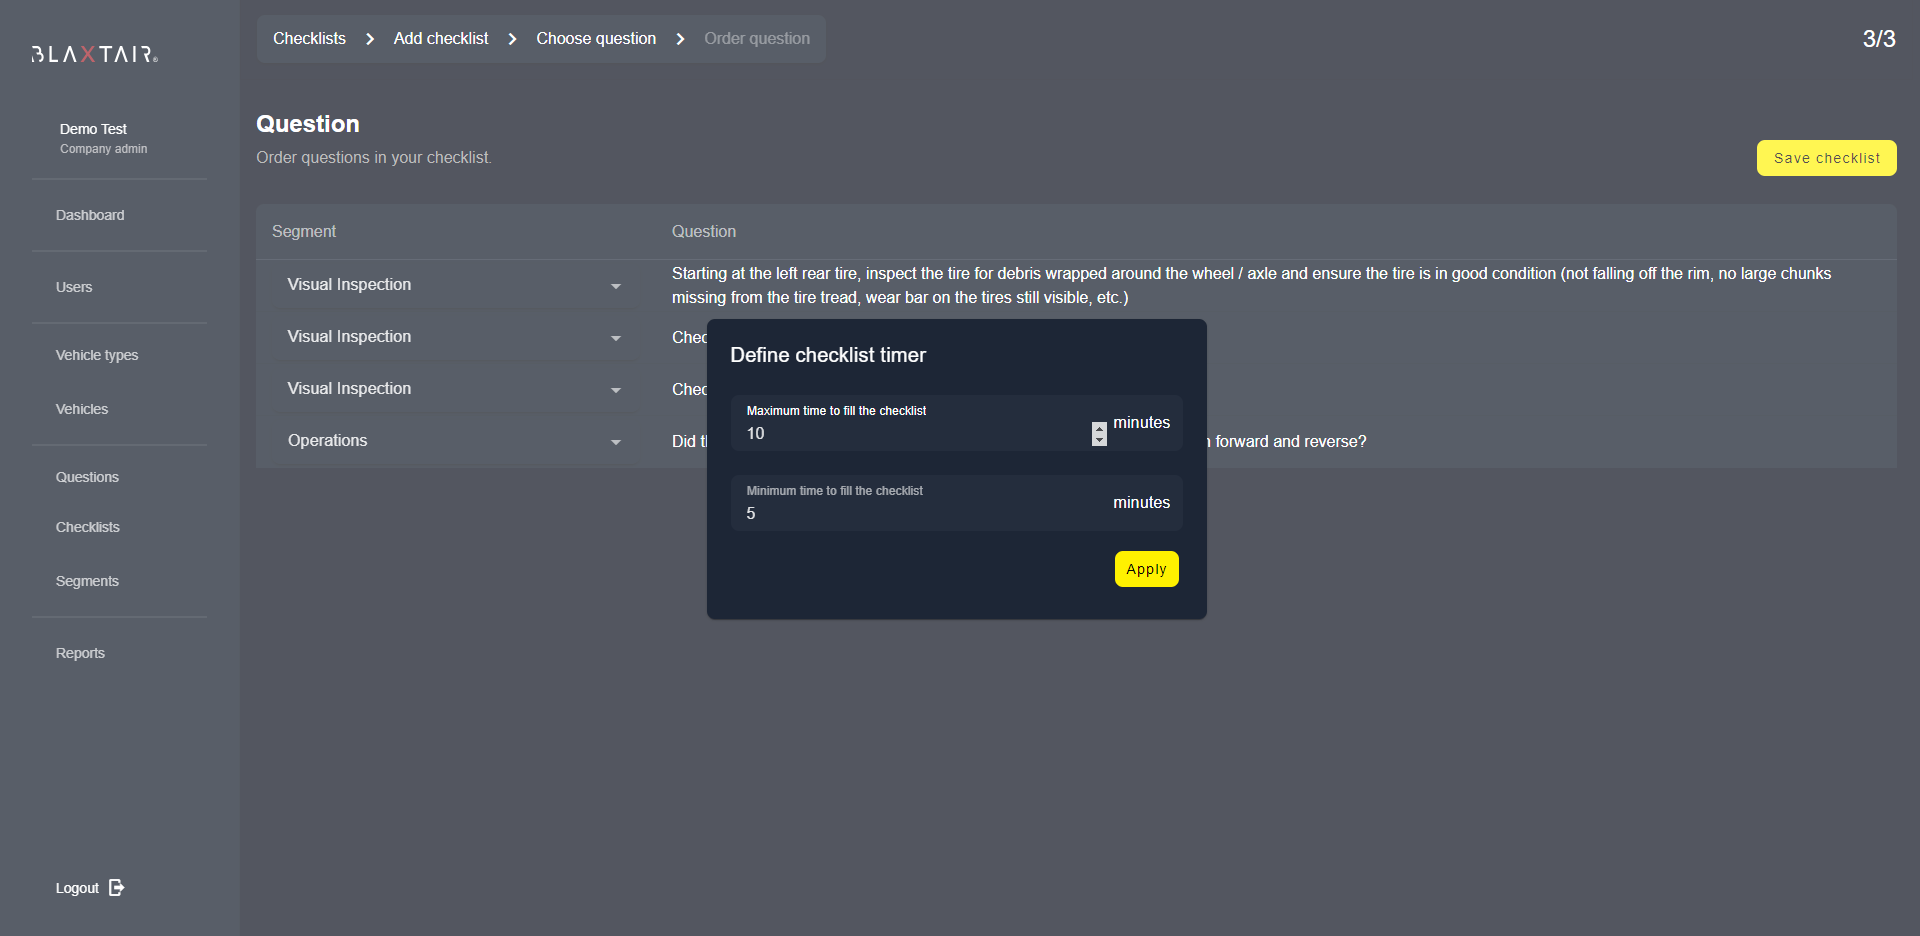
[COMPANY ADMIN] defines the maximum and minimum time needed to fill the checklist.
This min / max timers are important as they will lead to warning / failed checklist if not respected.
Those parameters are in “minutes” so it’s not possible to set a minimum time to 30s. In such case customer shall choose between 0 and 1 min.
IMPORTANT NOTE : if checklist max timer is exceeded, the checklist will be failed AND an alarm at maximum sound will be displayed until Key off.
Step 6 - Vehicle Type Management
This section allows [COMPANY or APP ADMIN] to create a vehicle type. Only one checklist can be linked to one vehicle type. But the same checklist can be applied to several vehicle types.

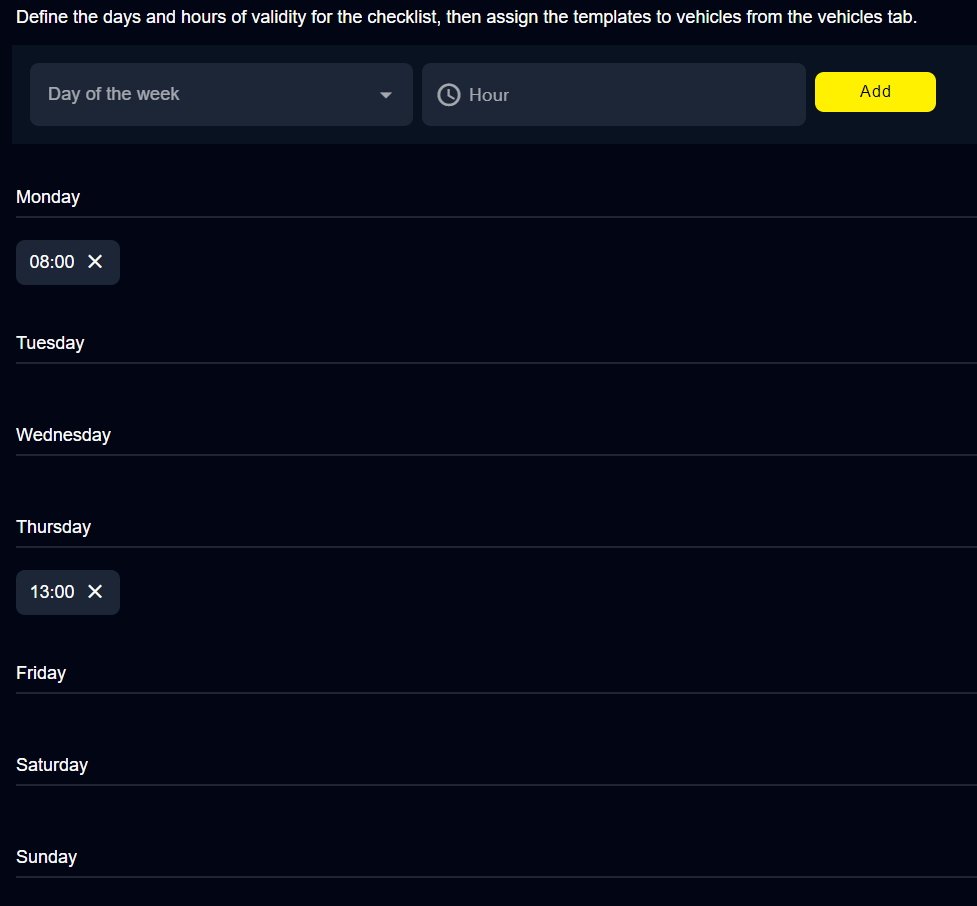
Step 7 - Planning Management (OPTIONAL)
Planning is optional. If not used, Checklist will need to be filled 8 hours after last successfull checklist filled + next key off / key on. If planning is used, Checklist will need to be filled at the key off/ key on following the day/ time specified in the planning.
[COMPANY or App ADMIN] can click on Planning section and on “+ Add Template” on the top right to create a new planning.
After defining the name for this new planning, the page below will be displayed.
Clicking on “Day of the week” will allow to select days of the week (monday, tuesday, etc.) ; “Hour" will allow to define the time.
After clicking on “Add”, the planning will be updated with the days / time previously selected
Step 8 - Vehicle Management
[COMPANY or app ADMIN] can click on Vehicles section on the left and Create vehicle on the top right corner.
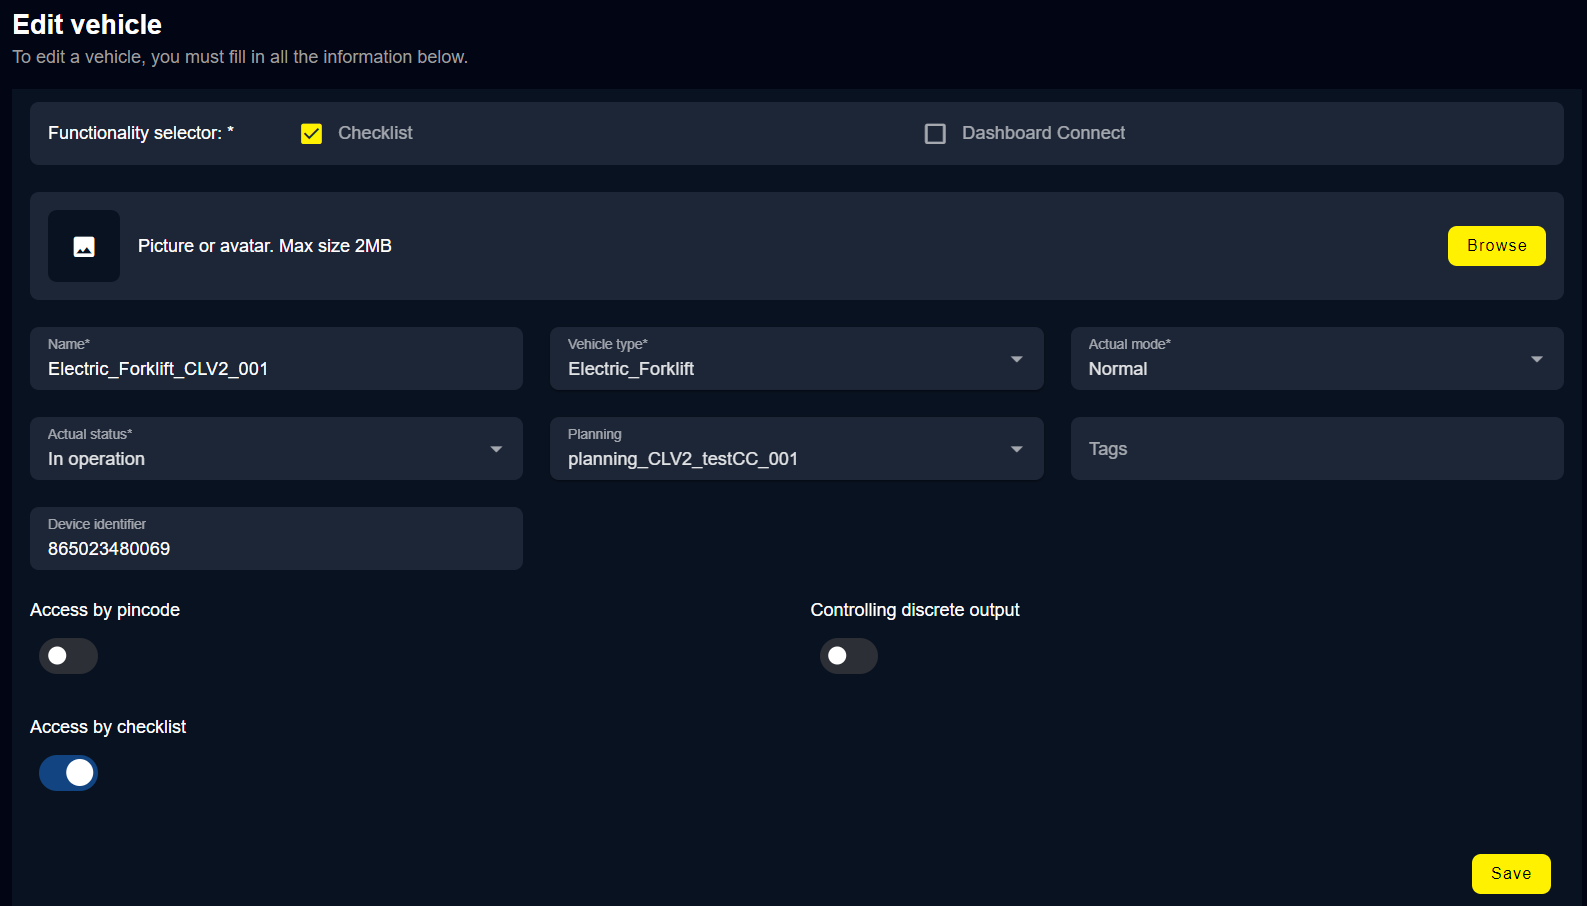
Description of the field / Tick boxes :
Mandatory fields are shown with an “*”
“Functionality selector” : only available if company has acess to Checklist AND Connect. Otherwise this bar will be masked. By ticking Checklist, Checklist feature will be available for this vehicle and only the fields related to Checklist will be shown; by ticking “Dashboard connect”, the fields related to Connect will be shown.
“Picture” of the vehicle can be uploaded
“Name” = free field for vehicle name / Id
“Vehicle Type” = to be chosen among the vehicle types existing in the company (reminder - this is how vehicle is linked to a Checklist)
“Actual mode” = Not used / not to be modified
“Actual status” = Not used / not to be modified
“Planning” - optional field :
if no planning is selected, the checklist will have to be filled 8 hours after the last successful Checklist filled (at the next key off / key on)
if planning is selected, the checklist will have to be filled at each day/ time specified in the planning
Device identifier - required for checklist to work on a smart display = Serial number of the smart display installed in the vehicle
Access by pincode: activates the pincode access or not. If activated whereas "access by checklist" is not, then pincode will be requested at each system start (Key off/ Key on) and act as an "access control" function.
Access by checklist: activates the checklist or not.
If Access by pincode AND Access by checklist are activated, then driver will have to enter its pincode to get the right to fill the questions of the checklist
Controlling discrete output: allows the system to activate a discrete output when checklist/pincode have been correctly filled. Can be connected to the vehicle to authorize vehicle nominal movement/ engine start or not/ reduced speed. An activated output will apply a high level voltage (similar to smart display input voltage), limited to max 200mA
⚠️ this option shall not be activated if not used on the vehicle
this could lead to short cut between the discrete output and the ground
STEP 9 - smart display Installation in vehicle
The smart display has the following cables :
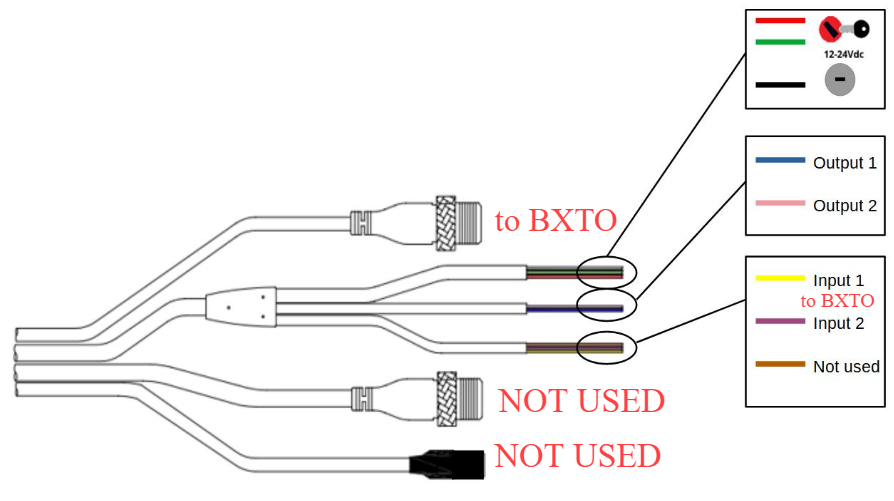
Power/ IGN (Ignition) / Ground :
cradle power (red wire) and IGN (green wire) must be connected to the same power source. This source shall be disconnected when vehicle is off (Key/ IGN OFF), otherwise this could lead to vehicle battery being drained.
Cradle ground (black cable) must be connected to the ground corresponding to the power source.
Discrete Output (optional)
Discrete output 1 (blue wire) can be used to connect to interact with the vehicle. Will be activated only if :
activated in maintenance mode (until key off and exit of maintenance + settings page)
OR activated in dashboard on the vehicle page linked to this tablet
AND
Checklist is valid
OR a segment allowing interaction with the vehicle is being answered
OR Checklist has been answered with only “non critical” questions wrongly answered (until Key off)
Connection to BXTO (optional)
if BXTO is equipped on the vehicle, the 2 following connections with the smart display are required :
video signal from CVBS connector must be connected to smart display Video M12 connector (4pin)
a Discrete output of BXTO configured to be at high level when alarm is active shall be connected to discrete input 1 of the smart display (yellow wire)
⚠️ This connection is critical
if forgotten, the alarm won’t be audible
smart display has to be locked in its cradle. We advise cradle to be secured with the provided key to avoid smart display to be dismounted as smart display is not made to work without its cradle.
STEP 10 - smart display configuration
smart display shall be set ON by powering the vehicle
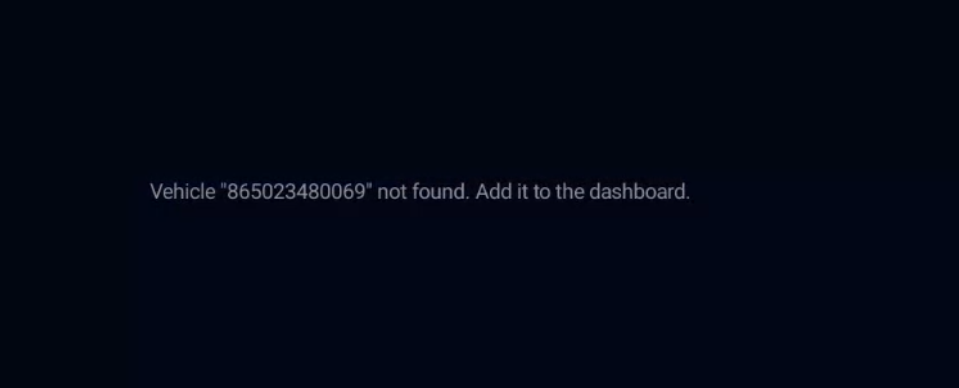
if smart display has not been linked to a vehicle in the dashboard (see step 8 - Vehicle management), an error message will be shown indicating this link must carried out : (the text is incorrect and will be changed in a future SW version)
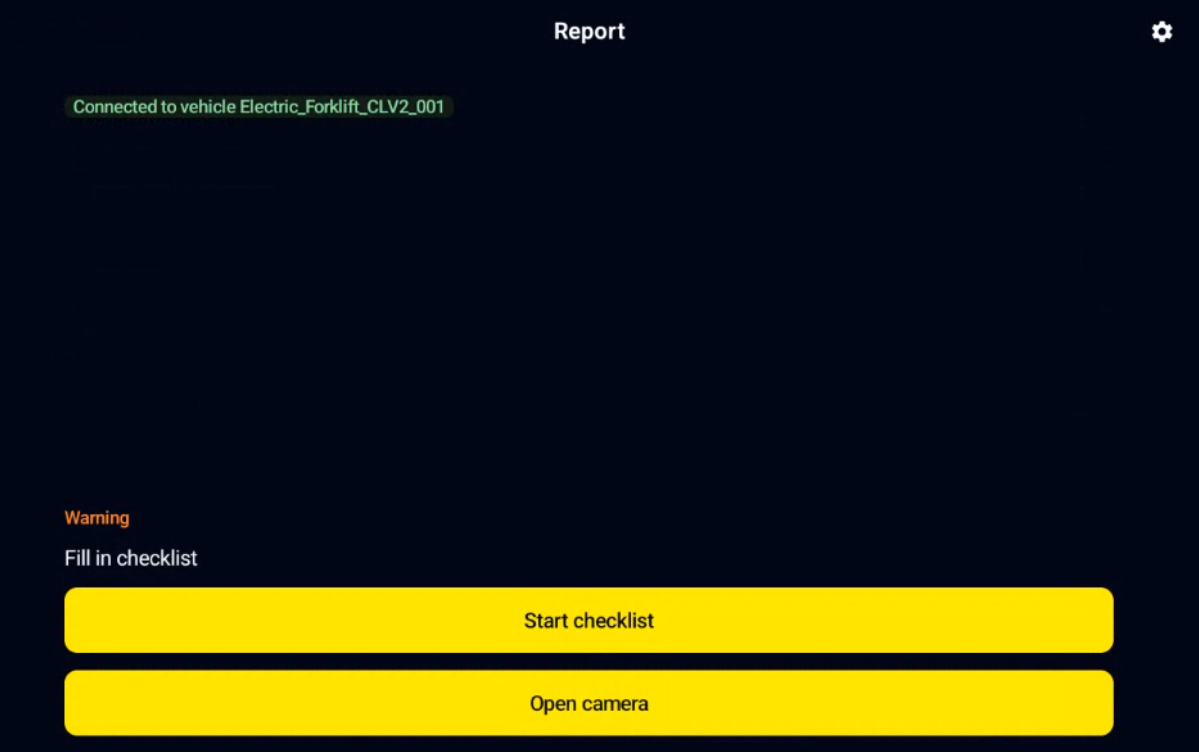
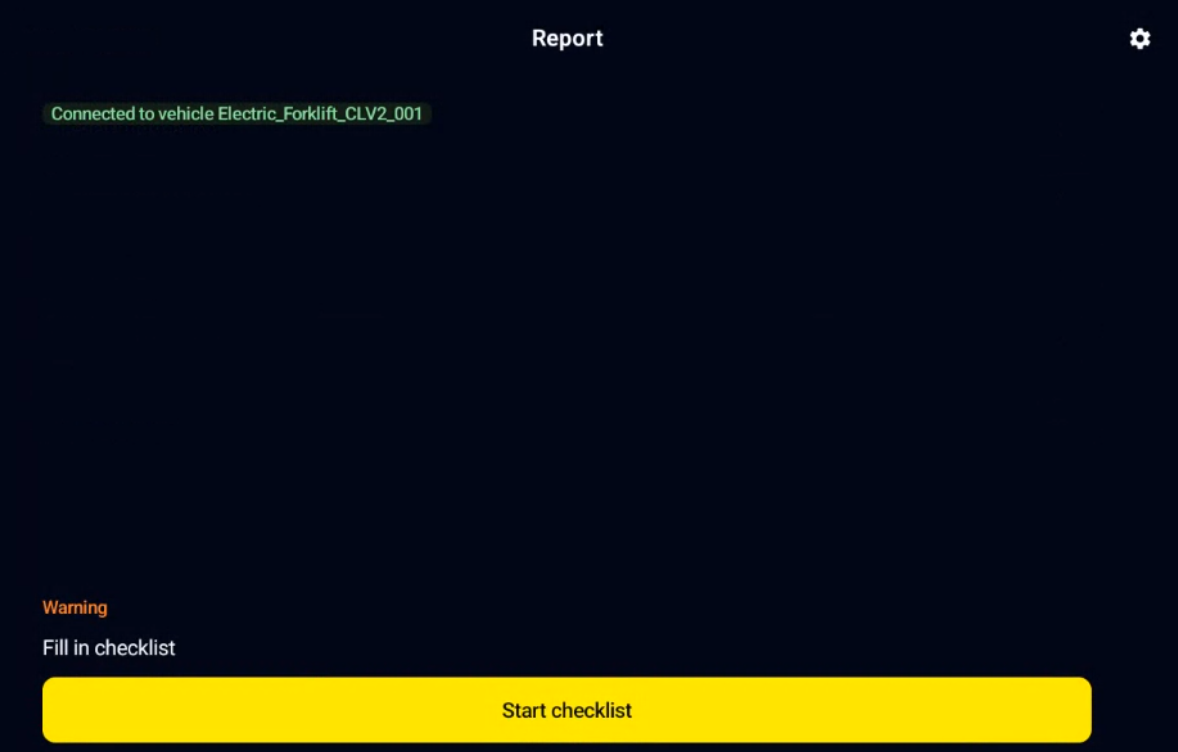
if smart display link has been performed in the dashboard, the following page will be displayed, asking to fill the checklist. This page allows to check that the vehicle to which smart display is connected is correct
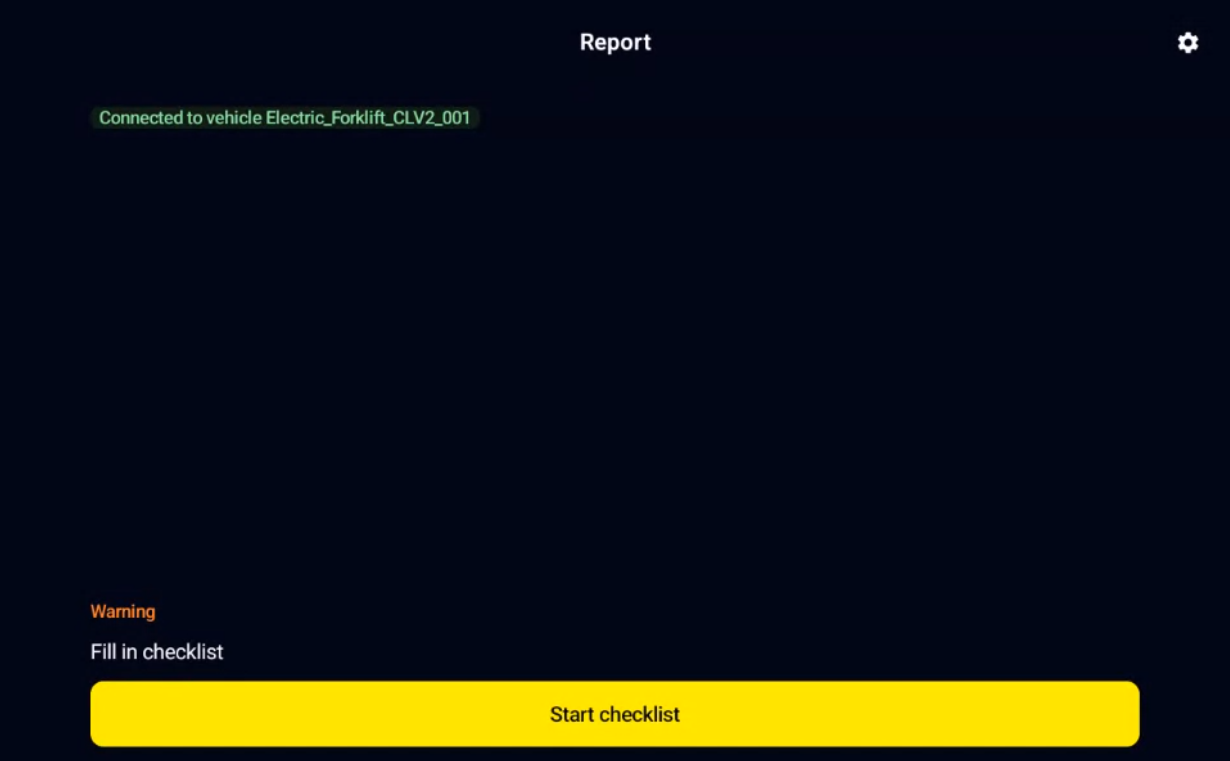
After this step, Checklist is ready to be used on the vehicle as a standalone system.
Step 11 (optional) - smart display configuration - link with BXTO
if BXTO is installed on the vehicle (see step 9), the following configuration shall be performed
click on the gear (top right corner) to display following screen
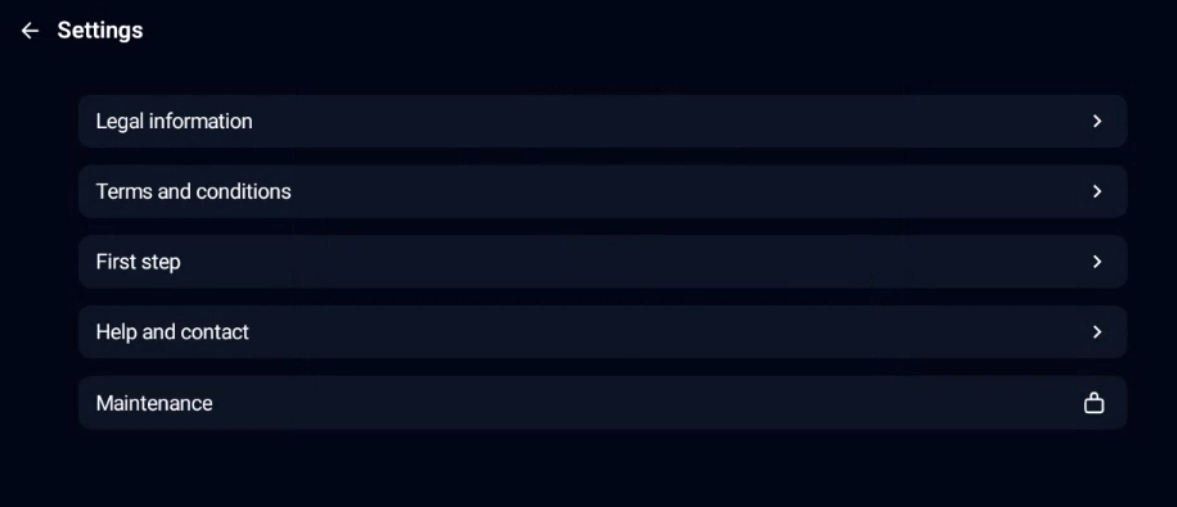
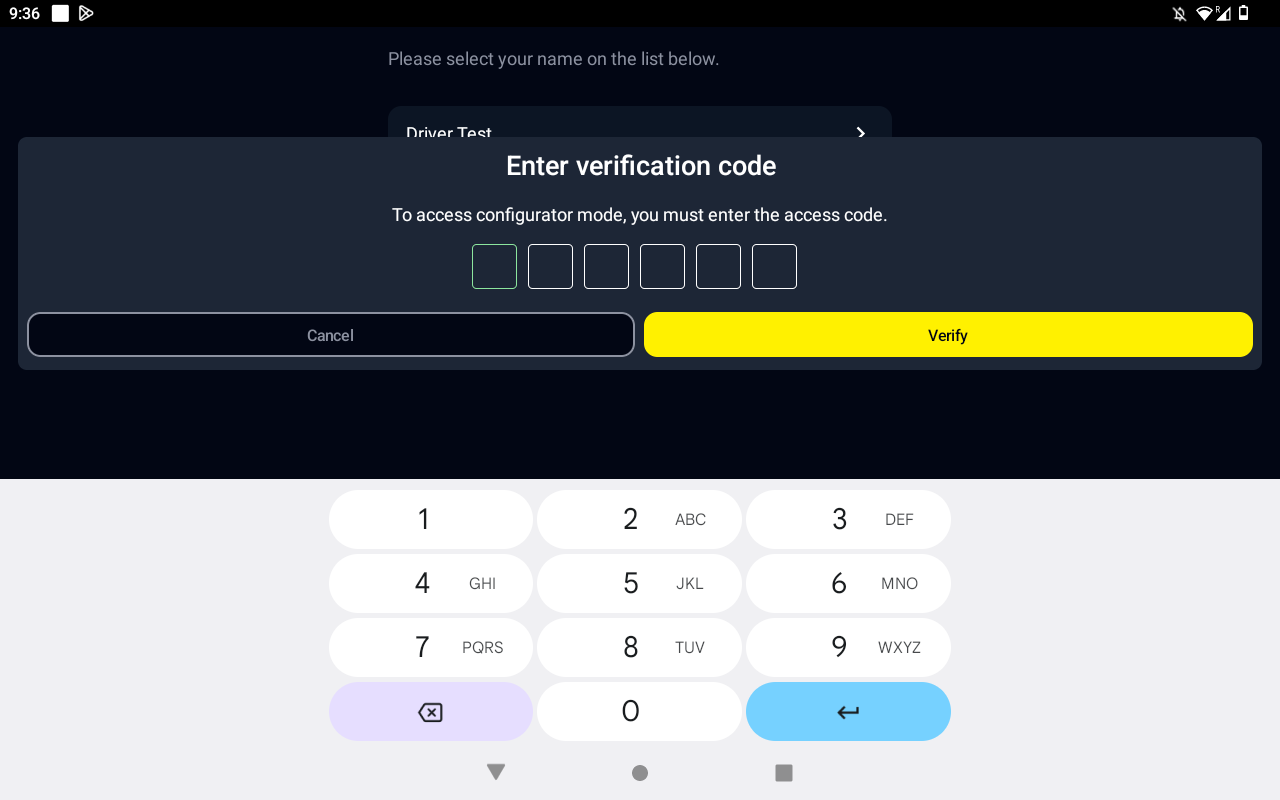
click on “Maintenance”
enter password to get to the following screen :
Default password is 5504
to activate link with BXTO, click on “Enable Blaxtair Camera Launch”. By ticking this option :
BXTO video will automatically be displayed 10s after successful checklist is filled
BXTO video can be displayed 10s after pressing “open camera” button on the smart display home page. This “open camera” button can be used for example on a faulty vehicle to benefit from the BXTO protection.
⚠️ Maintenance page shall be exited before turning off system/ vehicle
Otherwise, maintenance page will remain open / accessible when turning system on again
After this step, Checklist + BXTO are ready to be used on the vehicle.
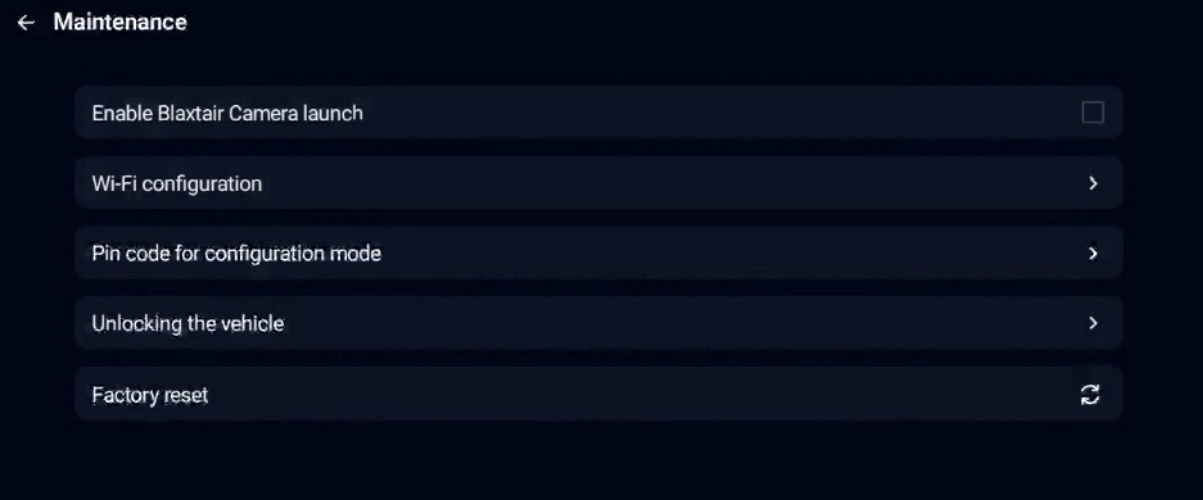
Step 12 - Options offered in maintenance mode
Reminder : the following page can be accessed after clicking on “Maintenance” in the setting page and by typing related password.
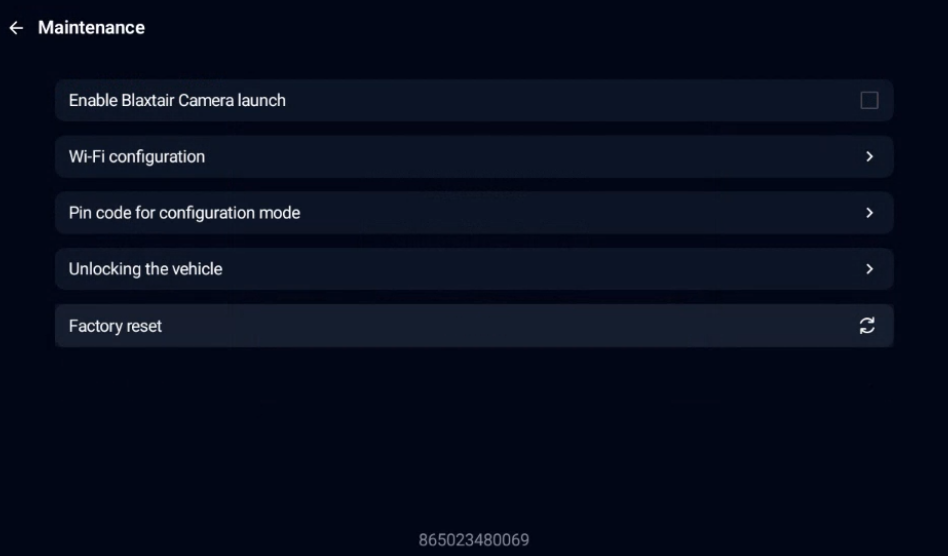
access to Smart display’s Serial Number (displayed on the bottom of the page)
“Enable Blaxtair Camera launch” : see step 11
Wi-fi configuration - allows to select a Wi-fi network to be connected to - this is usefull for areas with low/ no 4G coverage or for system software update

Pin code for configuration mode : allows to change standard pwd to enter Maintenance mode
Change output state : forces discrete output to high state (to disable vehicle limitations, if any). This allows to manually change the state of the discrete output from Low to High.
⚠️ This works even if option “controlling discrete output” is not ticked in the dashboard
Shall not be used if not connected to the vehicle to avoid risks of power to ground shortcuts
Factory reset : empties the smart display’s memory (reports stored in memory). This can be used to force the connection with dashboard to take into account modifications (for example after activating pincode feature)
⚠️ Maintenance page shall be exited before turning off system/ vehicle
Otherwise, maintenance page will remain open / accessible when turning system on again
Connection between dashboard and checklist
It’s important to know when are connections done between checklist and dashboard as an update in the dashboard (change of checklist, etc.) will not be taken into account at other moments. Connection is possible only if network is available (4G/ Wifi) :
At system start (key On), if smart display’s memory is empty (first use or after a “reset to factory” done in maintenance mode
at the sending of a checklist
after pincode has been validated
case of connection loss/ and retrieved :
if there’s no connection : updates in the dashboard will not be taken into account by the smart display, reports of the checklist will not be sent
when connection is recovered : unsent reports will be sent
Operating Checklist by driver
This chapter will describe the nominal use of checklist by a driver
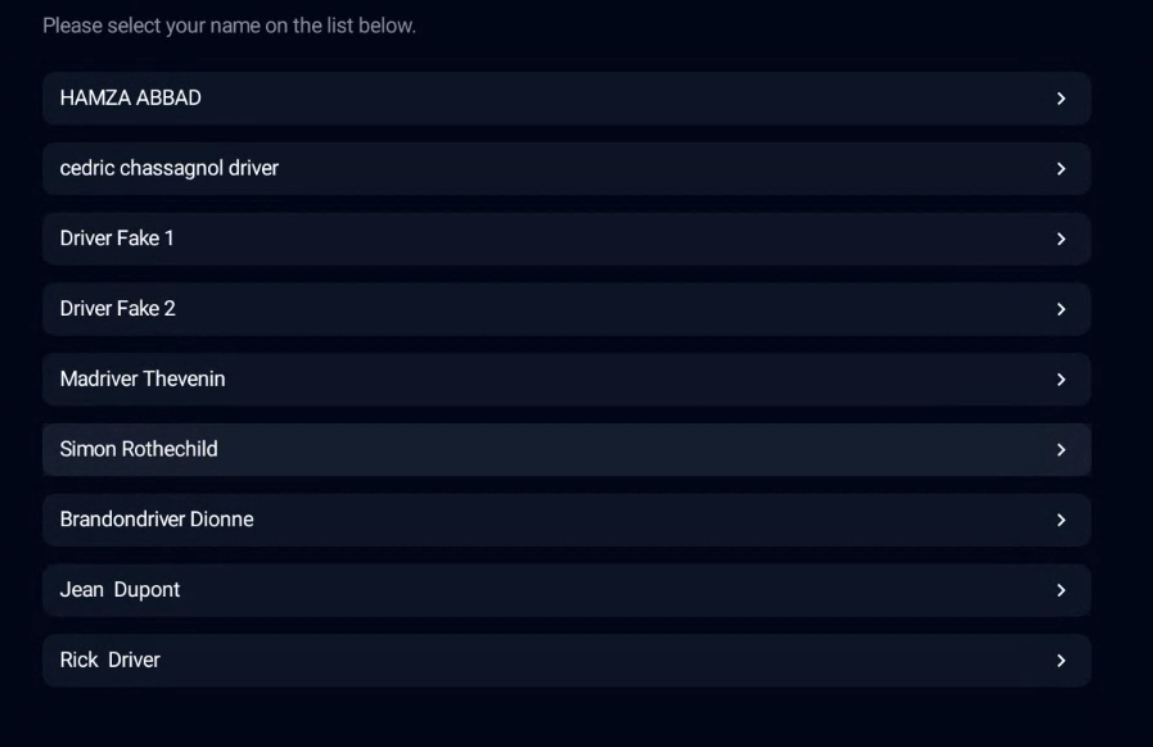
After Key on, the following page will be displayed, [DRIVER] can click on “start checklist”.
[DRIVER] selects his/her name on the list.
[DRIVER] then enters his/her PIN Code (only if "access by pincode" has been ticked in the dashboard's vehicle page)
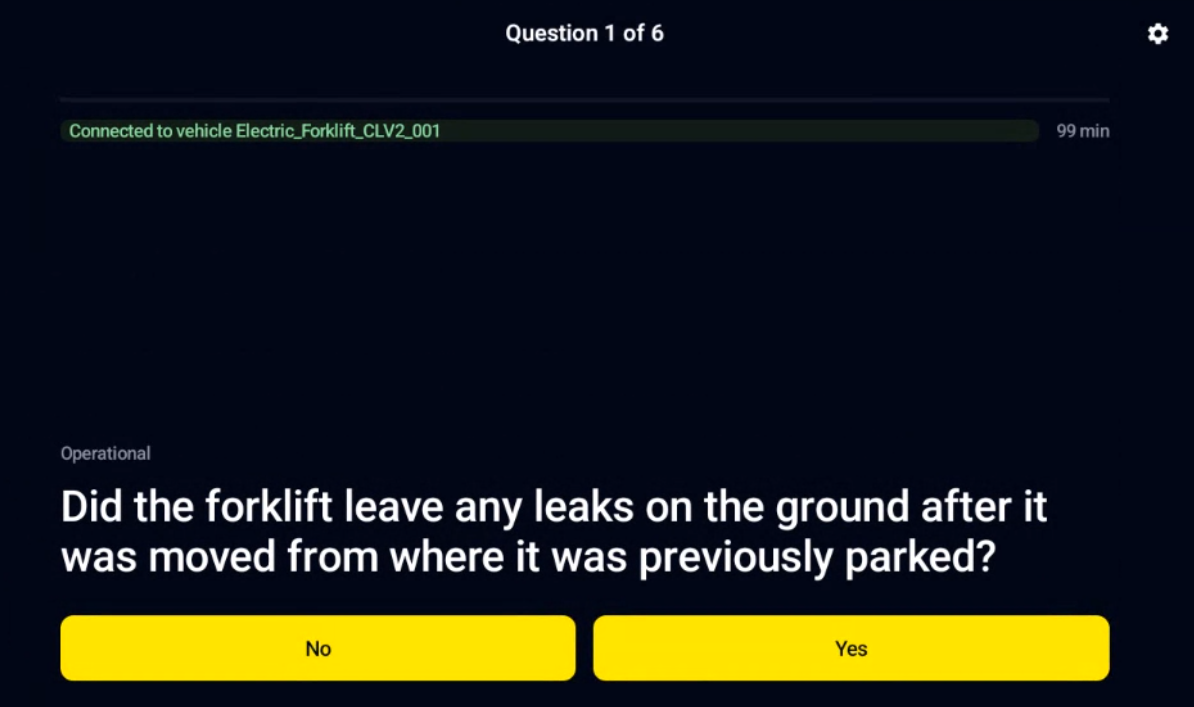
[DRIVER] answers questions of the checklist
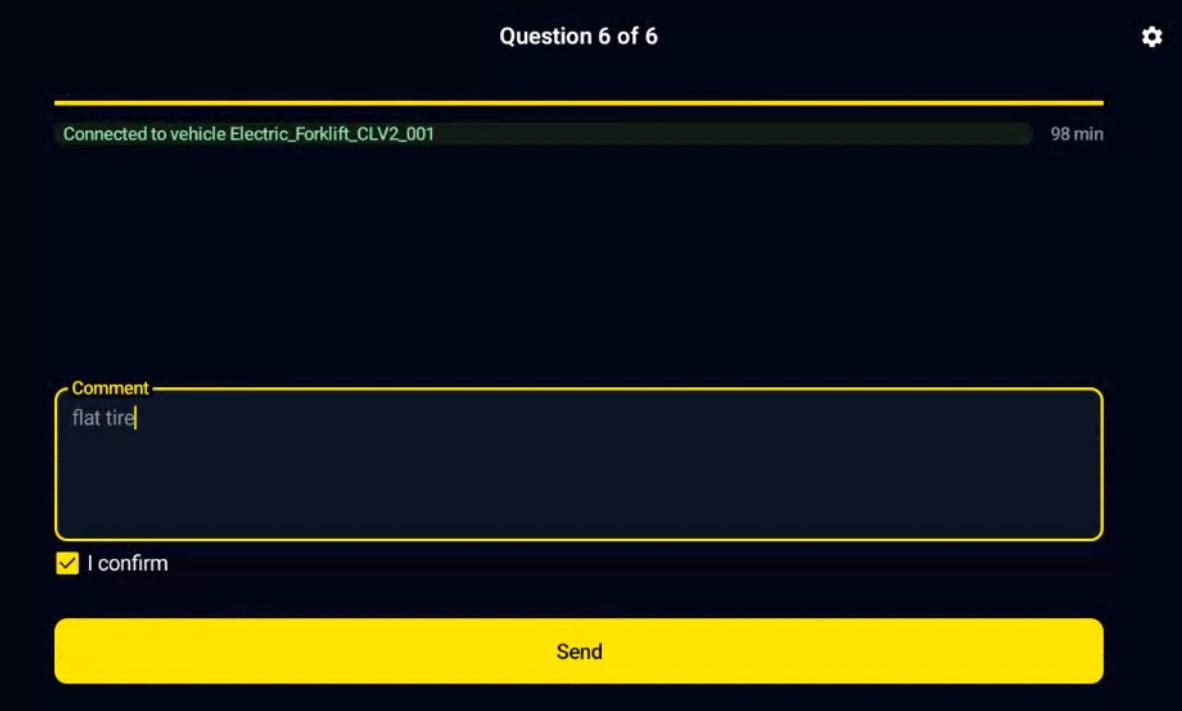
after answeering the last question, the following page will be displayed. [DRIVER] can enter a comment (optional) and validate the checklist by ticking “I confirm” and “Send”
There are 3 possible outcome of the checklist :
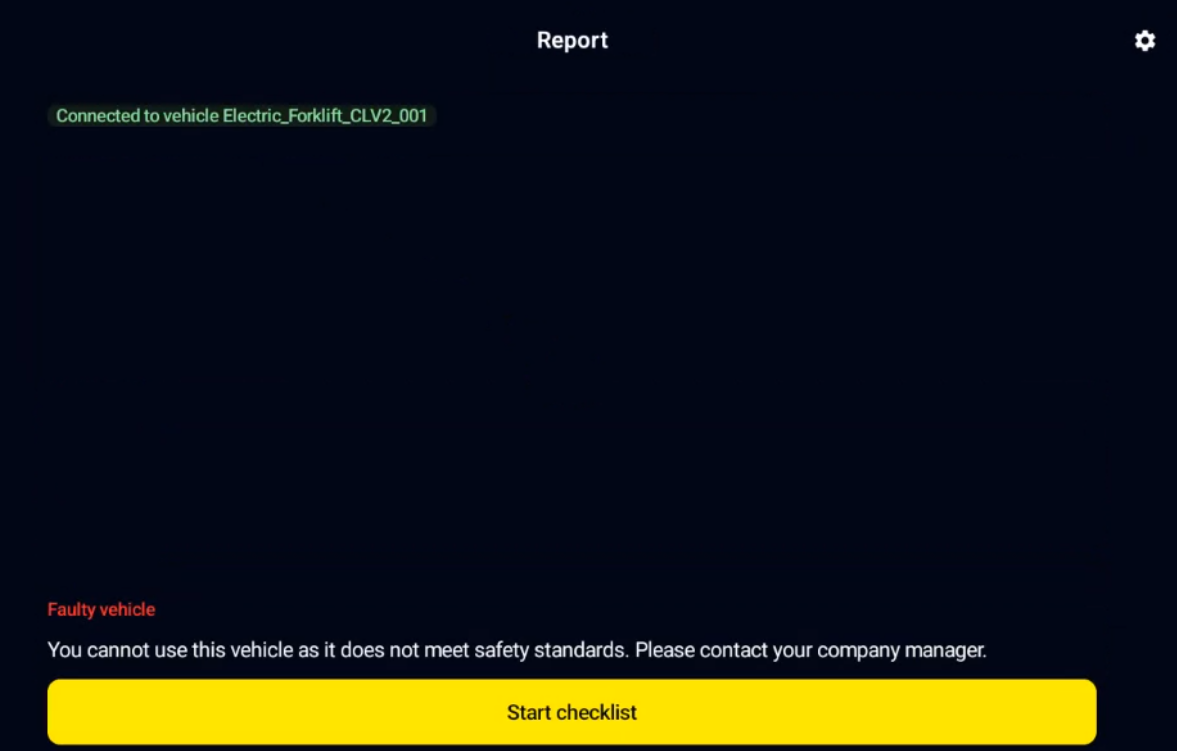
Faulty vehicle : at least one “critical” question of the checklist was wronly answered <=> checklist is failed, the vehicle is defined as “faulty”. If discrete output is used (activated in the dashboard’s vehicle page and wired to the vehicle), discrete output will change its state which may induce interaction with the vehicle. Only a valid checklist OR the “Change output state” option in maintenance mode OR the by pass of the relay mechanism allows to stop the interaction with the vehicle.
Driver can restart the checklist again if driver made a mistake while answering checklist
Warning vehicle : at least one “warning” question of the checklist was wrongly answered AND no “critical” question was wrongly answered <=> the vehicle is defined as in “warning” state. If discrete output is used, warning state WILL NOT limit the vehicle movement until next Key OFF.
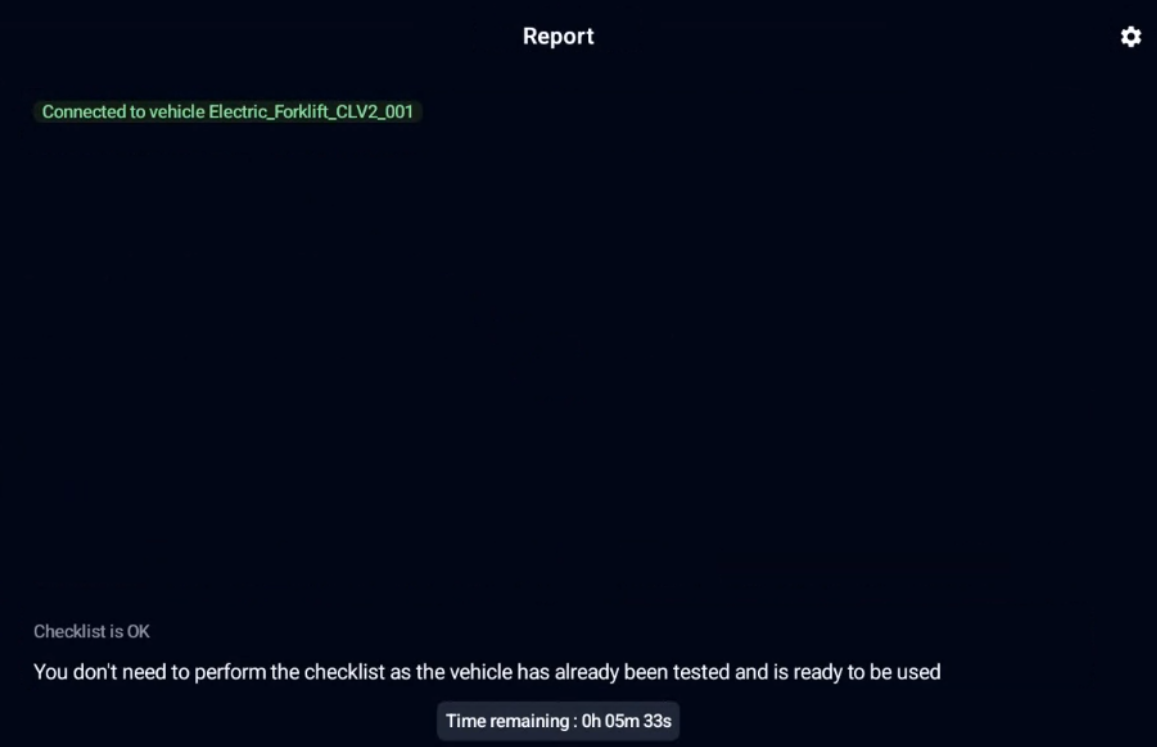
Checklist OK : all questions were correctly answered. If discrete output is used, vehicle movement won’t be limited. The “Time remaining” gives the validity time of the checklist. In example below, the checklist will be asked again in 5min33s AND the following Key Off/ On. Reminder (see step 7) : validity timer is 8 hours if no planning is linked to the vehicle / the time before reaching the next slot of the planning if planning has been linked to the vehicle.
DASHBOARD Features
This chapter describes some features from the dashboard that have not been covered yet
Kpi
App admin or Company admin can access to KPIs
Reports
App admin or Company admin can access to all checklist reports from its fleet : reports will only be available if network is available around the vehicles

Reports list can be exported in a csv file
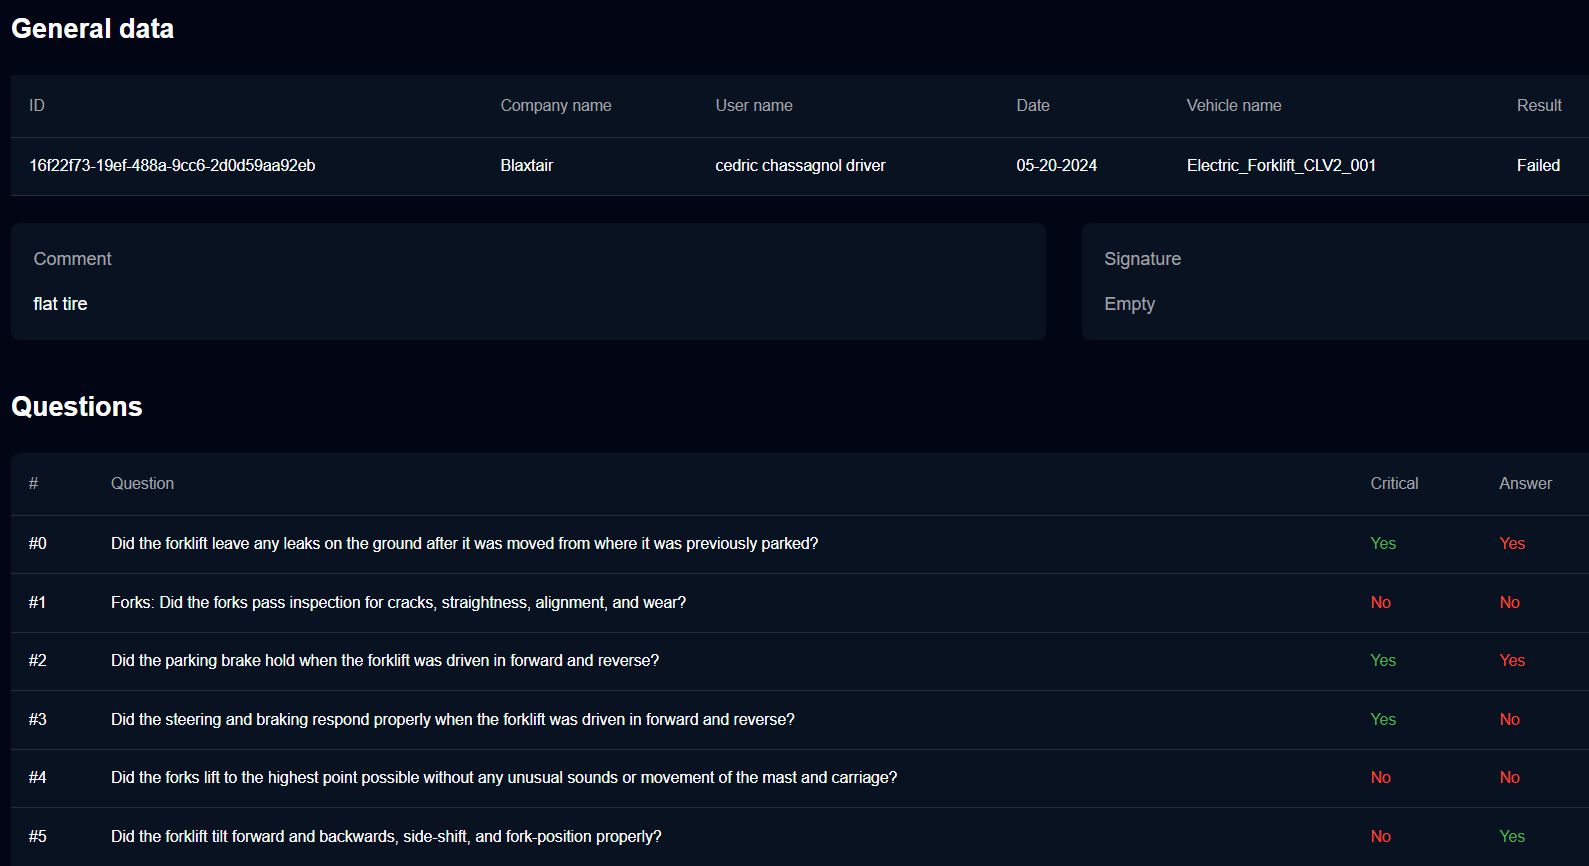
By clicking on a report, the following page is displayed showing date of the report, driver’s name, driver’s comment (if any), the questions and whether they’re critical (Yes and green) or warning type (no and red) and the answer (correct in green, wrong in red)
Automatic emailing in case of checklist warning or fail
By clicking on your account (bottom left part of dashboard page), you will have the possibility to enable/ disable automatic emails when a checklist is in error or warning.

Known limitations
Dashboard and Smart display will connect together only if :
Smart display’s memory is empty (first use or after a “reset to factory” action in maintenance mode)
Checklist is sent
Valid pincode entered by driver
Application crash (not nominal)
=> This means that a modification in the dashboard (for example change in the planning) will not be taken into account outside the conditions above
If checklist and pincode are activated on a vehicle, pincode will be requested at each KEY OFF/ KEY ON, not only when Checklist needs to be filled - this acts as an access control.
Smart display’s brightness cannot be changed by user (automatic adjustment is active)
When BXTO’s option is active, it takes 10s after Key ON to have transition from Checklist page to BXTO’s Camera page.
If key OFF/ On performed while in maintenance page, system will open again in maintenance page
If controlling discrete output at high level has been activated, it will remain active after Key OFF / ON
=> it’s Mandatory to exit maintenance mode after the needed operation have been performed
Setting for minimum timer to fill the checklist is in minutes. So it’s not possible to set it to 30s for example.
Disclaimer only available in settings and not on opening page of Checklist
Since version 0.6.5 (in production since december 2024), it’s possible for user to change the sound volume level using tablet’s button. User can not decrease sound below 25% of max volume.