1.2 User Guide
Please find the PDF version at this link.
I- Account Creation "sign up"
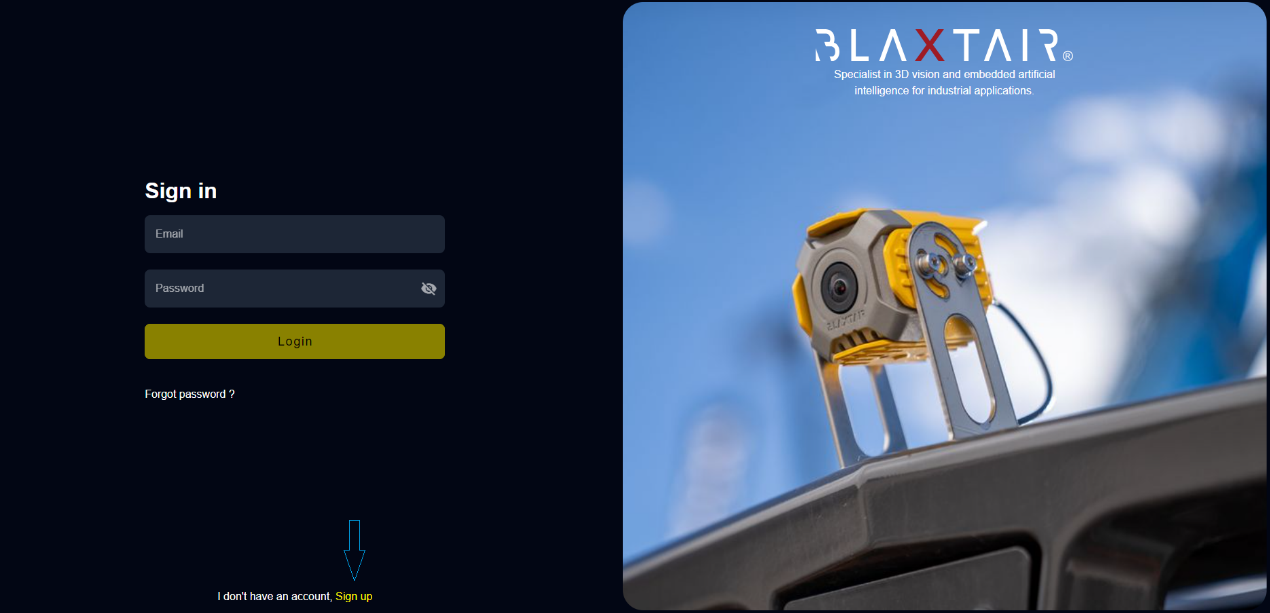
If your company does not yet have an account, begin the creation process by clicking on "sign up" on the website Blaxtair , and then fill out the form with your personal details. Wait for Arcure to validate your request. Upon approval, you will receive an email with a link to set up your password. Conversely, if your company already has an account, simply ask your company's administrator to create your user account.
II- Logging in to your Connect account
If you already have an account on the Connect app and wish to log in, simply go to the website Blaxtair , enter your username and password, and then click on the "login" button.
III- “Risk management” menu
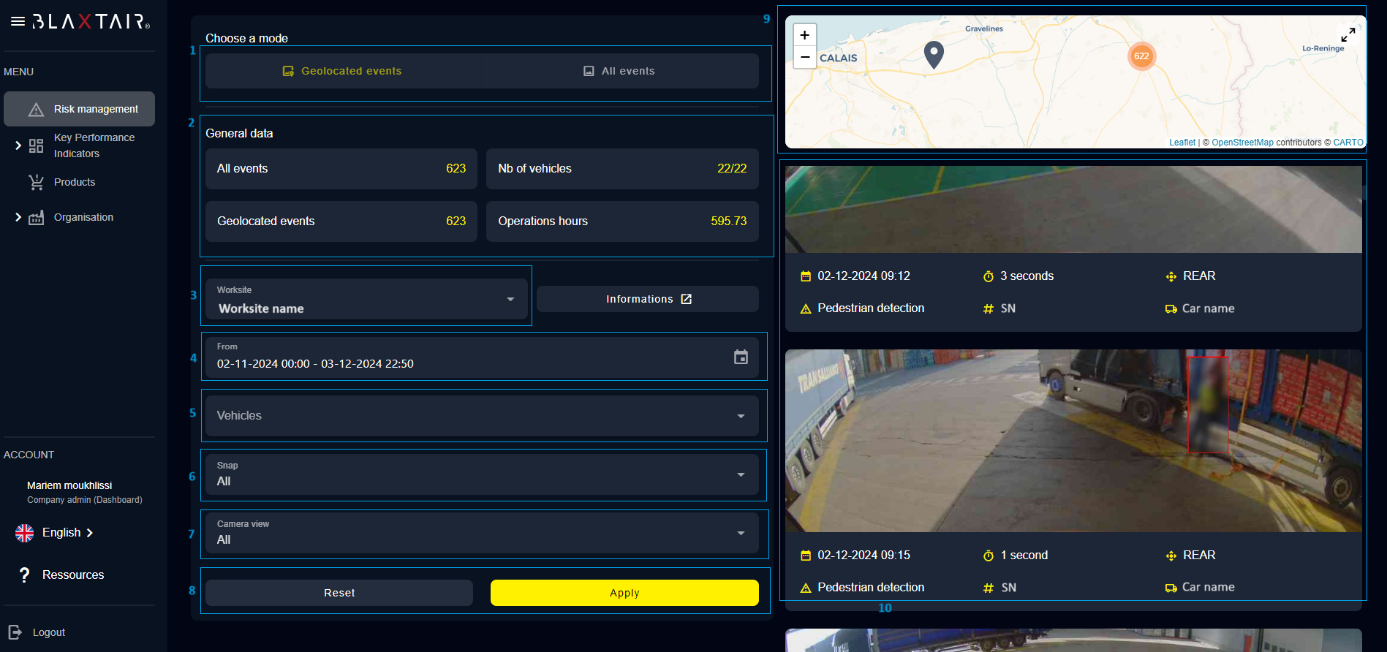
3-1 "Pedestrian detection" tab
Accessing 'Risk Management' through the main menu opens a dedicated interface where you can view alerts generated by your Blaxtairs. This section also offers a series of filters to refine and optimize the display of the various detections collected.

ID | Description |
1 | With this filter, you can choose to either view only the detections with geolocation or display all alerts coming from your Blaxtairs. |
2 | The "General Data" section provides a statistical overview of the detections shown, including:
|
3 | This filter allows you to select a specific worksite to view the detections associated with it. |
4 | This filter enables the selection of a specific time period for displaying detections. The detections displayed will correspond only to events that occurred within the chosen time frame. |
5 | This filter allows you to specifically select vehicles from a given worksite to display their detections. By not selecting any vehicle, you will see all detections related to that worksite. However, by choosing one or more vehicles, only the detections recorded by the Blaxtairs associated with these selected vehicles will be presented. |
6 | This filter provides the option to filter detections to display only those with a photo, those without a photo, or both. |
7 | This filter gives you the option to select detections based on the camera used: you can choose to display only events captured by the front camera, those by the rear camera, or both. |
8 | The "apply" button is used to activate the selected filters and display the detections corresponding to your search criteria. The "Reset" button, on the other hand, resets all filters to allow you to start a new search with different criteria. |
9 | A geographical map displays all detections as markers. Clicking on a marker opens a popup window providing details about the specific detection. To enlarge the map, click on the two small arrows located at the top right of it. |
10 | Scrolling through the screen allows you to browse all detections. For each, the photo captured at the moment of detection is displayed, accompanied by relevant information such as the date of detection, the type of detection, the serial number of the Blaxtair responsible for the detection, as well as the name of the vehicle associated with this Blaxtair... |
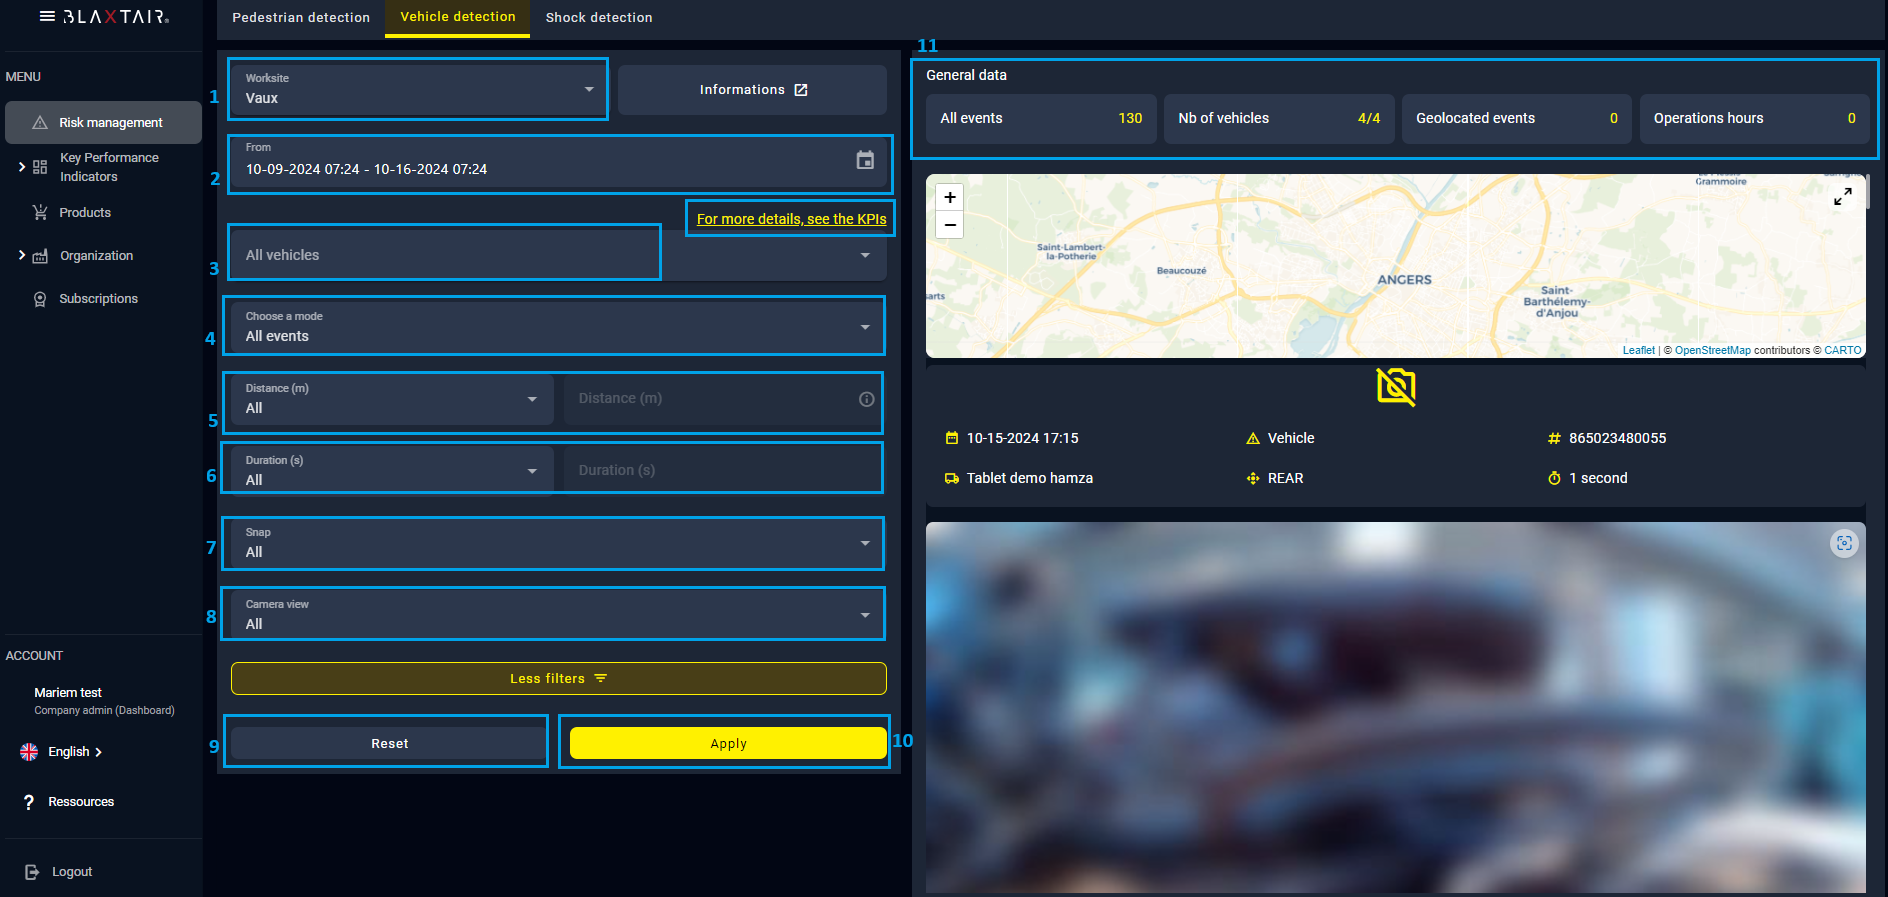
3-2 "Vehicle detection" tab
On the "Risk Management" page, the "Vehicle Detection" tab is dedicated to displaying vehicle detections. You can use the various filters on the left to refine your search and quickly find the detections that interest you.
ID | Description |
1 | This field allows you to select the worksite on which you want to perform your search. The detections displayed will be those generated by the devices associated with this worksite. |
2 | This filter allows you to select a period, and only the detections generated during this period will be displayed. |
3 | This field allows you to choose vehicles, so that only detections generated by the products associated with these vehicles will be displayed. |
4 | This filter gives you the option to display only geolocated detections or all detections. |
5 | This filter allows you to limit the results based on the distance between the camera and the detected vehicle. You can choose to display detections within a distance either greater than or less than a value specified in the second field. |
6 | This filter allows you to sort detections based on their duration. You can display only those with a duration greater than or less than a value, expressed in seconds, that you input. |
7 | This filter allows you to display only detections with a photo, without a photo, or all detections. |
8 | Filter based on the type of camera that made the detection: front or rear. |
9 | The "reset" button clears all filters. |
10 | The "apply" button validates your filters and displays all detections matching your criteria. |
11 | "General Data" provides useful statistics on the displayed detection results. |
3-3 "Shock detection" tab
In the "Risk Management" page of the application, you will find a dedicated tab for the shock detector. This tab allows you to view various events triggered by your shock detectors. Additionally, the page offers a range of filters to refine your searches and pinpoint relevant information.
ID | Description |
1 | Site Selection: Use this dropdown menu to choose from the various sites of your company. |
2 | Date Filter: This field allows you to filter events based on when they were generated. |
3 | Vehicle Filter: Select specific vehicles to view the events they have generated. |
4 | Photo Filter: This field enables you to filter events based on whether they have associated photos |
5 | Horizontal Intensity Filter: Allows you to select from five different levels of horizontal intensity. |
6 | Vertical Intensity: This field provides five levels of vertical intensity to filter shocks. |
7 | Reset Button: Clear all filter fields to start a new search. |
8 | Apply Filters Button: Apply and confirm the selected filters to display the corresponding events. |
9 | General Data: View statistics related to the displayed events |
10 | Event Scrolling: Scroll through all the events that meet your search criteria. |
Under each photo associated with an event, relevant information about that event is displayed to provide context and additional details.

ID | Description |
1 | Event Date: Shows the date on which the event occurred. |
2 | Associated Vehicle: Displays the name of the vehicle involved in the event detection. |
3 | Detection Type: Identifies the type of the detected event, specifically a "Shock". |
4 | Horizontal Intensity: Indicates the horizontal intensity of the detected shock. |
5 | UT Serial Number: Provides the serial number of the Processing Unit that generated the event. |
6 | Vertical Intensity: Exhibits the vertical intensity of the detected shock. |
IV-‘Fleet management’ menu
The Fleet Management page provides an overview of all vehicles in the fleet, and displays key statistics (operating hours, detection counts, etc).
One of the key features introduced is a vehicle tagging system, which allows users to categorize and group vehicles based on custom criteria. These tags must be entered during the vehicle creation or modification process, using the corresponding form. Each vehicle can be assigned between one and four tags, depending on the user's specific needs (e.g., location, department, specific usage).
Once defined, the tags appear in the "Tags" column on the Fleet Management page. They can then be used as filter criteria by clicking the filter button located at the top right of the page. This makes it easy to compare vehicles assigned to the same site, team, or operational group.
Tags are shared across all users within the same company, ensuring consistency in how fleet data is organized and analyzed.
Additionally, fields such as “Owner,” “Renter,” and “Seat Contact” can be manually filled in directly from the main page by clicking the pencil icon to the right of each vehicle row. This information is also visible to all users within the company.
Finally, all displayed data can be exported as a CSV file using the “Download CSV” button, enabling further analysis or archiving outside the application.
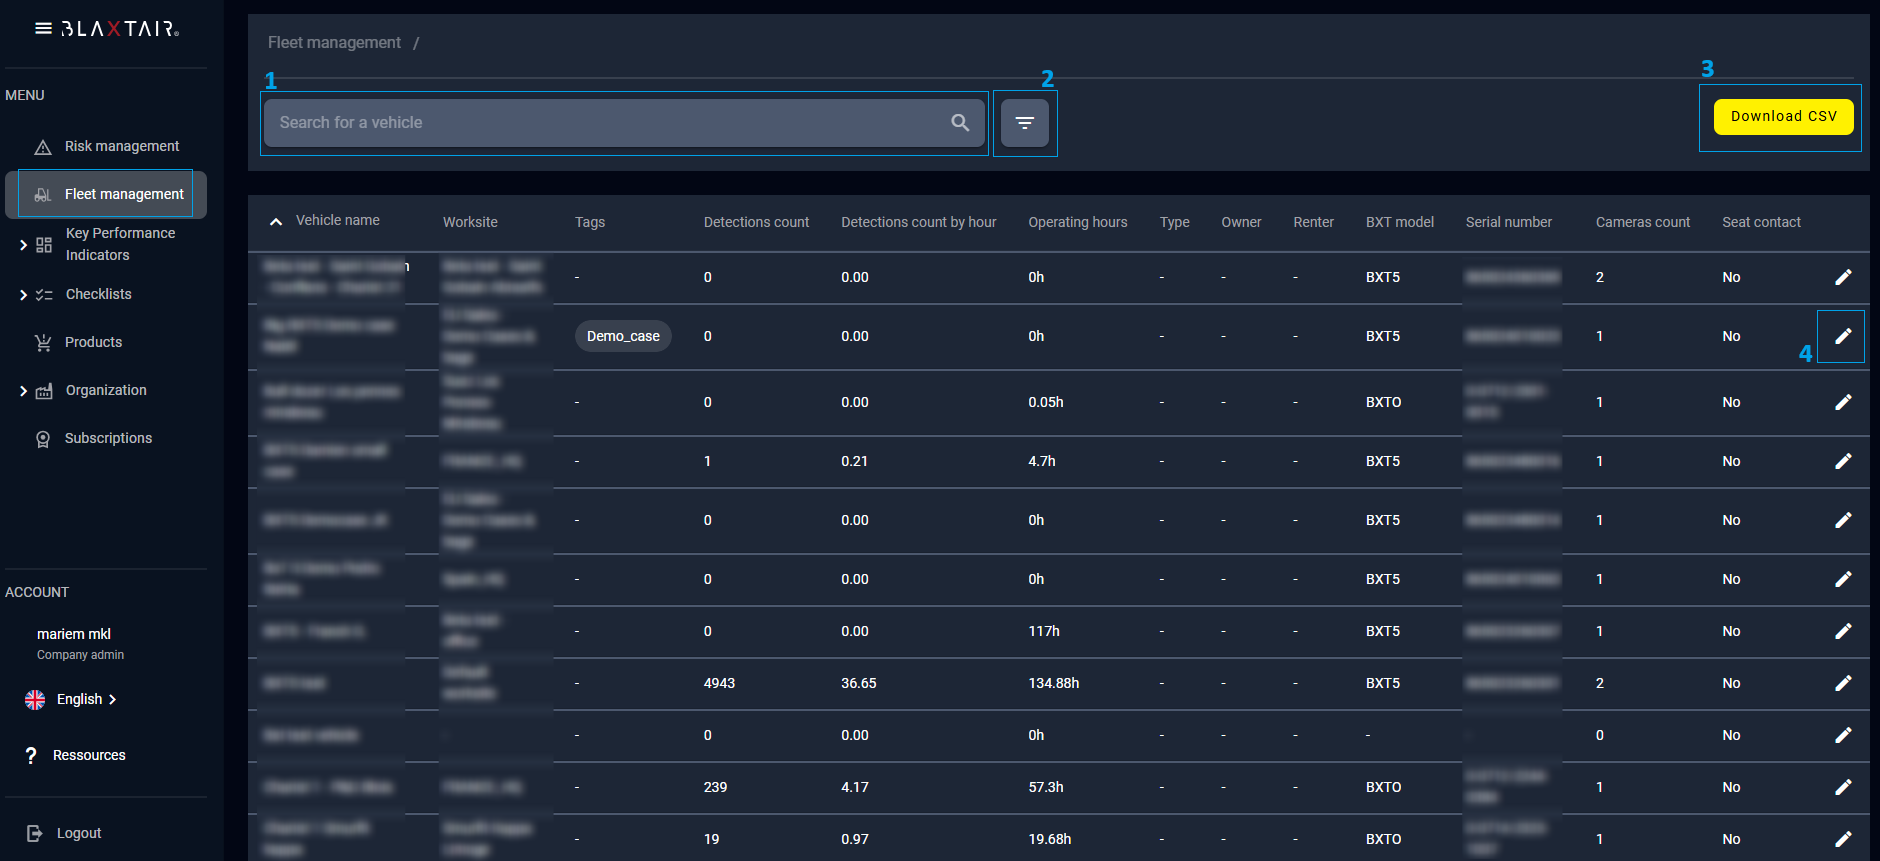
ID | Description |
1 | This field allows you to search for a value in any column on the Fleet Management page. |
2 | This button lets you add more filters, including vehicle tags, worksites, and the time period used for generating statistics. |
3 | This button allows you to download a CSV file containing the data displayed on the Fleet Management page. |
4 | This button enables you to manually fill in fields for each vehicle, such as seat contact, owner, renter… etc. |
V-‘Key Performance Indicators’ menu
4-1 "Pedestrian" tab
This page displays key performance indicators (KPIs) designed to assist users in analyzing data and making informed decisions to enhance the safety of their worksites. These KPIs play a crucial role by also allowing the assessment of the effectiveness of the measures taken, observing whether the decisions made have contributed to reducing the number of critical detections.
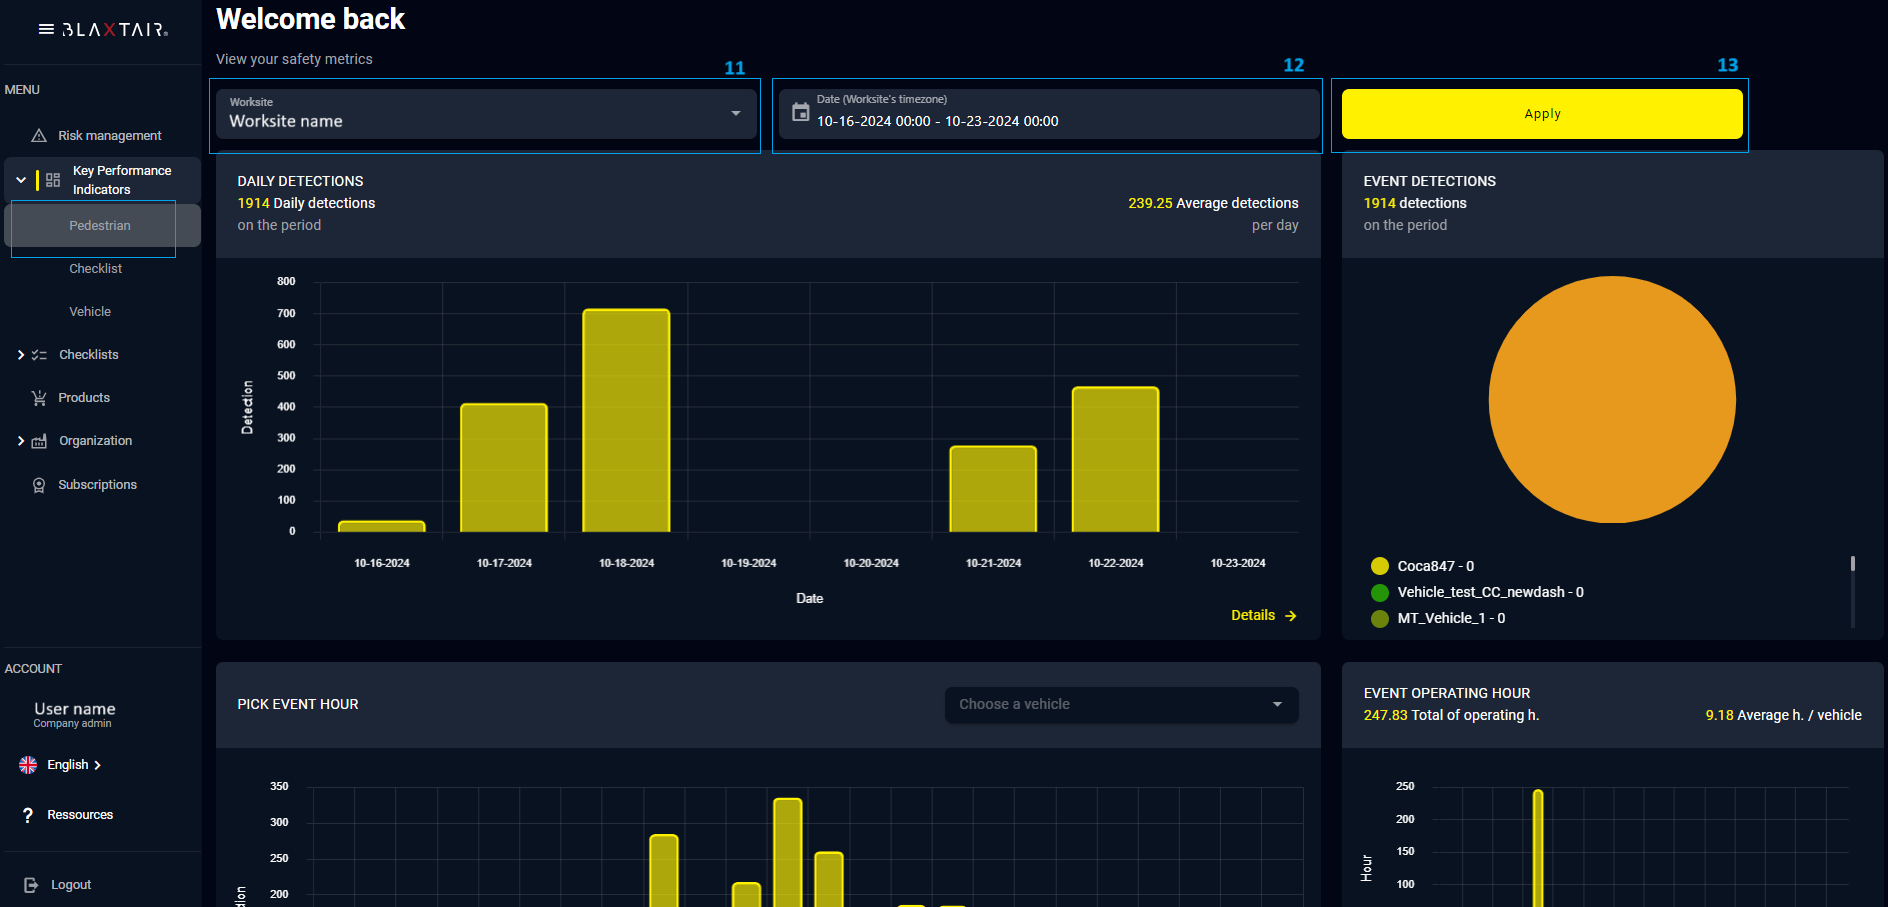
Identifiant | Description |
11 | This filter allows you to select a specific worksite for which you want to view the key performance indicators (KPIs) associated with its detections. |
12 | This filter lets you define the period during which the detections will be considered for KPI calculations. |
13 | The "Apply" button confirms your filter choices and displays the corresponding key performance indicators (KPIs). |
Daily détection | A bar chart showing the number of detections per day. |
Event détections | A pie chart illustrating the number of detections per vehicle. |
Peack event hour | The average number of detections per hour, calculated over the selected period. |
Event operating hour | The total operating hours for each vehicle. |
Top 10 detection per operating hour | A list of the 10 vehicles with the highest detection-to-operating-hour ratio. |
Blaxtair ratio | The ratio of the number of detections per operating hour to the total across all vehicles. |
4-2 "Vehicle" tab
This page displays KPIs based on vehicle detection data collected by your products. The various charts allow you to track the evolution of detections by day and by vehicle, providing valuable insights into performance trends.
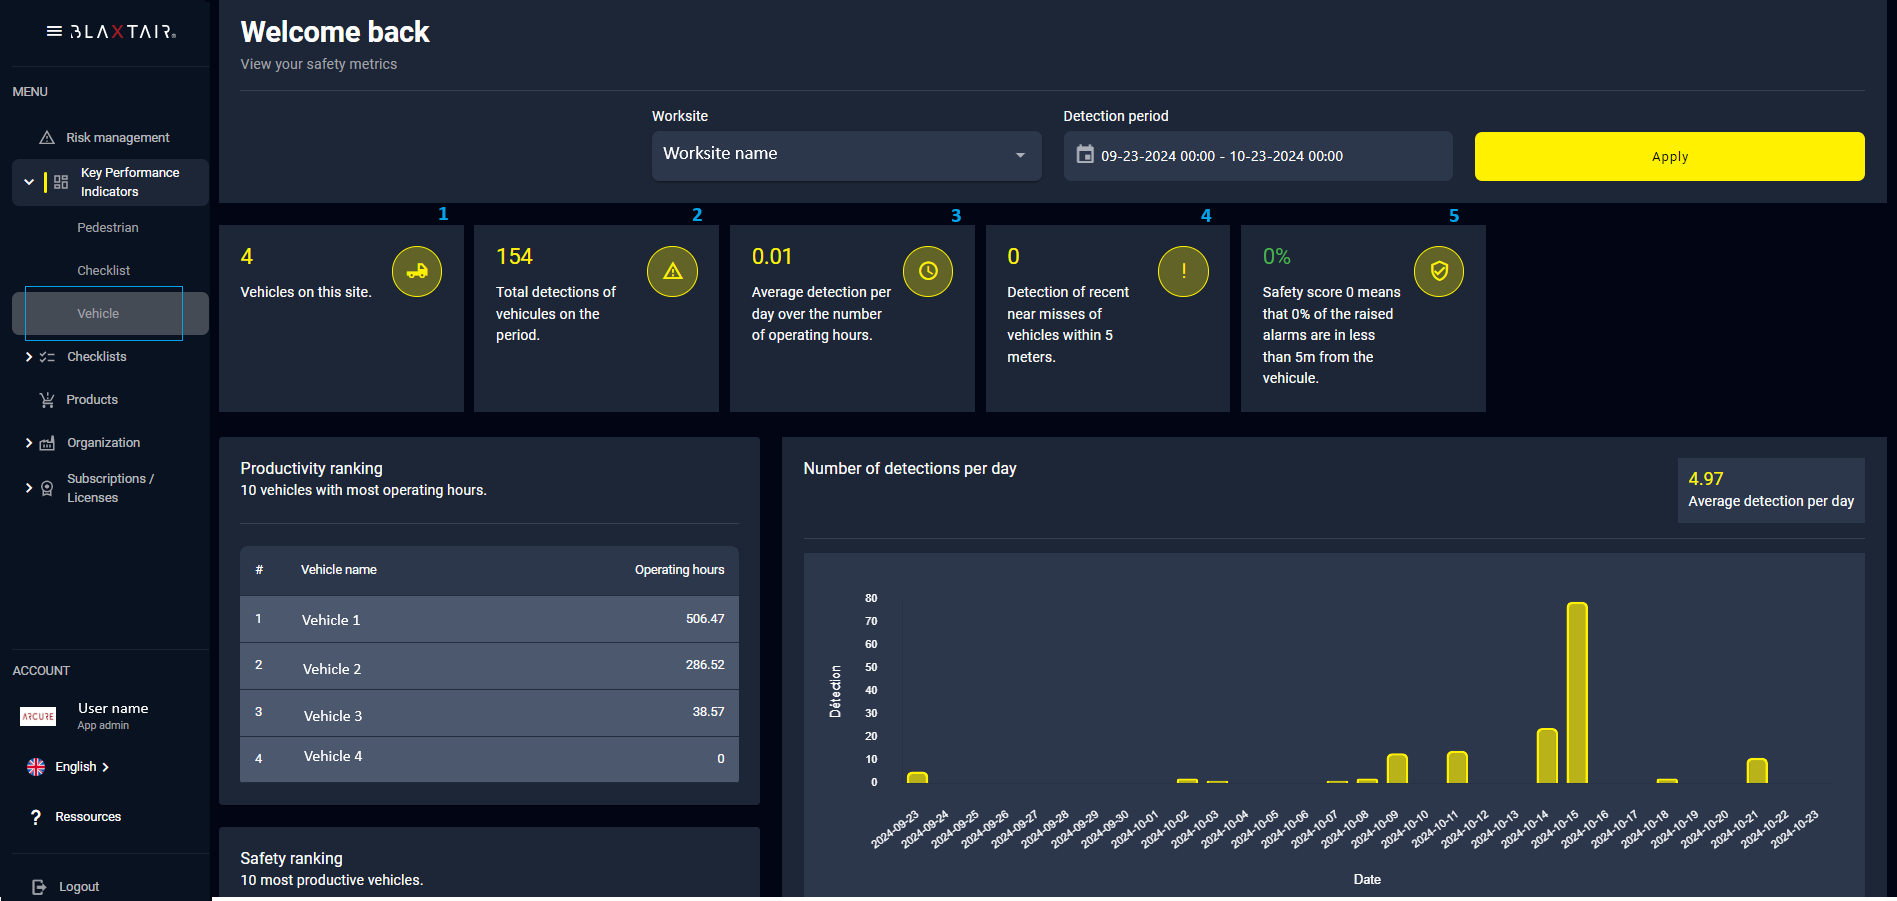
ID | Description |
|---|---|
1 | Total number of vehicles associated with your worksite |
2 | Total number of detections generated by the products associated with your worksite during the selected period |
3 | Daily average of total detections divided by operating hours |
4 | Number of detections where the distance between the camera and the vehicle is less than 5 meters |
5 | Safety score: the percentage of detections where the distance between the camera and the vehicle is less than 5 meters |
VI- ‘Worksite’ menu
Users have the option to organize their information by site and, within each site, to add vehicles to which Blaxtair products can be associated. By selecting the "sites" menu, they can view the list of sites available within their company and to which they have access.
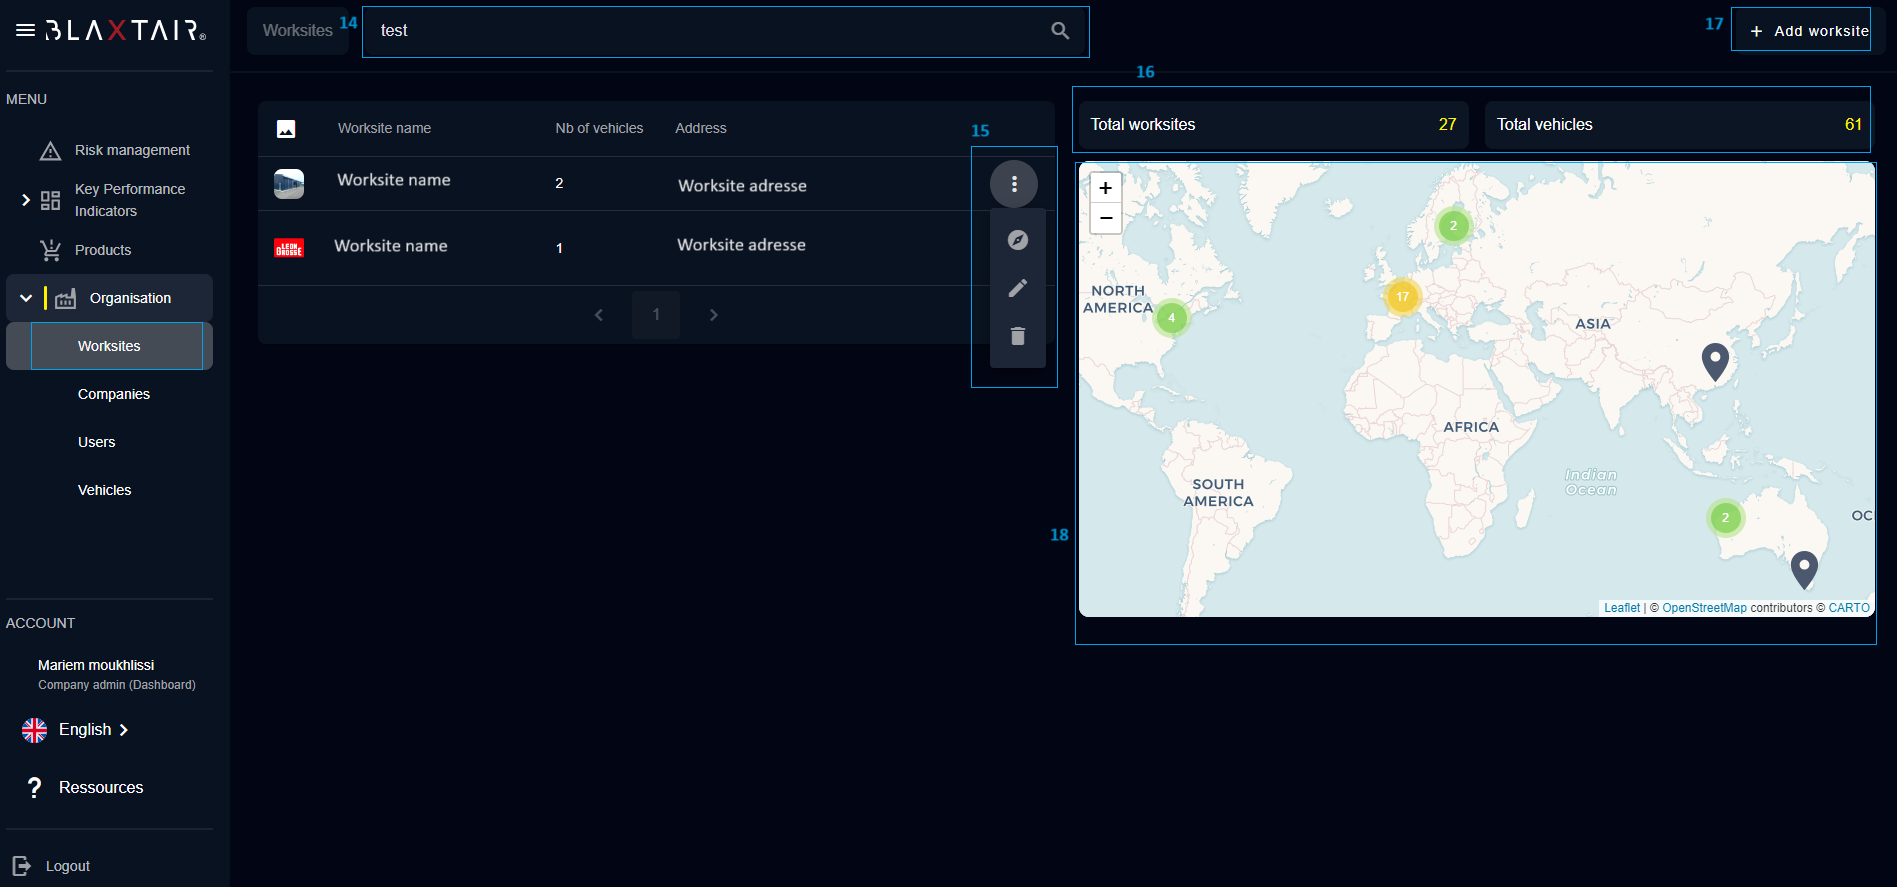
ID | Description |
14 | The search bar allows for searching the site by its name. |
15 | The three small dots located in front of each site in the interface provide access to different actions regarding the selected site:
|
16 | These details represent the total number of sites the user can access, as well as the total number of vehicles associated with these sites. |
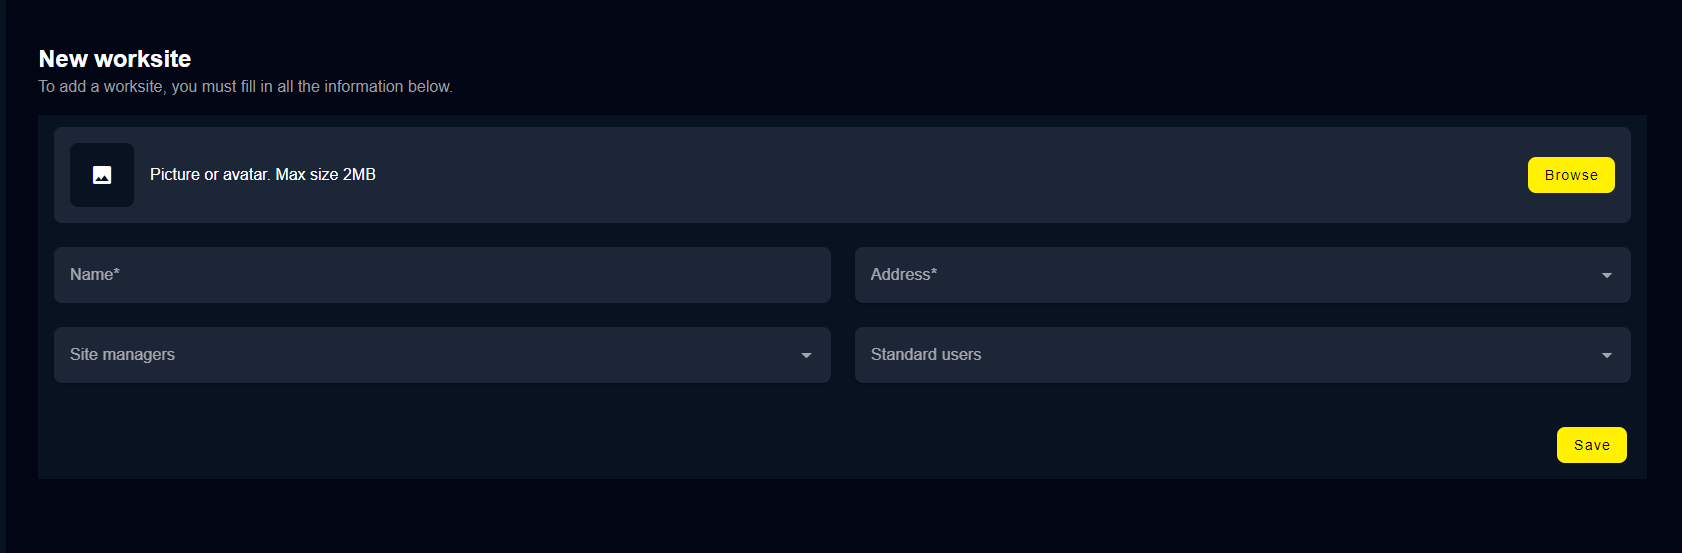
17 | This button allows for adding a new site by opening a creation form. It is necessary to enter the information concerning the site to be created. |
18 | The geographical map displays the different sites using markers. Clicking on a marker opens a popup window showing information related to that specific site. |
Below is a screenshot illustrating the form for creating a new worksite :
VII- ‘Vehicles’ menu
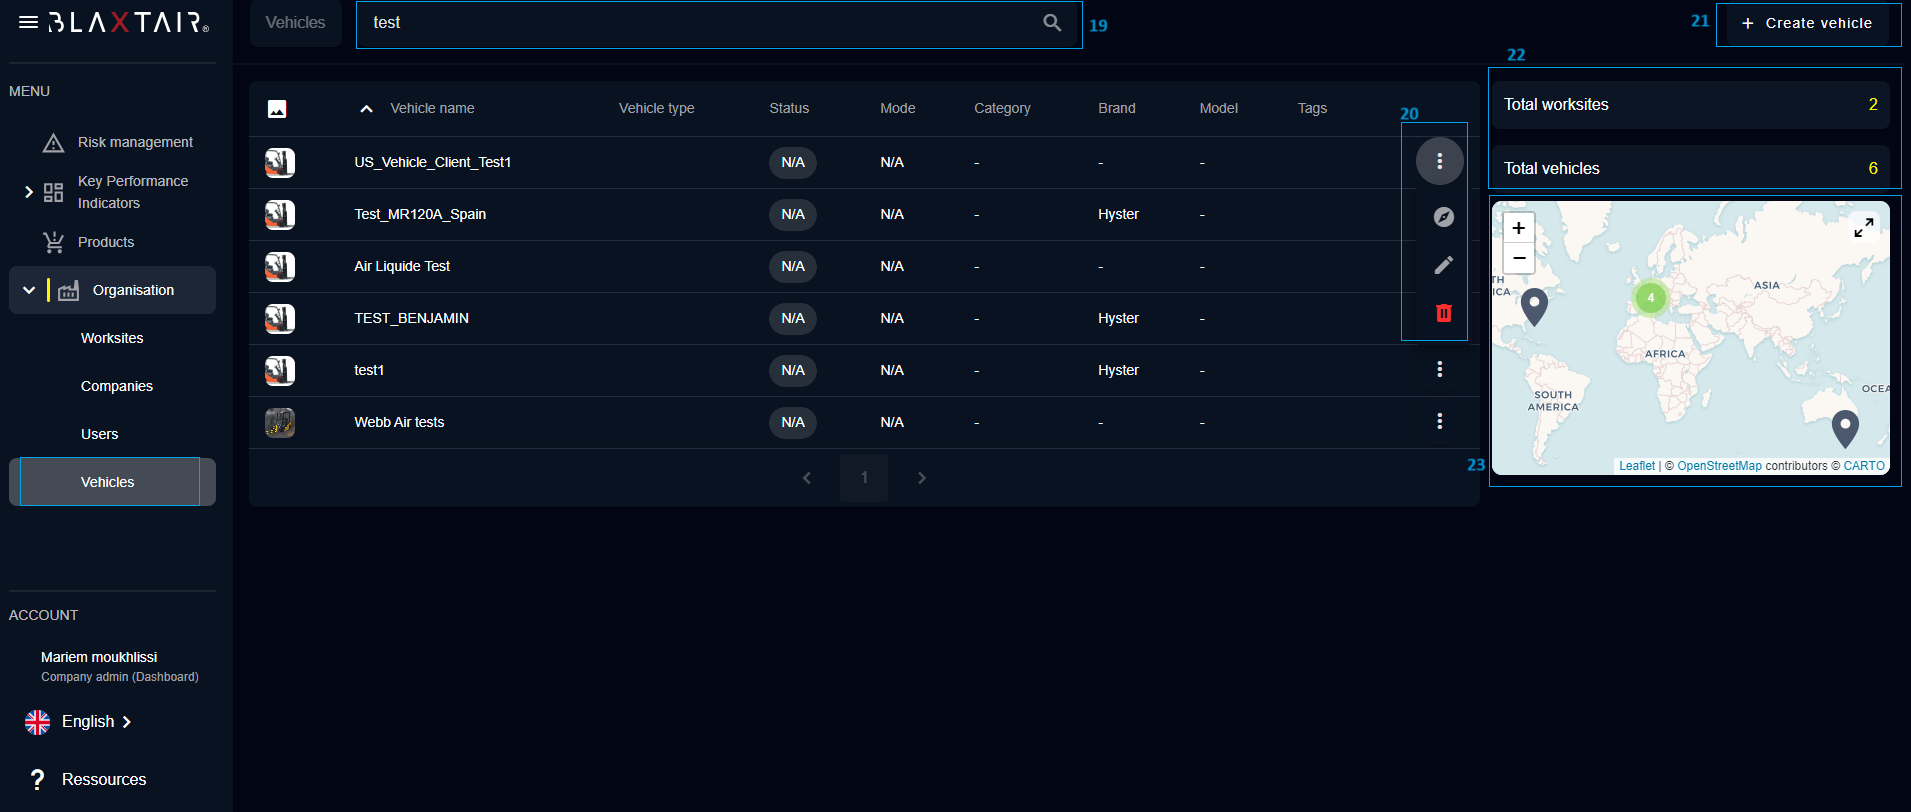
The "Vehicles" menu displays a list of vehicles associated with the sites that the logged-in user can access.
ID | Description |
19 | The search bar allows searching for the vehicle by its name |
20 | The three dots located in front of each vehicle in the interface allow access to various actions regarding the selected vehicle:
|
21 | This button allows adding a new vehicle by opening a creation form. It is necessary to enter information about the vehicle to be created. |
22 | These details represent the total number of sites the user can access, as well as the total number of vehicles associated with these worksites. |
23 | The geographical map displays the different vehicles using markers. Clicking on a marker opens a pop-up window presenting information related to that vehicle. |
VIII- ‘Product’ menu
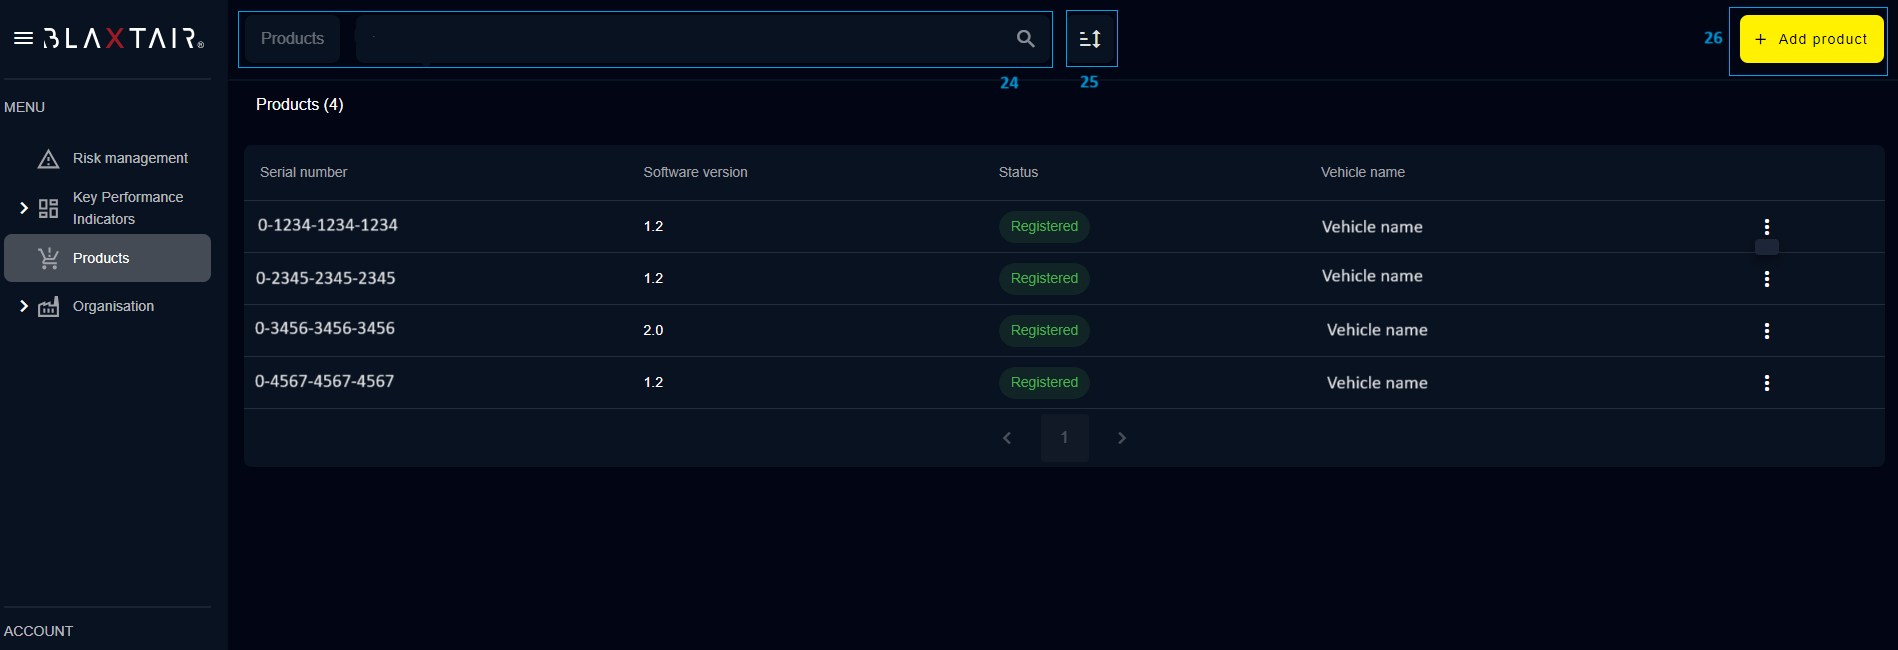
The "Product" menu presents the list of Blaxtair devices owned by the user's company and linked to the sites accessible to the user.
ID | Description |
24 | Search by serial number to find a product. |
25 | This button allows filtering products according to their status, with three options available:
|
26 | This button allows registering a new product and associating it with a vehicle. |
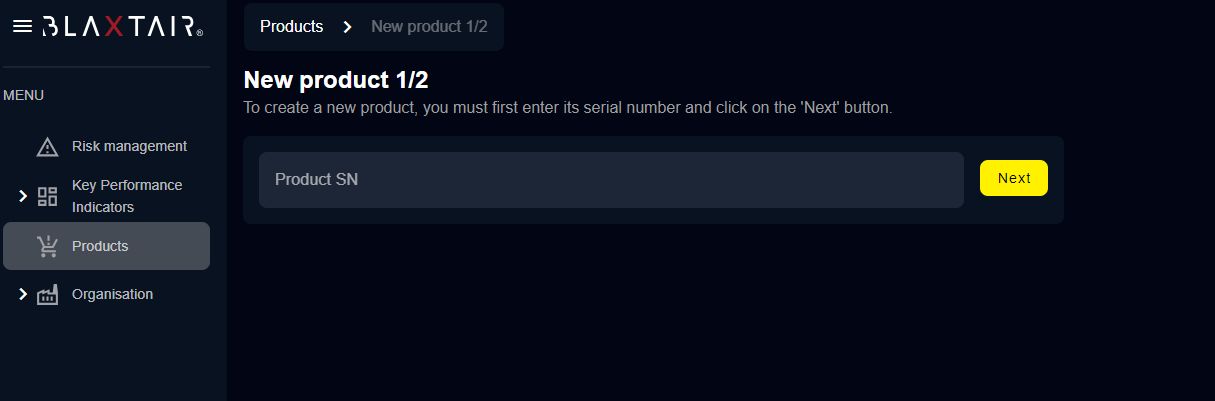
7-1 Add a new product
To register a new product, you need to have it with you and note its serial number. By selecting "add product," you access a form to enter this number. The next step requires you to link the product to a vehicle, which you can choose from an existing list or add a new one if necessary. Once the vehicle is assigned, your request is sent to Arcure for approval. Initially, your product will be listed with the status "validation required." Following approval by Arcure, the status will change to "registered," allowing you to access the data produced by this product.
IX- ‘Users’ menu
The "User" menu provides an overview of the members of your company, allowing you to add or remove users based on your account permissions. You also have the option to validate registrations by changing their status from "to be approved" to "approved." Similarly, you can restrict access to the application for certain users by changing their status to "blocked."
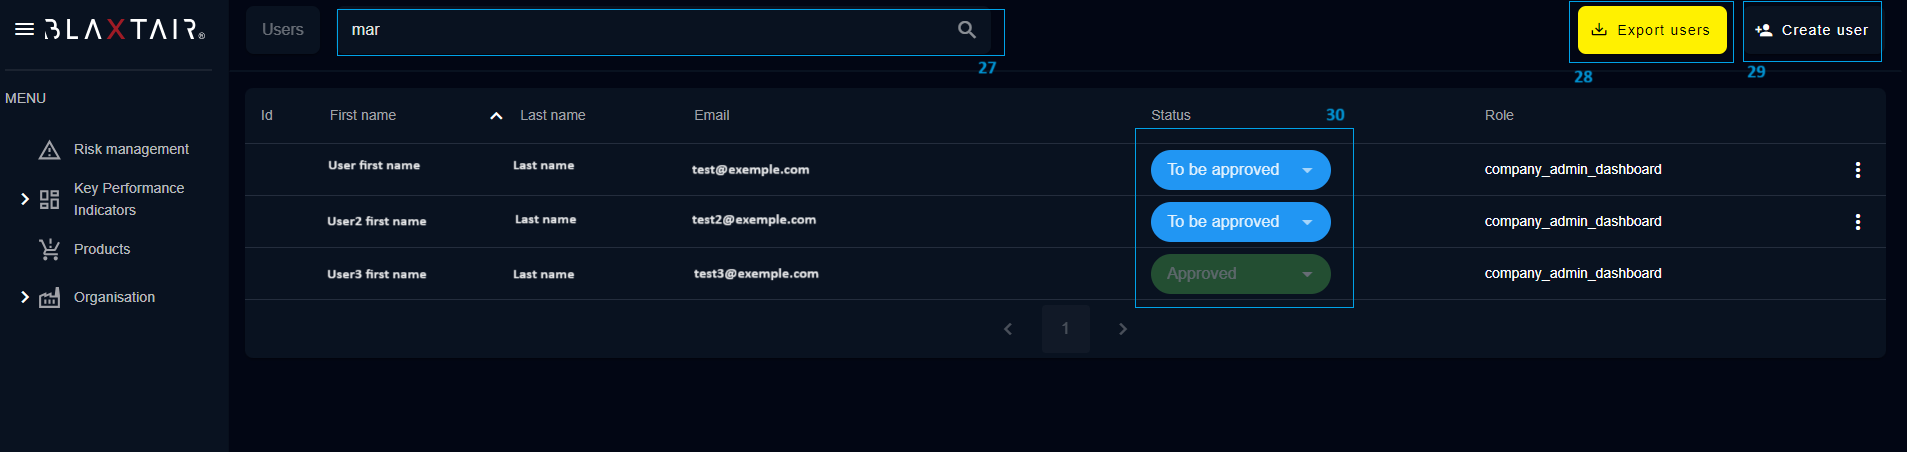
ID | Description |
27 | A search field to find a user by using their name. |
28 | This button provides the functionality to export the list of users along with the date of their last login. |
29 | This button is intended for users with the necessary permissions to create a new user profile. |
30 | This column displays the status of the users' accounts. You have the option to change this status directly by clicking on it for the specific user concerned. |
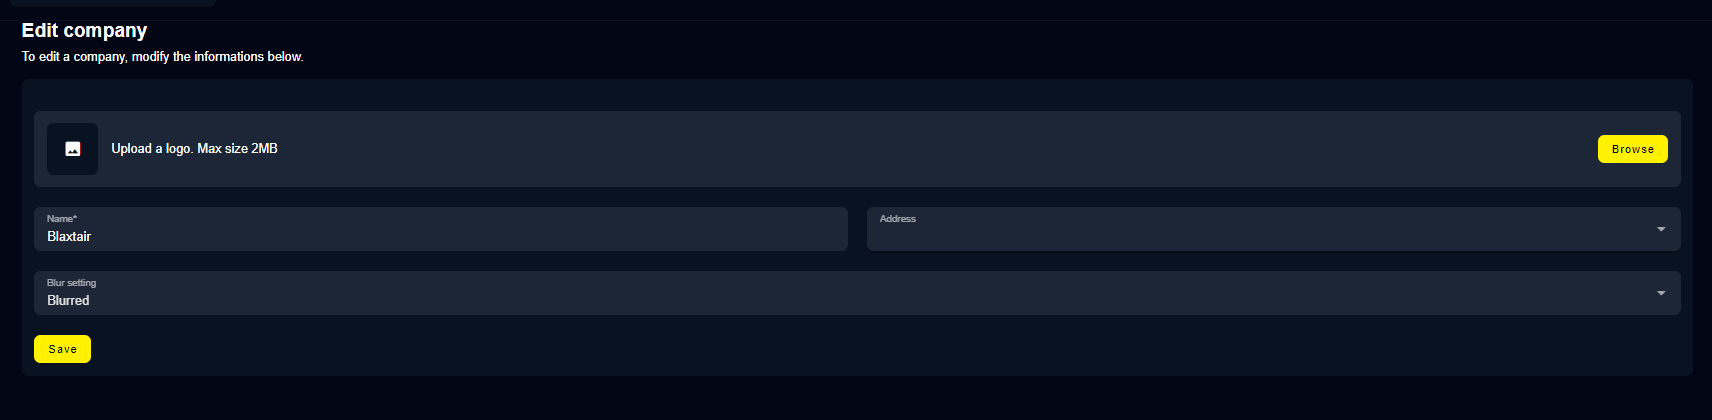
X- ‘Company’ menu
On this page, users can modify the name and address of their company and adjust the image blurring settings displayed in the 'Risk Management' section. For image blurring, three options are available:
Blurred: Photos are shown blurred to conceal the individuals present.
Original: Original photos are displayed without modification.
Hidden: Detections are presented without including the photos.
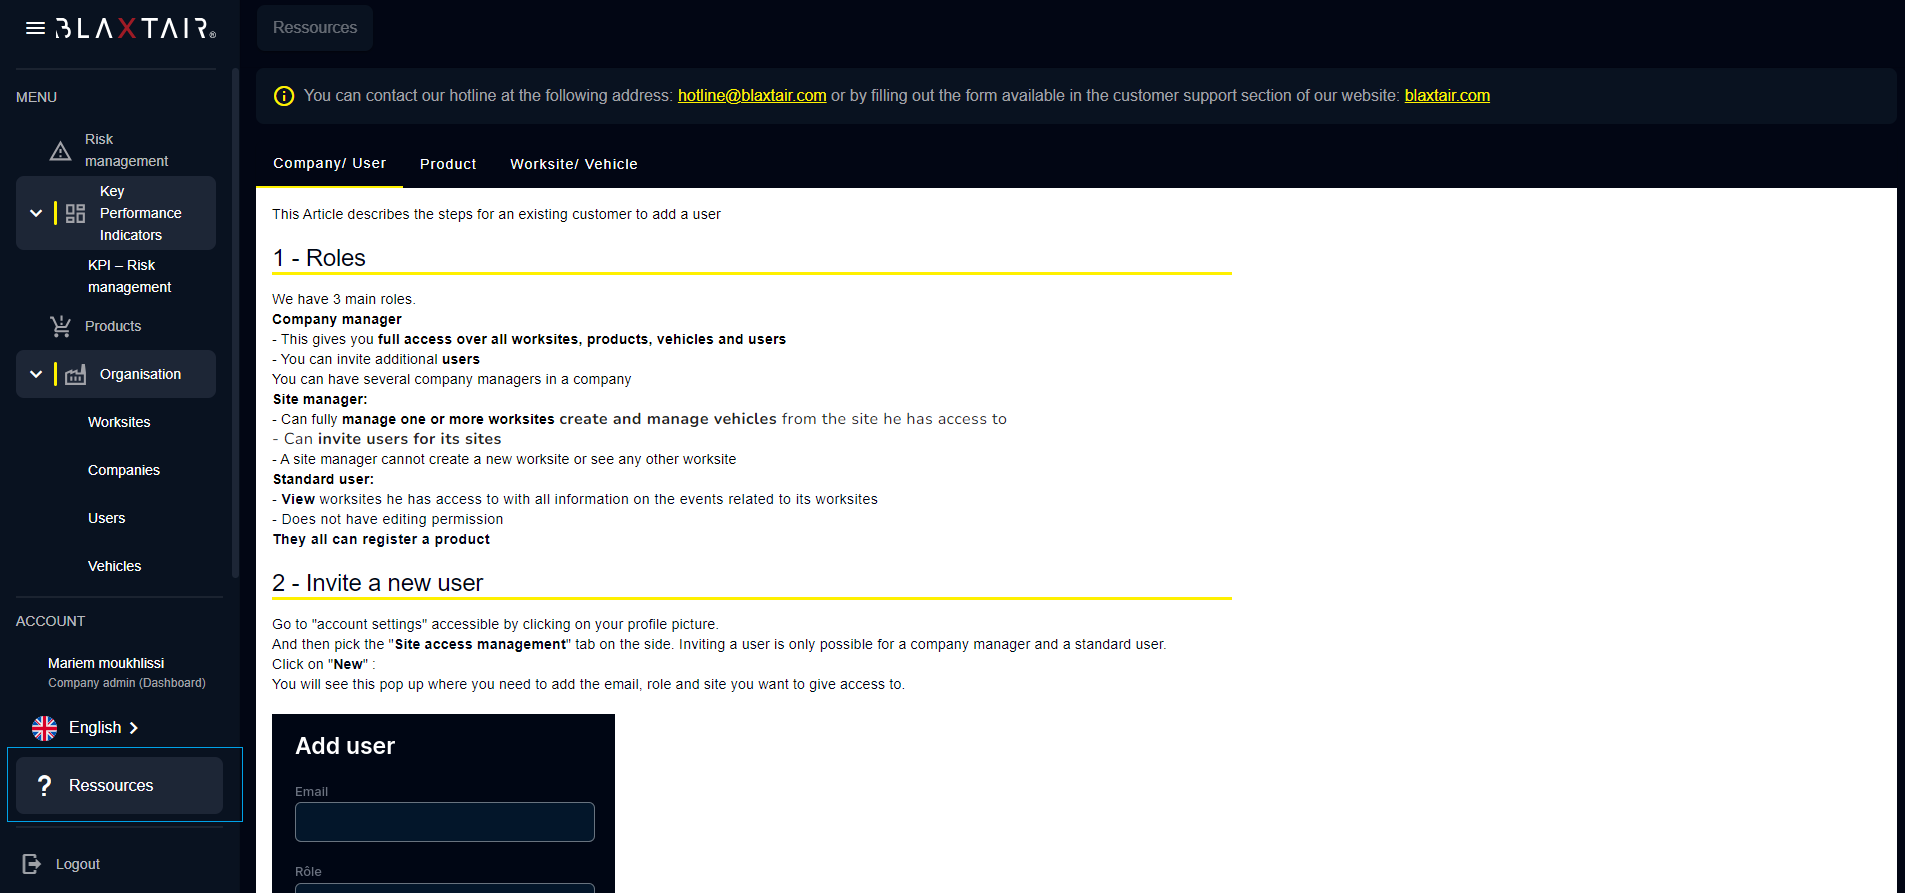
XI- User Roles and Permissions
The application offers three distinct roles for users, providing different levels of access:
Company Manager: Acts as the data administrator for their company, with the ability to add new users, assign them specific roles and accesses, create and update worksites or vehicles, or delete them. They can also add new products and associate them with vehicles.
Worksite Manager: Can only manage the worksites assigned to them, without access to data from unassociated worksites. They have the power to add or remove vehicles on their worksites, update them, add users to their worksites, or remove them, and integrate new products into one of their worksites.
Standard User: Authorized to view the data of the worksites they are associated with without being able to make modifications or create new items. Their role is exclusively advisory.
Each role is designed to meet specific management and information access needs within the application.
XII- ‘Ressource’ menu
This page serves as a user guide for the application, explaining the different roles accessible to user profiles, how to add a new user, create a new worksite or vehicle, as well as the procedure for adding a new product. It is designed to provide detailed instructions to ensure efficient navigation and use of all the application's features.
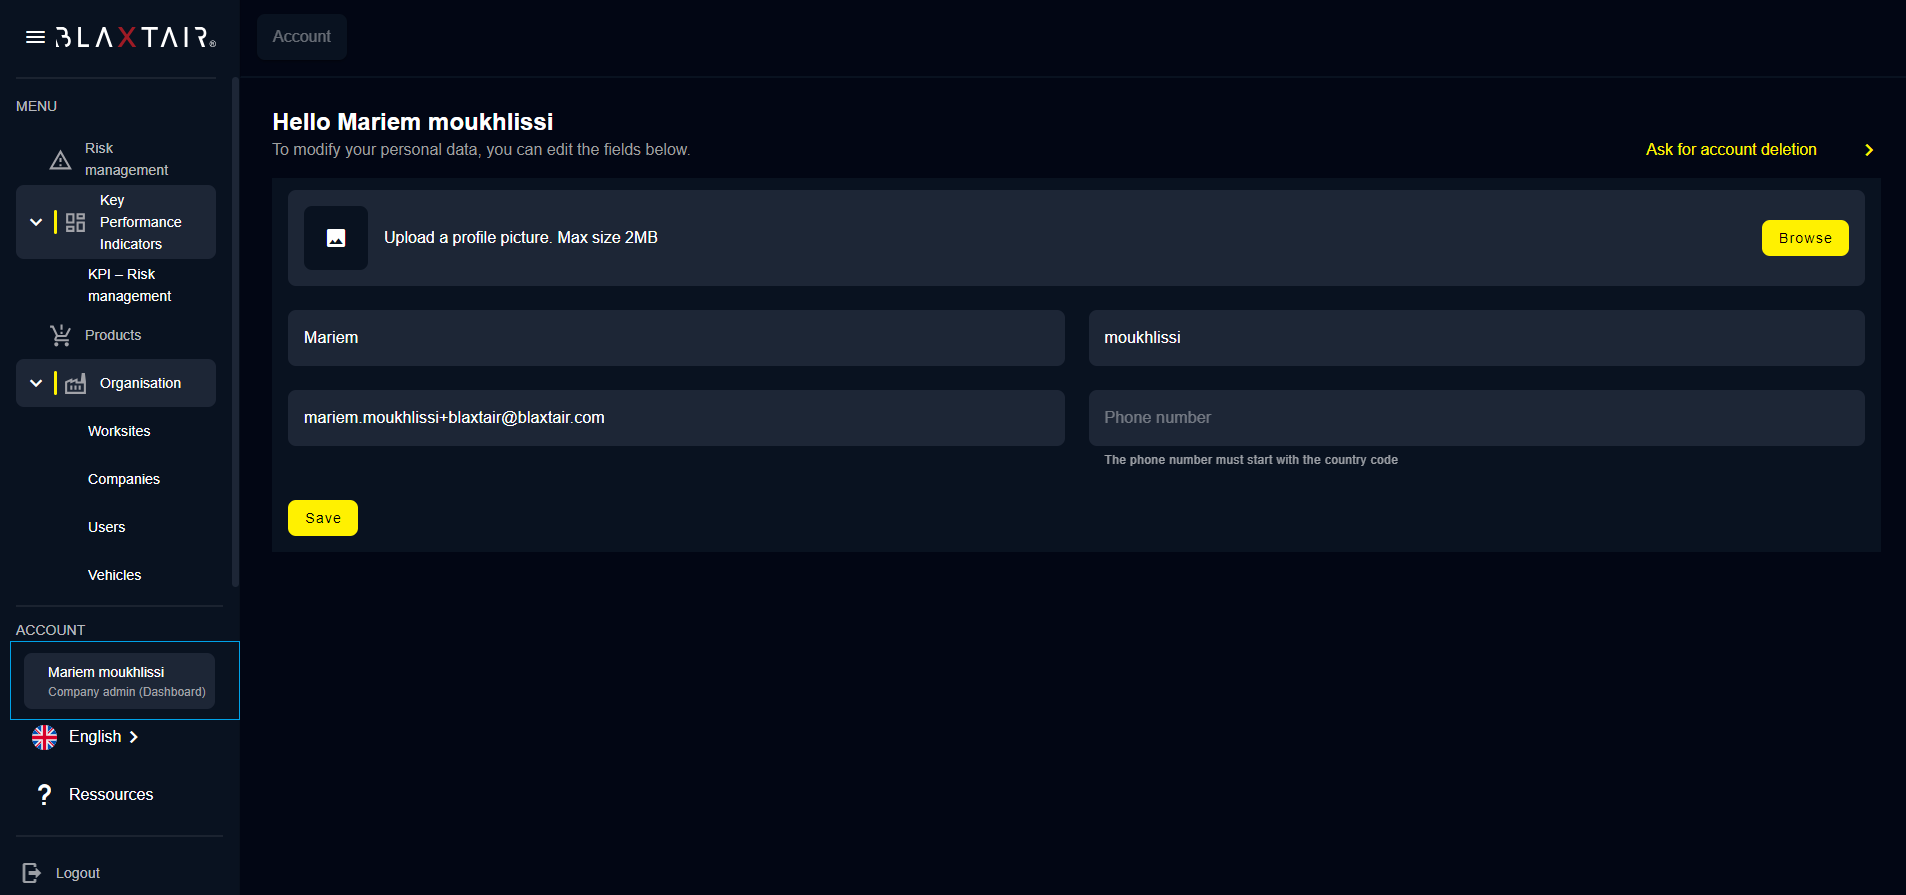
XIII- ‘My account’ menu
This page provides users with the option to update their personal information, such as name, email address, profile picture, and phone number.